Local Weather Station

来自Microduino Wikipedia
跳转至: 导航搜索
Language English

Objective

To detect environment via a temperature & humidity sensor and light-sensitve senor, then display the data on OLED. Users can build a weather station and give yourself a real experiment of the "nature" around you.

Principle

Equipment

Module Number Function
Microduino-CoreUSB 1 Core board
Microduino-Sensorhub 1 Sensor pin board
Microduino-BM 1 Battery management
Microduino-OLED 1 Display
Microduino-DUO-V 1 Extension board
Microduino-Temp&Hum 1 Temperature and humidity sensor
Microduino-Light 1 Light-sensitive sensor
  • Other Equipment:
    • A battery

Hardware Buildup

  • Setup 1:Connect CoreUSB to the computer, open program examples, select the right board and serial port and then download the program.
  • Setup 2:Stack all modules and use DUO-V as the extension board. Sensorhub and OLED can be only stacked on the top.
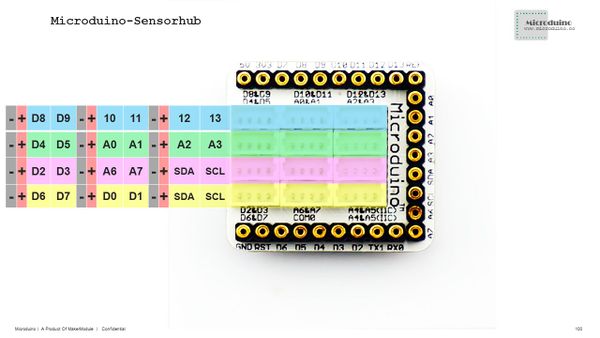
  • Setup3:Connect temp&hum sensor to Sensorhub's A4 and A5 pins and the light-sensitive sensor to A0.
Microduino-sensorhub rule.JPG
  • Setup4:Connect the battery to BM.

Software Debugging

  • Function Description:
    • " oled.h " controls the file displaying environment data.
    • " weather.h " File of environment data acquired by the sensors.
  • Calculate temp&hum and light values
  am2321.read();
  sensor_tem = am2321.temperature / 10.0;
  sensor_hum = am2321.humidity / 10.0;

sensor_light = map(analogRead(A0), 0, 1023, 0, 255);
  • The led light on OLED goes on when temperature is above a certain value.
  if (sensor_tem > 30)
  {
    s_data = 1;
    digitalWrite(ledPin, HIGH);
  }
  else
  {
    s_data = 0;
    digitalWrite(ledPin, LOW);
  }

Result

Sensors can acquire temperature, humidity and light intensity data from the environment and display them on OLED. By changing the environment around you, you'll find corresponding change on the screen. For this project, you can get a beautiful shell with LEGO boards which can be easily stacked with mCookie.
Video