MicroMV 串口通信
MicroMV上的串口通讯
- UART对象
'''
初始化一个串口对象
uart_idx  , 串口ID, 我们这里只能写1或者3
baud_rate , 波特率
'''
UART(uart_idx, baud_rate)
- 初始化UART对象
uart = UART(4, 115200)
- UART 函数操作
uart.read(10)        # read 10 characters, returns a bytes object
                    # 读入10个字符, 返回一个比特对象
uart.read()            # read all available characters
                    # 读取所有的有效字符
uart.readline()        # read a line
                    # 读入一行
uart.readinto(buf)  # read and store into the given buffer
                    # 读入并且保存在缓存中
uart.write('abc')    # write the 3 characters
                    # 向串口写入3个字符abc
- 单个字符的读取与写入
uart.readchar()     # read 1 character and returns it as an integer
                    # 读入一个字符
uart.writechar(42)  # write 1 character
                    # 写入ASCALL码为42的字符
- 判断串口是否有数据
uart.any() # returns the number of characters waiting
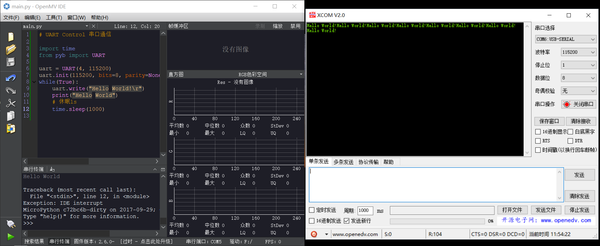
- 向串口发送数据的代码
# UART Control 串口通信
import time
from pyb import UART
uart = UART(4, 115200)
uart.init(115200, bits=8, parity=None, stop=1) # init with given parameters
while(True):
    uart.write("Hello World!\r")
    print("Hello World")
    # 休眠1s
    time.sleep(1000)
- 实验效果
- TTL 转接到PC上的串口的显示效果
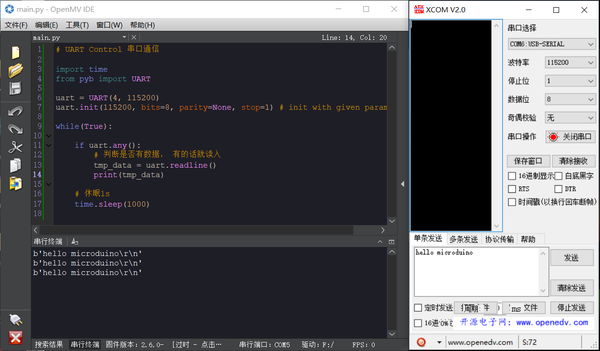
- 向串口接收数据
# UART Control 串口通信
import time
from pyb import UART
uart = UART(4, 115200)
uart.init(115200, bits=8, parity=None, stop=1) # init with given parameters
while(True):
    if uart.any():
        # 判断是否有数据, 有的话就读入
        tmp_data = uart.readline()
        print(tmp_data)
    # 休眠1s
    time.sleep(1000)
- 数据双向发送与接收
# UART Control 串口通信
import time
from pyb import UART
uart = UART(4, 115200)
uart.init(115200, bits=8, parity=None, stop=1) # init with given parameters
def sending_data():
    global uart
    uart.write("haha\n")
def recive_data():
    global uart
    if uart.any():
        tmp_data = uart.readline()
        uart.write("RECIVED : %s\n"%tmp_data)
        print(tmp_data)
while(True):
    sending_data()
    recive_data()
    time.sleep(1000)

