Electronic Welcome

来自Microduino Wikipedia
跳转至: 导航搜索
Language English

Objective

This Electronic Greeter will play happy music when someone walking by.

Schematic

Microduino-PIR sensor will detect if there is someone moving. If there is, this device will get lighten and play music, which lasts for a while and then stop.

Equipment

Module Number Function
mCookie-CoreUSB 1 Core board
mCookie-Hub 1 Sensor pin board
mCookie-Audio 1 Audio module
mCookie-Amplifier 1 Amplifier module
mCookie-BM 1 Battery management
Microduino-PIR 1 Pyroelectric Infrared Radiation sensor
Microduino-Color led 1 Colored light
  • Other Equipment
    • Two Loudspeakers
    • One cell of battery

Program Download

  • Setup 1:Connect CoreUSB and PC/Mac with an USB cable, and open Arduino IDE.
  • Setup 2:Click file>example>> mCookie > _204_JoyfulGreeter.
  • Setup 3:Select the right board card and COM port, then download the program.

Software Debugging

  • Function description:
    • ” audio.h”(File that controls Audio to play music.)
    • “colorWipe()”(Function to control LED color.)
  • Serial port usage of the Audio module needs to be decided jumpers on the board. Default Serial (2,3)
#include <SoftwareSerial.h>

SoftwareSerial mySerial(2, 3); // RX, TX

//#define AUDIO_PORT Serial1    //Core+
#define AUDIO_PORT mySerial  //Core
  • Control pin description
#define humanHotSensor 4//PIR sensor D4 
#define PIN 6//Colored light
  • Send serial instruction to control Audio by detecting human movement via PIR.
  if (humanHotState) {
    colorWipe(strip.Color(125, 125, 125));//The colored light is on 

    if (!playing) {
      Serial.println("play sound.....");
      // audio_play();
      audio_choose(1);//Play audio 
      playing = true;
    }
  }
  else
  {
    playing = false;
    //audio_pause();
    Serial.println("stop sound.....");
    colorWipe(strip.Color(0, 0, 0));
  }

Hardware Buildup

  • Setup1:Connect PIR sensor to D4 pin of Sensorhub and colored light to D6 pin.

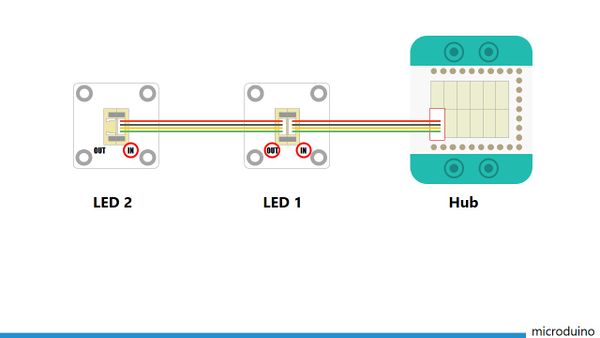
For connection method, please refer to the following picture. Mind connection order, which starts from LED interface IN to Out. It can control six LED lights at most.

CoreUSB Ble steup11.jpg
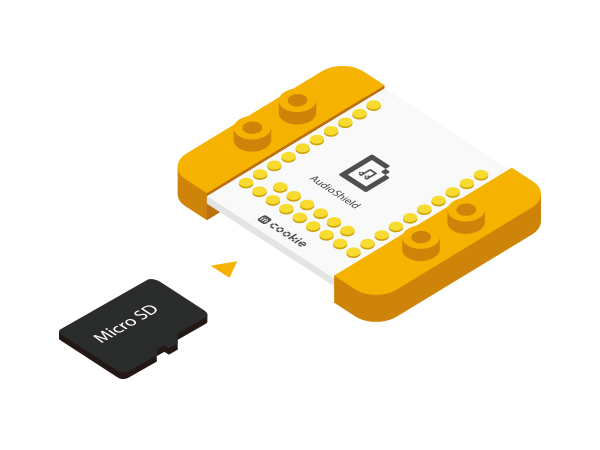
  • Setup 2:Insert TF into AudioShield.
MusicBox Joystick TF.jpg
  • Setup 3:Stack AudioSheild and Audio together for TF card reader use. Connect PC via Auido, you can save music into TF card. Here it can only save one piece of music and the play duration shouldn't be long.
  • Setup4:Connect two loudspeakers to Amplifier and stack Audio, AudioShield and Amplifier.
  • Setup5:Connect the activated battery box to BM.

[File:CoreUSB_Ble_steup2.jpg|600px|center]]

  • Setup6:Stack all the modules without fixed order (Except that Audio, AudioShield and Amplifier should be stacked together.)

Result

When it detects someone moves, the colored led will turn on and play music. You can build a beautiful frame with LEGO.

Video