“Microduino-OLED”的版本间的差异
(→Specifications) |
B.autran@free.fr(讨论 | 贡献) (Connector) |
||
| (未显示3个用户的16个中间版本) | |||
| 第1行: | 第1行: | ||
| + | {{Language|Microduino-OLED}} | ||
{| style="width: 800px;" | {| style="width: 800px;" | ||
|- | |- | ||
| 第4行: | 第5行: | ||
[[file:Microduino-OLED-rect.jpg|400px|thumb|right|Microduino-OLED]] | [[file:Microduino-OLED-rect.jpg|400px|thumb|right|Microduino-OLED]] | ||
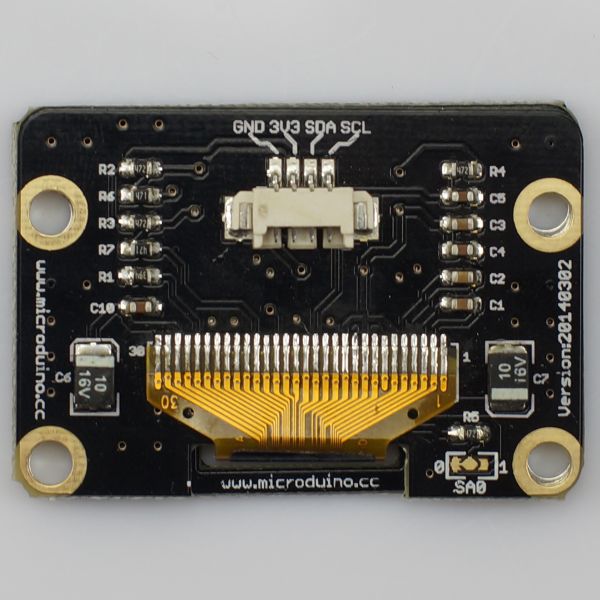
| − | '''Microduino-Oled 12864''' is based SSD1306 0.96 inch 12864 OLED display module | + | '''Microduino-Oled 12864''' is based on SSD1306 0.96 inch 12864 OLED display module, adopting the I2C interface and 3.3V power supply. |
| 第12行: | 第13行: | ||
==Features== | ==Features== | ||
| − | * | + | *glow actively, own a wide view and need no backlight ; |
| − | *Low driving voltage | + | *Low driving voltage and power consumption; |
| − | *I2C | + | *Communicate in a way of I2C and save IO interfaces,widely used;; |
| − | *Small, cheap, open | + | *Small, cheap, stackable and open; |
| − | *Open | + | *Open hardware circuit design and Arduino compatible programming development environment; |
| − | *Microduino | + | *Uniform Microduino interface standard and rich peripheral modules, capable of having a fast and flexible connection and extension with other modules and sensors in accord with Microduino interface standard; |
| 第27行: | 第28行: | ||
*Resolution:128x64; | *Resolution:128x64; | ||
*Interface: IIC communication; | *Interface: IIC communication; | ||
| − | * | + | *Voltage:3.3V; |
| + | [[File:OLED-Pinout-1.jpg|800px|thumb|center|Microduino-OLED-Pinout1]] | ||
|- | |- | ||
| 第34行: | 第36行: | ||
==Documents== | ==Documents== | ||
| − | Eagle PCB File:Microduino-Oled.zip | + | Eagle PCB [[File:Microduino-Oled.zip]] |
| − | + | main components | |
| − | * | + | *12864Oled Display screen:2864HSWEG01 [[File:2864HSWEG01.pdf]] |
| − | * | + | *Driver IC:SSD1306 [[File:SSD1306-Revision 1.1.pdf]] |
|- | |- | ||
| 第45行: | 第47行: | ||
==Development== | ==Development== | ||
| − | * | + | *Microduino_OLED_U8glib:https://github.com/Microduino/Microduino_Tutorials/tree/master/Microduino_Libraries/_01_Microduino_OLED_U8glib |
| − | * | + | *Microduino_OLED_MultiLCD:https://github.com/Microduino/Microduino_Tutorials/tree/master/Microduino_Libraries/_01_Microduino_OLED_MultiLCD |
| − | * | + | *【Adafruit_SSD1306 library'''[https://github.com/adafruit/Adafruit_SSD1306 github下载 ]''' 】 |
| + | |||
|- | |- | ||
| 第53行: | 第56行: | ||
==Applications== | ==Applications== | ||
| − | + | The basic usage of u8glib library's sample program | |
| − | + | Note:The IIC interfaces of Microduino-Core and Microduino-Core+ are "A4(SDA), A5(SCL)" and "D20(SDA), D21(SCL)" respectively. | |
| − | * | + | *Put the downloaded library into the libraries of Arduino IDE installation folder. If you open Arduino IDE, please close all the other example program before you open example programs inside u8glib library; |
| − | * | + | *Open the HelloWorld sample program, remove comments on this line: U8GLIB_SSD1306_128X64 u8g (U8G_I2C_OPT_NONE) (remove "/ /"), then download it directly after it gets compiled successfully. You can see the "Hello World!" displayed on the screen after the download; |
| − | * | + | *Display characters/variables: |
| − | * | + | **Use u8g.print (xx) function, just like the way you did with Serial.print (xx). |
| − | * | + | *Change the font: |
| − | *u8g.setFont(xx) | + | **Use u8g.setFont (xx) function to change the font, parentheses "xx" can be replaced by the corresponding font library name (you can search font library in u8g.h within U8glib \utility folder); |
| − | * | + | **Large font is recommended for u8g_font_7x13, middle font for u8g_font_fixed_v0r and small font for u8g_font_chikitar; |
| − | * | + | *Change coordinates: |
| − | * | + | **Use u8g.setPrintPos (x, y) function to change the display of coordinates |
| − | * | + | *Screen Rotation: |
| − | * | + | **Post u8g.setRot180() in void setup() function, the screen will be flipped to 180-degree, you also can change 180 to 90,270; |
|- | |- | ||
| | | | ||
| − | == | + | ==FQA== |
| + | *What the voltage for this module? | ||
| + | **3.3V | ||
| + | |||
| + | *What the exact reference for connector? | ||
| + | |||
| + | *Is female connector supply by Microduino.cc in parcel with OLED? | ||
| + | ==Purchase== | ||
|- | |- | ||
| 第79行: | 第89行: | ||
==History== | ==History== | ||
| − | * | + | *June 23, 2013, Batch completed, formal shelves. |
| − | * | + | *June 2, 2013,Second proofing test is completed, No problems found so far, panel batch is complete. |
| − | * | + | *May 18, 2013,Test model came out, no power-on reset circuit, not a capacitor resolved. |
| − | * | + | *May 16, 2013,Model released, there is a small problem. |
| − | * | + | *May 7, 2013,Layout is complete. |
|- | |- | ||
| | | | ||
| − | |||
| − | |||
| − | |||
==Pictures== | ==Pictures== | ||
2015年1月25日 (日) 23:05的最新版本
| Language | English |
|---|
|
Microduino-Oled 12864 is based on SSD1306 0.96 inch 12864 OLED display module, adopting the I2C interface and 3.3V power supply.
|
目录Features
|
Specifications
文件:OLED-Pinout-1.jpg Microduino-OLED-Pinout1 |
DocumentsEagle PCB 文件:Microduino-Oled.zip main components
|
Development
|
ApplicationsThe basic usage of u8glib library's sample program Note:The IIC interfaces of Microduino-Core and Microduino-Core+ are "A4(SDA), A5(SCL)" and "D20(SDA), D21(SCL)" respectively.
|
FQA
Purchase |
History
|
Pictures
|


