“连接谷雨平台/zh”的版本间的差异
502748957@qq.com(讨论 | 贡献) (创建页面,内容为“{| style="width: 800px;" |- | <p style="color: #4F4E4E;font-size:220%">'''连接谷雨平台示例'''</p> <br> 在下面的示例中,使用Core+核心控制NBIOT…”) |
502748957@qq.com(讨论 | 贡献) |
||
| 第16行: | 第16行: | ||
<p style="color: #E87E05;font-size:155%">电路搭建</p> | <p style="color: #E87E05;font-size:155%">电路搭建</p> | ||
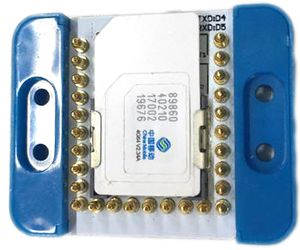
将Battery+、Core+、NBIOT叠在一起。支持NBIOT的SIM卡插入卡槽 | 将Battery+、Core+、NBIOT叠在一起。支持NBIOT的SIM卡插入卡槽 | ||
| − | [[File:NBIOT SIM.jpg|300px|center|SIM卡插入卡槽]] | + | [[File:NBIOT SIM.jpg|300px|center|thumb|SIM卡插入卡槽]] |
<br> | <br> | ||
<p style="color: #E87E05;font-size:155%">代码</p> | <p style="color: #E87E05;font-size:155%">代码</p> | ||
| 第42行: | 第42行: | ||
</source> | </source> | ||
将代码复制到Microduino IDE中,程序下载成功后,打开串口,下方选择NL和CR。 | 将代码复制到Microduino IDE中,程序下载成功后,打开串口,下方选择NL和CR。 | ||
| + | [[File:NBIOT SERIAL CONFIG.jpg|300px|center]] | ||
<br> | <br> | ||
|} | |} | ||
| − | [[ | + | [[NBIOT Reference | 返回NBIOT库语法手册]] |
2018年12月17日 (一) 08:09的版本
|
连接谷雨平台示例
所需硬件
电路搭建 将Battery+、Core+、NBIOT叠在一起。支持NBIOT的SIM卡插入卡槽
代码 #include <SoftwareSerial.h>
SoftwareSerial mySerial(4, 5); // RX, TX
void setup() {
// Open serial communications and wait for port to open:
Serial.begin(9600);
while (!Serial) {
; // wait for serial port to connect. Needed for native USB port only
}
// set the data rate for the SoftwareSerial port
mySerial.begin(9600);
}
void loop() { // run over and over
if (mySerial.available()) {
Serial.write(mySerial.read());
}
if (Serial.available()) {
mySerial.write(Serial.read());
}
}
将代码复制到Microduino IDE中,程序下载成功后,打开串口,下方选择NL和CR。
|
