“直流电机控制”的版本间的差异
(→调试) |
(→程序) |
||
| (未显示2个用户的6个中间版本) | |||
| 第1行: | 第1行: | ||
| + | {{Language |DC_Motor_Control}} | ||
{| style="width: 800px;" | {| style="width: 800px;" | ||
|- | |- | ||
| 第7行: | 第8行: | ||
==设备== | ==设备== | ||
| − | *'''[[Microduino-Core]]''' | + | *'''[[Microduino-Core/zh]]''' |
| − | *'''[[Microduino- | + | *'''[[Microduino-USBTTL/zh]]''' |
*其他硬件设备 | *其他硬件设备 | ||
| 第19行: | 第20行: | ||
**二极管 一个 | **二极管 一个 | ||
**NPN晶体管 一个 | **NPN晶体管 一个 | ||
| − | |||
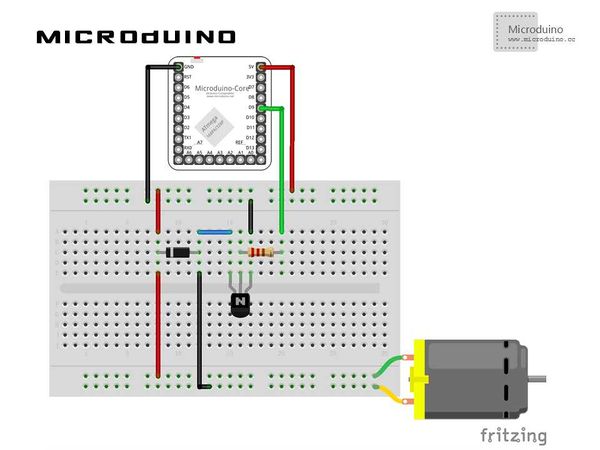
==原理图== | ==原理图== | ||
| 第27行: | 第27行: | ||
==程序== | ==程序== | ||
| − | + | [https://github.com/Microduino/Microduino_Tutorials/tree/master/Microduino_Processing/ProcessingDCMotorControl ProcessingDCMotorControl] | |
| − | |||
| − | ProcessingDCMotorControl | ||
==调试== | ==调试== | ||
| 第43行: | 第41行: | ||
Microduino: | Microduino: | ||
| − | // | + | 使用firmata的StandardFirmata程序。 |
| + | |||
| + | Processing: | ||
| + | |||
| + | 首先给你的processing添加个controlP5库文件:http://www.sojamo.de/libraries/controlP5/ | ||
| − | + | 下载后解压放到你的processing安装文件的\modes\java\libraries文件夹里,重启processing IDE | |
| − | |||
| − | |||
| − | |||
| − | |||
| − | |||
| − | |||
| − | |||
| − | |||
| − | |||
| − | |||
| − | |||
| − | |||
| − | |||
| − | |||
| − | + | //定义串口 | |
| + | arduino = new Arduino(this, Arduino.list()[0], 57600); //your offset may vary | ||
| + | arduino.pinMode(motorPin, Arduino.OUTPUT); | ||
| − | // | + | //加载一个滑动条 |
| − | + | cp5 = new ControlP5(this); | |
| − | + | // add a vertical slider | |
| − | + | cp5.addSlider("slider") | |
| − | // | + | .setPosition(0, 580) |
| − | + | .setSize(600, 20) | |
| − | + | .setRange(0, 600) | |
| − | + | .setValue(25) | |
| − | + | ; | |
| − | // | + | //在draw()中绘制圆环进度条,并控制Microduino串口pwm |
| − | + | background(0); | |
| + | noFill(); | ||
| + | stroke(255); | ||
| + | smooth(); | ||
| + | arc(width/2, height/2, 300, 300, turn, radians(map(speed, 0, 600, 0, 360))+turn); | ||
| + | //Specify font to be used | ||
| + | textFont(f, 48); | ||
| + | //Display Text | ||
| + | text ((int)speed, width/2-30, height/2+20); | ||
| + | vel=(int)map(speed, 0, 600, 0, 255);//map | ||
| + | if (speed>0)//run motor by speed | ||
| + | { | ||
| + | arduino.analogWrite(motorPin, vel); | ||
| + | delay(1); | ||
| + | } | ||
| + | else//stop motor | ||
{ | { | ||
| − | + | arduino.analogWrite(motorPin, Arduino.LOW); | |
| − | |||
| − | |||
} | } | ||
| − | // | + | //底部滑动条移动事件处理 |
| − | void | + | void slider(float speedValue) { |
| − | + | speed=speedValue; | |
| − | + | println("Motor Speed:"+speed); | |
| − | |||
| − | |||
| − | |||
} | } | ||
步骤三:下载代码并编译通过。 | 步骤三:下载代码并编译通过。 | ||
| − | + | 步骤四:运行后,在processing中左右移动底部滑动条,看电机的转速变化。 | |
==结果== | ==结果== | ||
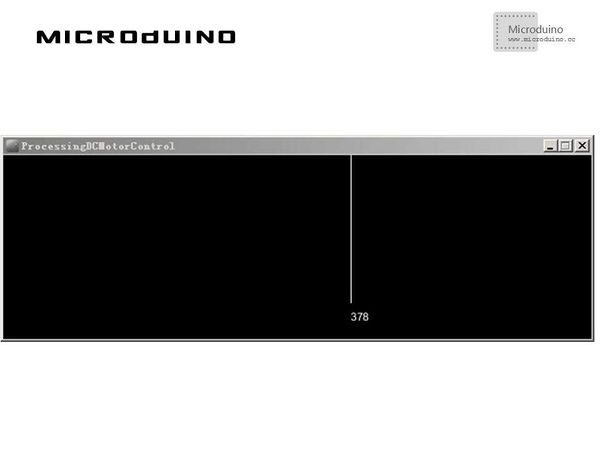
| − | + | 屏幕上会显示一个圆环进度条,拖拽下方的滑动条,圆环显示不同速率,电机的转速也随之变化。 | |
| − | [[File: | + | [[File:processingDCMotorResult1.jpg|600px|center|thumb]] |
| − | |||
==视频== | ==视频== | ||
2014年10月29日 (三) 07:20的最新版本
| Language | English |
|---|
目的本教程将教大家如何用processing来控制直流电机的转速。 设备
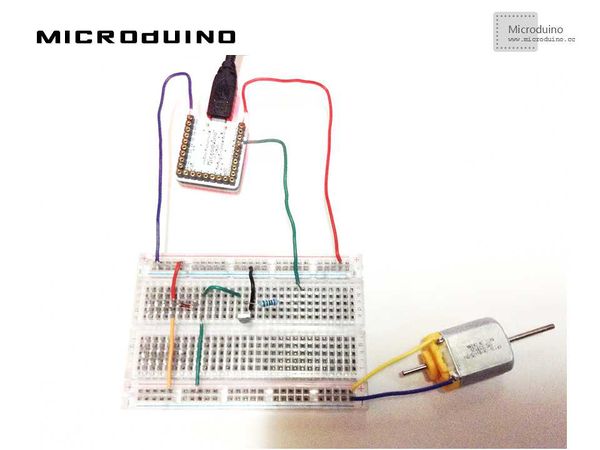
原理图程序调试步骤一:按着原理图搭建硬件环境,像这样:
本例需要两端的代码,Processing端和Microduino端 Microduino: 使用firmata的StandardFirmata程序。 Processing: 首先给你的processing添加个controlP5库文件:http://www.sojamo.de/libraries/controlP5/ 下载后解压放到你的processing安装文件的\modes\java\libraries文件夹里,重启processing IDE //定义串口 arduino = new Arduino(this, Arduino.list()[0], 57600); //your offset may vary arduino.pinMode(motorPin, Arduino.OUTPUT); //加载一个滑动条 cp5 = new ControlP5(this);
// add a vertical slider
cp5.addSlider("slider")
.setPosition(0, 580)
.setSize(600, 20)
.setRange(0, 600)
.setValue(25)
;
//在draw()中绘制圆环进度条,并控制Microduino串口pwm background(0);
noFill();
stroke(255);
smooth();
arc(width/2, height/2, 300, 300, turn, radians(map(speed, 0, 600, 0, 360))+turn);
//Specify font to be used
textFont(f, 48);
//Display Text
text ((int)speed, width/2-30, height/2+20);
vel=(int)map(speed, 0, 600, 0, 255);//map
if (speed>0)//run motor by speed
{
arduino.analogWrite(motorPin, vel);
delay(1);
}
else//stop motor
{
arduino.analogWrite(motorPin, Arduino.LOW);
}
//底部滑动条移动事件处理 void slider(float speedValue) {
speed=speedValue;
println("Motor Speed:"+speed);
}
步骤三:下载代码并编译通过。 步骤四:运行后,在processing中左右移动底部滑动条,看电机的转速变化。 结果屏幕上会显示一个圆环进度条,拖拽下方的滑动条,圆环显示不同速率,电机的转速也随之变化。 视频 |


