“光照指示器”的版本间的差异
853387039@qq.com(讨论 | 贡献) (→搭建硬件) |
|||
| (未显示2个用户的4个中间版本) | |||
| 第4行: | 第4行: | ||
| | | | ||
==目的== | ==目的== | ||
| − | + | 做一个的光照指示器,将光值分为三个等级,通过绿、蓝、红三种颜来反应光的强弱。 | |
| + | [[File:light_indicator-ok.jpg|600px|center]] | ||
==原理== | ==原理== | ||
| + | 通过Light光线传感器检测光的强弱,系统判断光强在定义的哪个范围区间,对应让彩灯亮不同颜色,同时,在同一区间内光越强,颜色越亮。 | ||
| + | [[File:light_indicator-sch.jpg|600px|center]] | ||
==设备== | ==设备== | ||
| 第13行: | 第16行: | ||
|模块||数量||功能 | |模块||数量||功能 | ||
|- | |- | ||
| − | |[[ | + | |[[mCookie-CoreUSB/zh]]||1||核心板 |
|- | |- | ||
| − | |[[ | + | |[[mCookie-Hub/zh]]||1||传感器转接板 |
|- | |- | ||
|[[Microduino-Light/zh]]||1||光敏传感器 | |[[Microduino-Light/zh]]||1||光敏传感器 | ||
|- | |- | ||
| − | |[[Microduino- | + | |[[Microduino-Color led/zh]]||1||彩色led灯 |
| − | |||
| − | |||
|} | |} | ||
| + | *其他设备 | ||
| + | **USB数据线*1 | ||
| + | **传感器连接线*1 | ||
| + | [[File:light_indicator-module1.jpg|600px|center]] | ||
| + | |||
| + | ==准备== | ||
| + | *Setup 1:将Color led背面的'''IN'''和Hub的数字口(D6)接起来,光照传感器接A0。 | ||
| + | [[file:mCookie-light_indicator-sensor.JPG|600px|center]] | ||
| + | *Setup 2:将CoreUSB,Hub,Color LED,Light连接在一起。通过USB数据线将接入电脑。 | ||
| + | [[file:mCookie-light_indicator-pc.JPG|600px|center]] | ||
| + | |||
| + | ==调试== | ||
| + | *打开Arduino IDE,把原来IDE里的代码都删除,将下列代码复制到IDE中。 | ||
| + | <source lang="cpp"> | ||
| + | #include <Adafruit_NeoPixel.h> | ||
| + | |||
| + | #define PIN 6 | ||
| + | Adafruit_NeoPixel strip = Adafruit_NeoPixel(1, PIN, NEO_GRB + NEO_KHZ800); | ||
| + | |||
| + | #define Light_PIN A0 | ||
| − | + | #define Light_value1 400 | |
| + | #define Light_value2 800 | ||
| − | + | int sensorValue; | |
| − | |||
| − | |||
| − | |||
| − | |||
| − | |||
| − | |||
| − | |||
| − | |||
| − | |||
| − | == | + | void setup() { |
| − | + | Serial.begin(115200); | |
| − | * | + | strip.begin(); |
| + | strip.show(); // Initialize all pixels to 'off' | ||
| + | } | ||
| + | |||
| + | void loop() { | ||
| + | sensorValue = analogRead(Light_PIN); | ||
| + | Serial.println(sensorValue); | ||
| + | if (sensorValue < Light_value1) | ||
| + | colorWipe(strip.Color(0, map(sensorValue, 10, 400, 0, 255), 0)); | ||
| + | else if (sensorValue >= Light_value1 && sensorValue < Light_value2) | ||
| + | colorWipe(strip.Color(0, 0, map(sensorValue, 400, 800, 0, 255))); | ||
| + | else if (Light_value2 >= 800) | ||
| + | colorWipe(strip.Color(map(sensorValue, 800, 960, 0, 255), 0, 0)); | ||
| + | } | ||
| + | |||
| + | void colorWipe(uint32_t c) { | ||
| + | for (uint16_t i = 0; i < strip.numPixels(); i++) { | ||
| + | strip.setPixelColor(i, c); | ||
| + | strip.show(); | ||
| + | } | ||
| + | } | ||
| + | </source> | ||
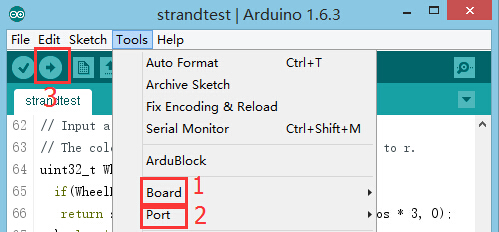
| + | *选择正确的板卡和COM端口 | ||
| + | [[file:upload.JPG|600px|center]] | ||
| + | *编译 | ||
| + | **编译时会提示保存项目,用户可以自己命名保存到你的文件夹即可。 | ||
| + | *下载 | ||
| + | **编译成功后可以直接下载,提示下载成功表示程序下载完毕。 | ||
| + | [[file:upload-led.JPG|600px|center]] | ||
| + | *结果 | ||
| + | 改变光的环境,光从暗到亮颜色依次变化为绿-蓝-红,并且光越弱,亮度越低。 | ||
| + | |||
| + | ==程序说明== | ||
| + | *传感器引脚定义,彩灯接D6,光照传感器接A0 | ||
<source lang="cpp"> | <source lang="cpp"> | ||
#define PIN 6 | #define PIN 6 | ||
| 第66行: | 第112行: | ||
colorWipe(strip.Color(map(sensorValue, 800, 960, 0, 255), 0, 0)); | colorWipe(strip.Color(map(sensorValue, 800, 960, 0, 255), 0, 0)); | ||
</source> | </source> | ||
| − | + | *“map(val,x,y,m,n)”函数为映射函数,可将某个区间的值(x-y)变幻成(m-n),val则是你需要用来映射的数据。 | |
| − | |||
| − | |||
| − | |||
==视频== | ==视频== | ||
|} | |} | ||
2015年11月23日 (一) 11:39的最新版本
| Language | English |
|---|
目的做一个的光照指示器,将光值分为三个等级,通过绿、蓝、红三种颜来反应光的强弱。 原理通过Light光线传感器检测光的强弱,系统判断光强在定义的哪个范围区间,对应让彩灯亮不同颜色,同时,在同一区间内光越强,颜色越亮。 设备
准备
调试
#include <Adafruit_NeoPixel.h>

#define PIN 6
Adafruit_NeoPixel strip = Adafruit_NeoPixel(1, PIN, NEO_GRB + NEO_KHZ800);

#define Light_PIN A0

#define Light_value1 400
#define Light_value2 800

int sensorValue;

void setup() {
  Serial.begin(115200);
  strip.begin();
  strip.show(); // Initialize all pixels to 'off'
}

void loop() {
  sensorValue = analogRead(Light_PIN);
  Serial.println(sensorValue);
  if (sensorValue < Light_value1)
    colorWipe(strip.Color(0, map(sensorValue, 10, 400, 0, 255), 0));
  else if (sensorValue >= Light_value1 && sensorValue < Light_value2)
    colorWipe(strip.Color(0, 0, map(sensorValue, 400, 800, 0, 255)));
  else if (Light_value2 >= 800)
    colorWipe(strip.Color(map(sensorValue, 800, 960, 0, 255), 0, 0));
}

void colorWipe(uint32_t c) {
  for (uint16_t i = 0; i < strip.numPixels(); i++) {
    strip.setPixelColor(i, c);
    strip.show();
  }
}
改变光的环境,光从暗到亮颜色依次变化为绿-蓝-红,并且光越弱,亮度越低。 程序说明
#define PIN 6
Adafruit_NeoPixel strip = Adafruit_NeoPixel(1, PIN, NEO_GRB + NEO_KHZ800);

#define Light_PIN A0
#define Light_value1 400
#define Light_value2 800
sensorValue = analogRead(Light_PIN);
if (sensorValue < Light_value1)
    colorWipe(strip.Color(0, map(sensorValue, 10, 400, 0, 255), 0));
  else if (sensorValue >= Light_value1 && sensorValue < Light_value2)
    colorWipe(strip.Color(0, 0, map(sensorValue, 400, 800, 0, 255)));
  else if (Light_value2 >= 800)
    colorWipe(strip.Color(map(sensorValue, 800, 960, 0, 255), 0, 0));
视频 |
