Microduino Phone Bluetooth Controls Household Applications

来自Microduino Wikipedia
1304410487@qq.com讨论 | 贡献2015年3月31日 (二) 07:20的版本 (Created page with "{| style="width: 800px;" |- | ==Outline== *Project: Microduino Phone Bluetooth Controls Household Applications *Purpose: Connect Microduino-BT and Microduino-Core by phone ...")
(差异) ←上一版本 | 最后版本 (差异) | 下一版本→ (差异)
跳转至: 导航搜索


Outline

  • Project: Microduino Phone Bluetooth Controls Household Applications
  • Purpose: Connect Microduino-BT and Microduino-Core by phone and have a Bluetooth communication to control smart switch and then to get a control of applications.
  • Difficulty: High
  • Time-consuming: 6-hour
  • Maker: Microduino Studio-Ray

Equipment

Module Number Function
Microduino-Core 1 Core board
Microduino-USBTTL 1 Download program
Microduino-BT 1 Bluetooth wireless transmission


  • Other Equipment
One
Reformable patch board One
micro usb cable One
Switch One

Electric Control Board & Smart Power Plug

Electric control board consists of a pressure reduction module, a relay, Microduino 27pin slot and a wiring slot, which is easy to have an extensive connection with Microduino modules. Put it into the socket and you can make a smart power plug. More details, please refer to: Microduino Wifi Controls Household Applications

Program

Android client:

Notice: Here the new version means Bluetooth 4.0 and Android 4.3 higher supportable.

Here offers Android APP.

APP download:

Support old version of BT module: [MicroduinoOldBluControlOutlet.rar] Support new version of BT module: [MicroduinoNewBluControlOutlet.rar]

Microduino Test Program: [MicroduinoBluControlOutlet]


APP two-dimension code QQ scan download: Old BT module:

New BT module:

Debugging

Step 1: Inside smart power plug:


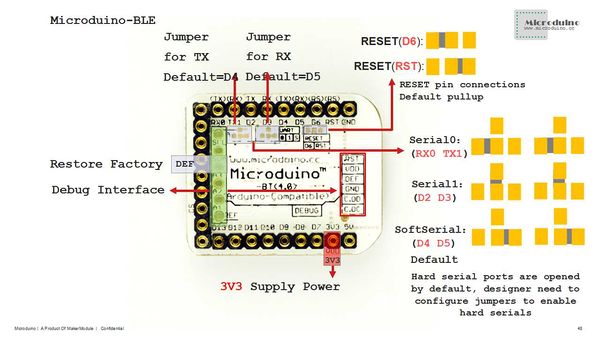
  • Step 2: Make sure your BT serial connection is D4, D5 by default.

Soft serial port used in program test is D4 and D5.

    • If you adopt D2 and D3
      • If adopting Core board, please change “SoftwareSerial mySerial(4, 5);” to “SoftwareSerial mySerial(2, 3);”.
      • If adopting Core+, you need to change “mySerial” in loop to “Serial1”.
    • If using D0, D1.
      • You need to change “mySerial” in loop to “Serial” and do not stack BT while program download or it’ll cause serial conflict.
Microduino-BT
  • Step 3: Build the circuit

Stack all modules needed.

  • Step 4: Download test program and open it.
    • Make sure the serial port of your BT is right, which can refer to Step 2. Compile program and download after that.
  • Step 5: Download Android client and then decompress and open it. It will notice users to open Bluetooth device.
  • Step 7: When the status changes from “Serial Present” to “Serial Ready”, you can start communication.

Click switch button on your phone and it means a successful communication if showing “power on” or “power off” on serial monitor on PC.

Step 8: Take off USBTTL module on receiving end, fixate the socket and Microduino module and plug in, making sure offer power for the application to be controlled. Here we adopt a small humidifier.

Adjust the switch to smart control mode.

Result

Use Microduino to achieve the control of household applications with Bluetooth device.


Note

  • Make sure BT serial port is right.
  • Android 4.3 or higher supportable.

Video

http://v.youku.com/v_show/id_XOTEzODAwMjQ0.html