Lesson 10--The first pegboard experiments (using electric iron)

来自Microduino Wikipedia
Jasonsheng讨论 | 贡献2014年2月16日 (日) 08:29的版本
跳转至: 导航搜索

Objective

In Previous experiment, we always used breadboard to build circuit, but maybe you want to do the circuit by using the Pegboard, so this lesson will show you how to use the electric iron, and some of the problems of welding.

Electric iron classification

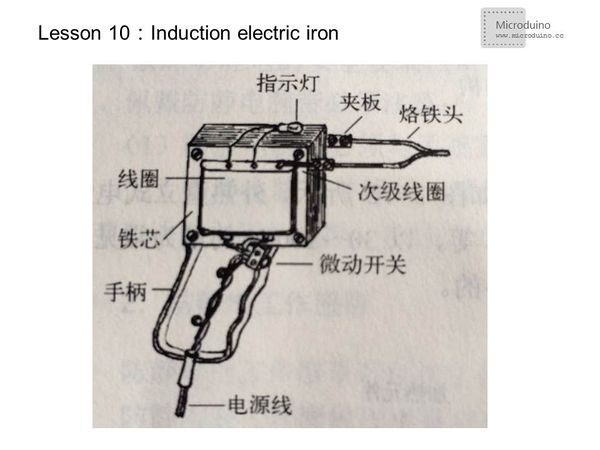
Induction electric iron

Induction electric iron, also called speed thermoelectric iron, commonly known as the torch. Actually it is a transformer. Its secondary winding only has one tuen,therefore the current is large, and reach the welding temperature quickly, generally a few seconds can be.

Lesson10-Induction.jpg

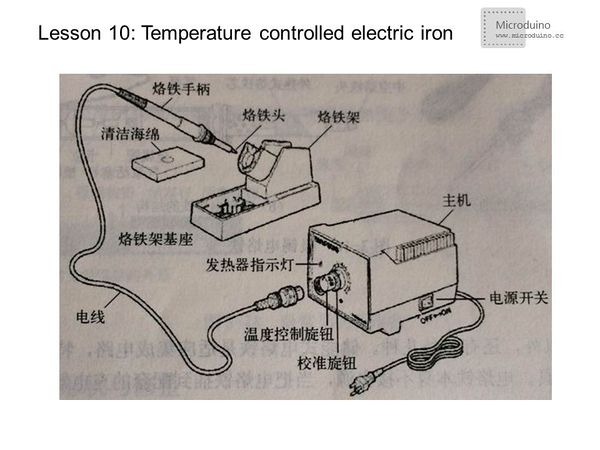
Temperature controlled electric iron

Temperature controlled electric iron use the temperature sensor to detect the tip temperature, then amplifier the sensor output signal by a amplification to control the electric power supply circuit, so as to achieve temperature control.

Lesson10-Temperature.jpg

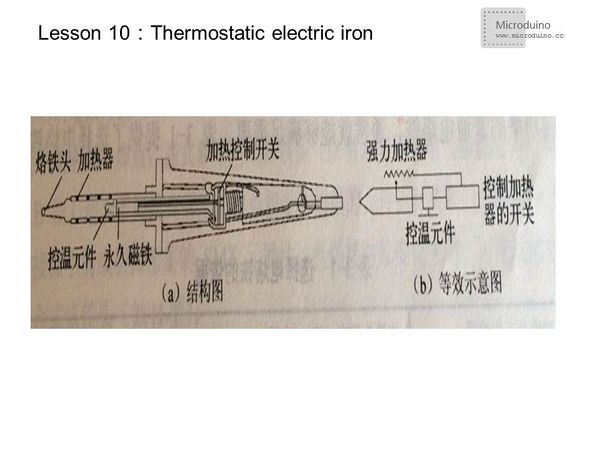
Thermostatic electric iron

Welding head is equipped with a ferromagnetic sensor, the magnetic disappeared when the temperature reaches a certain point.Using this feature as a magnetic control switch to control the heating element on and off, so as to control the solder iron temperature.

Lesson10-Thermostatic.jpg
  • Advantage of thermostatic electric iron:
    • Intermittent heating, not only save the power, but not overheated electric iron, long life;
    • Heating time soon, just 40 ~ 60S;
    • Electirc iron head is not affected by power supply voltage, ambient temperature.

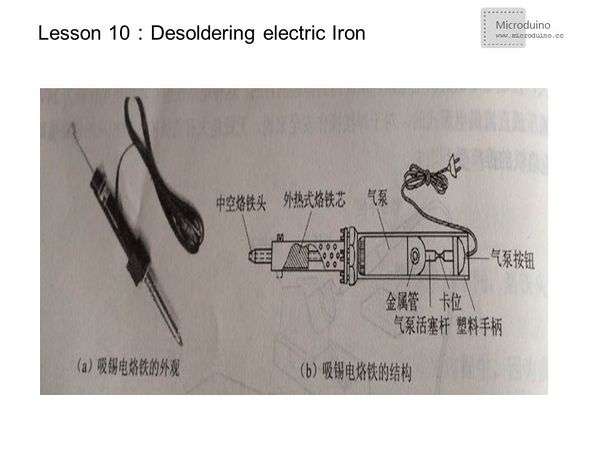
Desoldering electric Iron

Lesson10-Desoldering.jpg

In the maintenance of electronic products, often need to remove certain components and parts, then use desoldering electric Iron can easily sucked the solder from the printed circuit board, so weldment separates from the printed circuit board, and then you can easily the inspection and replacement.

When using desoldering electric Iron, press the pump button, compressed rubber bag, aligned with the hollow tip solder to heat. Until the solder melts when releasing the pump, solder was sucked inside tip; then remove the tip, press the pump button again, the solder is extruded.

Choose the electric iron

Welding object and nature of work Welding head temperature/℃(220V) Choosed electric iron
General PCB or install wire 300-400 20W Internal heating,30W External heating,Thermostatic electric iron
integrated circuit 300-400 20W Internal heating,Thermostatic electric iron
Lug, potentiometer, 2 ~ 8W resistors large electrolytic capacitors, high-power tube 350-45 30~50WInternal heating,50~75WExternal heating,Thermostatic electric iron
8W over large resistance, more than 2mm diameter wire 450-500 100W Internal heating,150~200W External heating
Bus, metal plates, etc. 500-630 300W External heating
Maintenance, commissioning general electronic products 20W Internal heating,Induction,Thermostatic electric iron

The basic steps of the welding operation

  • Step 1:Prepare welding
    • Left hand holing wire, right hand holding a soldering iron. Required to keep the welding head clean, no welding slag and other oxides;
  • Step 2:Heat element
    • Soldering iron head on against element, heating the whole element, about 1 ~ 2 seconds.Heating wires and welding plate, wire and connect the column to uniform heat at the same time;
  • Step 3:Into the wire
    • When welding surface is heated to a certain temperature, the wire contact elements from across the electric iron. Be careful not to put the solder wire to the iron head!
  • Step 4:Remove wire
    • When a certain amount of wire melted,remove the wire from the upper left corner of 45 degrees immediately;
  • Step 5:Remove electric iron
    • After solder infiltration welding plate and welding parts, remove the soldering iron from the upper right corner 45 degrees, finish welding.

From stem 3 to step5, maybe need 1~2s.

Video

http://v.youku.com/v_show/id_XNjU3MDMzMjA4.html