Lesson 30--Microduino-made DC V-A Meter

来自Microduino Wikipedia
Pkj讨论 | 贡献2014年9月17日 (三) 09:50的版本 (Created page with "Using Microduino to Make a DC V-A Meter--C# PC Display {| style="width: 800px;" |- | ==Purpose== The tutorial uses Microduino to make a DC V-A meter. The PC-side upper compu...")
(差异) ←上一版本 | 最后版本 (差异) | 下一版本→ (差异)
跳转至: 导航搜索

Using Microduino to Make a DC V-A Meter--C# PC Display

Purpose

The tutorial uses Microduino to make a DC V-A meter. The PC-side upper computer Winform can display the voltage and current values being measured. From the tutorial, you can have a further understanding of operational amplifier as well C# program example, and also get prepare for flexible application of Microduino and the real circuit buildup.

Equipment

Microduino-Core is the 8-bit single-chip development core board with Atmel ATmega328P as the core, which is an open and Arduino Uno compatible controller.

Microduino-USBTTL is the program download module, capable of connecting with Microduino-Core or Microduino-Core+ and making the modules communicate with the computer. It uses MicUSB as the download interface, which is also the smallest part of Microduino. Microduino is just as small as a quarter. Besides, the downlaod cable is just like the USB cable of most smart phones, easy to use.

  • Other Hardware Equipment
Related hardware Number Function
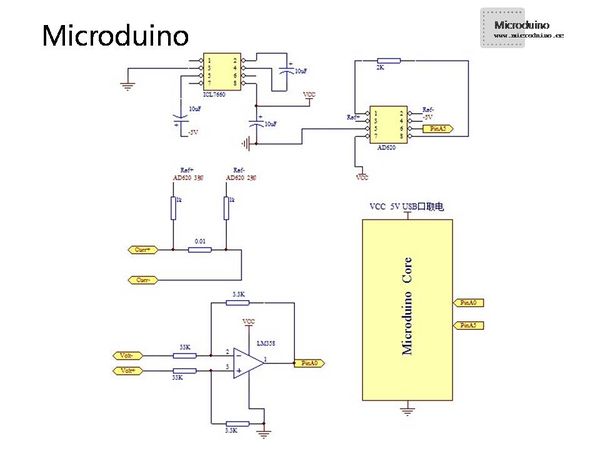
LM358 One A common dual operational amplifier, it is convenient for you to achieve mathematical operation circuit.
ICL7660 One Negative pressure-generated chip, used for operational amplifier power supply.
AD620 One Instrument amplifier, used for current detection.
1/4W Ω resistor Several Check the schematic.
0.01 Ω resistor(5W) One Cascaded in the circuit being measured.
1 Ω resistor(10W) One Cascaded with 0.01 Ω resistor and then connected to dry battery for testing current.
10uF 16V aluminum electrolytic capacitor Three For negative pressure generation circuit.
Dry battery Several For testing. USB cable One For connecting Microduino modules and PC.
Breadboard One All components gather here.
Jumper One box Served as the connector.

AD620 Instrument Amplifier

AD620 instrument amplifier is the product of AD company in America. Users can set the gain of any request from 1 to 1,000 with only an external resistor. Here we adopt a 2K Ω external resistor, meaning the gain G=1+(49.4/2)=25.7. The core of AD620 instrument amplifier is the three-stage operational amplifier circuit, which has higher CMRR(Common Mode Rejection Ratio) and a good temperature stability as well as small noise factor and high accuracy.


Schematic

IV Control protelSch.jpg

The circuit can test the current within 19.45A and the voltage within 50V theoretically.

  • Computing method of current: 25.7(Gain)*0.01(Resistance)*I(Current)<5V and here we get ”I<19.45A”. (Note: The cross-sectional area of the current connector should be no less than 2.5 mm².)
  • Computing method of voltage: The output voltage of LM358 cannot be higher than 5V(Power supply). Since the input voltage is reduced to 0.1 time of the original voltage, the theoretical test voltage is 50V.

Program

int myValueA0_V=0;//for  measure  voltage
int myValueA5_I=0;//for  measure  current
void setup()
{
  Serial.begin(9600);
}
void loop()
{
  myValueA0_V=analogRead(A0);
  delay(10);
  Serial.print(myValueA0_V*5.0/1023,3);
  Serial.print('\n');//C#  program need this charactor to split 
  myValueA5_I=analogRead(A5);
  delay(10);
  Serial.print(myValueA5_I*5.0/1023,3);
  delay(300);//send data delay     fit for  c# program time_tick
}

Debugging

  • Make sure the connection is all right.
  • Copy the program to Arduino IDE.
  • Compile the program and choose the right board and the related serial port.
  • Click Upload.
  • Open the file IV_control\bin\Debug under the folder of IV_control.exe after uploading Arduino program, you can see the form interface. (The C# program is supported by“.NET framework 4.0” . )
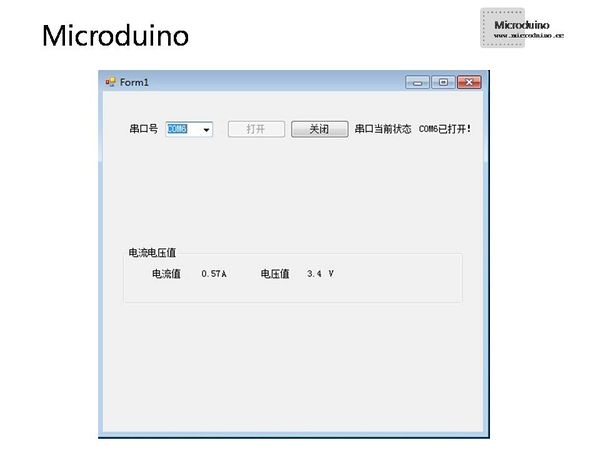
  • Let’s begin testing. Just watch the value change of the current and voltage in the form interface.
IV Control comOutput.jpg
  • Images of C# source program, Microduino and the protel schematic is available for download.

Csharp program and picture:文件:Csharp program and pictures.rar

Result

Watch current and voltage values and compare them with the theoretical value.

Video