Lesson 36--Microduino Infrared Remote Control Changes EEPROM values
| Language | English |
|---|
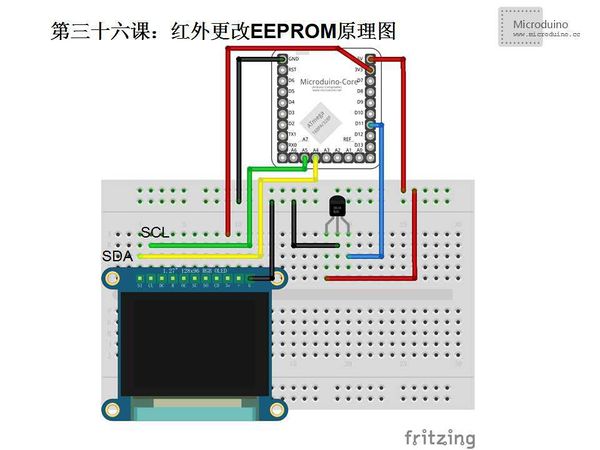
ObjectiveThis tutorial will teach you how to control EEPROM's value using infrared, and display the value in Microduino-OLED. Equipment
SchematicProgram#include <IRremote.h>
#include <avr/eeprom.h>
#include "U8glib.h"
#define EEPROM_write(address, var) eeprom_write_block((const void *)&(var), (void *)(address), sizeof(var))
#define EEPROM_read(address, var) eeprom_read_block((void *)&(var), (const void *)(address), sizeof(var))
U8GLIB_SSD1306_128X64 u8g(U8G_I2C_OPT_NONE);//Define OLED connection method
int action;//Record remote control button
int t;//Initial value
int RECV_PIN = 11;//Define infrared receiver pin 11
IRrecv irrecv(RECV_PIN);
decode_results results;
// Define a config_type structure contains a int variable
struct config_type
{
int num;
};
void draw(int changeNum) {
// 1) Define structure variable config and set the initial value
config_type config;
config.num = changeNum;
// 2) Store the config to EEPROM, from the address 0 to write
EEPROM_write(0, config);
// 3) Read the value from address 0, then stored into config_readback
config_type config_readback;
EEPROM_read(0, config_readback);
u8g.setFont(u8g_font_unifont);//Font 1
u8g.drawStr( 0, 16, "Num:");
u8g.setFont(u8g_font_7x13);//Font 2
u8g.setPrintPos(0, 32);
u8g.print(config_readback.num);
}
int deckey(unsigned long t)
{
switch(t){
case 0xFD08F7://Button 1 encoding
return 1;
break;
case 0xFD8877://Button 2 encoding
return 2;
break;
case 0xFD48B7://Button 3 encoding
return 3;
break;
case 0xFD28D7://Button 4 encoding
return 4;
break;
case 0xFDA857://Button 5 encoding
return 5;
break;
case 0xFD6897://Button 6 encoding
return 6;
break;
case 0xFD18E7://Button 7 encoding
return 7;
break;
case 0xFD9867://Button 8 encoding
return 8;
break;
case 0xFD58A7://Button 9 encoding
return 9;
break;
default:
return 0;
break;
}
}
void setup()
{
irrecv.enableIRIn(); // Intilize the infrared receiver
t=0;
}
void loop()
{
if (irrecv.decode(&results))
{
action=deckey(results.value);
u8g.firstPage();
do {
draw(action);
}
while( u8g.nextPage() );
delay(10);
irrecv.resume();
}
}
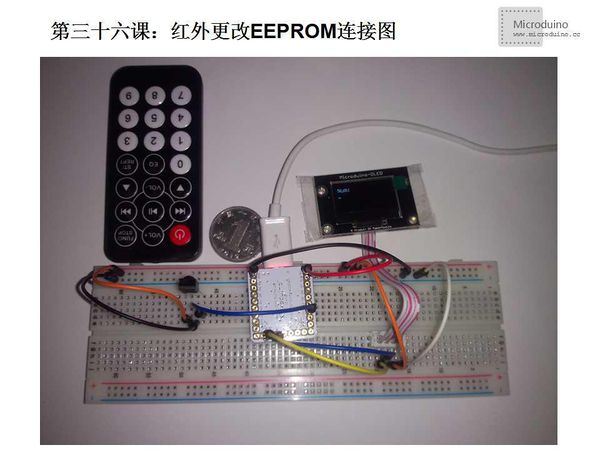
DebugStep 1:Copy the code to IDE and compile it Step 2:Set up circuit, as follows: Step 3:Run program Step 4:Put the remote control toward infrared receiver, then press the button. Observe the OLED and check the result. ResultOLED will display the value of remote control's button and store the value into EEPROM. Video |

