“Burn Bootloader to Microduino-Core/Core+ with an Arduino”的版本间的差异
(→Instructions) |
|||
| 第10行: | 第10行: | ||
|- | |- | ||
| | | | ||
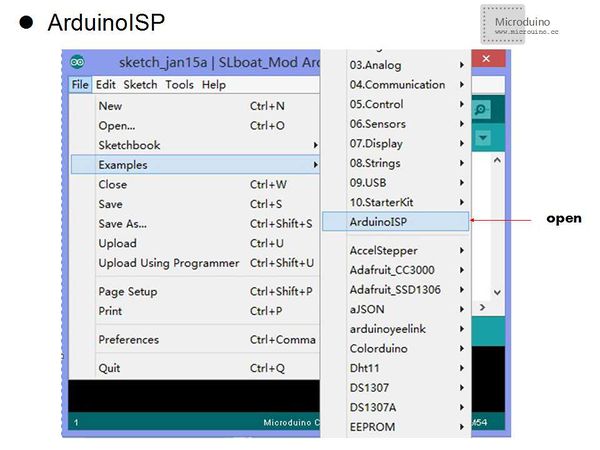
| − | [[File:ArduinoISP.jpg| | + | [[File:ArduinoISP.jpg|600px|thumb|center]] |
**2. Note for Arduino 1.0: you need to make one small change to the ArduinoISP code. Find the line in the heartbeat() function that says "delay(40);" and change it to "delay(20);". | **2. Note for Arduino 1.0: you need to make one small change to the ArduinoISP code. Find the line in the heartbeat() function that says "delay(40);" and change it to "delay(20);". | ||
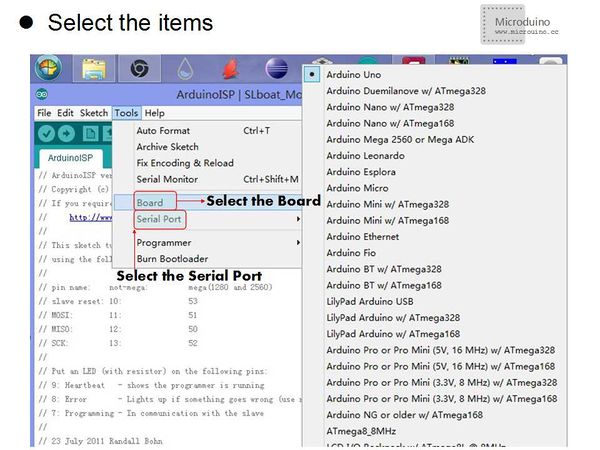
**3. Select the items in the Tools > Board and Serial Port menus that correspond to the board you are using as the programmer (not the board being programmed). | **3. Select the items in the Tools > Board and Serial Port menus that correspond to the board you are using as the programmer (not the board being programmed). | ||
|- | |- | ||
| | | | ||
| − | [[File:Select_items.jpg| | + | [[File:Select_items.jpg|600px|thumb|center]] |
**4. Upload the ArduinoISP sketch. | **4. Upload the ArduinoISP sketch. | ||
* Burn Bootloader into target Micromodule-Core/Core+ boards | * Burn Bootloader into target Micromodule-Core/Core+ boards | ||
| 第21行: | 第21行: | ||
|- | |- | ||
| | | | ||
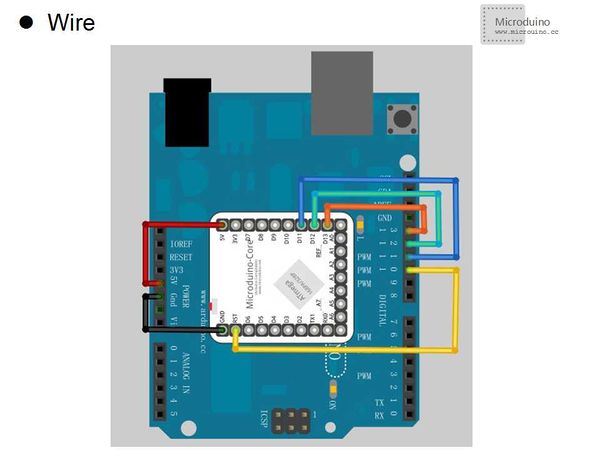
| − | [[File:microduino_wire.jpg| | + | [[File:microduino_wire.jpg|600px|thumb|center]] |
**2. Select the item in the Tools > Board menu that corresponds to the board on which you want to burn the bootloader (not the board that you're using as the programmer). See the board descriptions on the environment page for details. | **2. Select the item in the Tools > Board menu that corresponds to the board on which you want to burn the bootloader (not the board that you're using as the programmer). See the board descriptions on the environment page for details. | ||
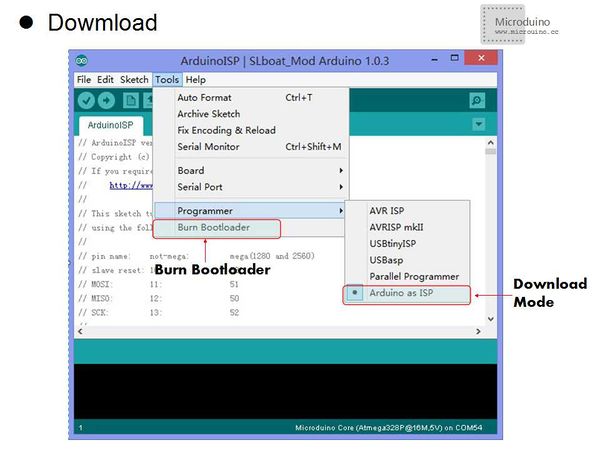
**3. Use the Burn Bootloader > Arduino as ISP command. | **3. Use the Burn Bootloader > Arduino as ISP command. | ||
|- | |- | ||
| | | | ||
| − | [[File:microduino_boot.jpg| | + | [[File:microduino_boot.jpg|600px|thumb|center]] |
|- | |- | ||
2014年1月15日 (三) 09:59的最新版本
|
This tutorial explains how to use an Arduino or Micromodule-Core/Core+ board as an AVR ISP (in-system programmer). This allows you to use the board to burn the bootloader onto an AVR (e.g. the Micromodule-Core or Core+ used in Arduino). The code in this example is based on the mega-isp firmware by Randall Bohn. |
Instructions
|
|
|
|
Circuits |


