“第四十一课--Microduino 直流电机正反转/zh”的版本间的差异
(Created page with "{{Language|Lesson_41--Microduino_Dc_Motor_Rotation_Control}} {| style="width: 800px;" |- | ==目的== 本教程将教大家用一种简单的方法使一个直流电机正转...") |
(没有差异)
|
2014年3月12日 (三) 07:33的版本
| Language | English |
|---|
目的本教程将教大家用一种简单的方法使一个直流电机正转与反转 设备
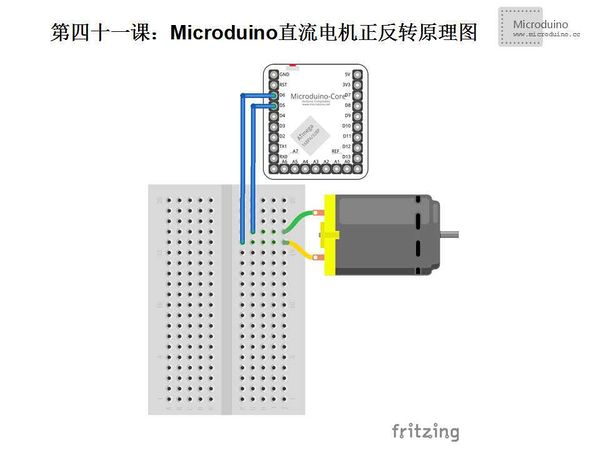
原理图注意:这不是一种最安全控制电机的方法,因为每个I/O pin只能承受40mA的电流。如果作为实际应用的话,还是建议大家使用类似于H-Bridge的电机驱动板 程序int motorPin1 = 5; // 一条线连接 digital pin 5
int motorPin2 = 6; // 另一条线连接 digital pin 6
void setup() {
// 初始化,设置两个引脚为输出
pinMode(motorPin1, OUTPUT);
pinMode(motorPin2, OUTPUT);
}
void loop()
{
rotateLeft(150, 500);//左转速率150,持续500ms
rotateRight(50, 1000);//右转速率50,持续1000ms
rotateRight(150, 1000);//右转速率150,持续1000ms
rotateRight(200, 1000);//右转速率200,持续1000ms
rotateLeft(255, 500);//左转速率255,持续500ms
rotateRight(10, 1500);//右转速率10,持续1500ms
}
//向左转
void rotateLeft(int speedOfRotate, int length){
analogWrite(motorPin1, speedOfRotate); //用pwm设置电流大小
digitalWrite(motorPin2, LOW); // 设置 Pin motorPin2为LOW
delay(length); //waits
digitalWrite(motorPin1, LOW); // 设置 Pin motorPin1为LOW
}
//向右转
void rotateRight(int speedOfRotate, int length){
analogWrite(motorPin2, speedOfRotate); //用pwm设置电流大小
digitalWrite(motorPin1, LOW); // 设置 Pin motorPin1为LOW
delay(length); //waits
digitalWrite(motorPin2, LOW); // 设置 Pin motorPin2为LOW
}
//全力向左转
void rotateLeftFull(int length){
digitalWrite(motorPin1, HIGH); //设置最大电流
digitalWrite(motorPin2, LOW); // 设置 Pin motorPin2为LOW
delay(length); //waits
digitalWrite(motorPin1, LOW); // 设置 Pin motorPin1为LOW
}
//全力向右转
void rotateRightFull(int length){
digitalWrite(motorPin2, HIGH); //设置最大电流
digitalWrite(motorPin1, LOW); // 设置 Pin motorPin1为LOW
delay(length); //waits
digitalWrite(motorPin2, LOW); // 设置 Pin motorPin2为LOW
}
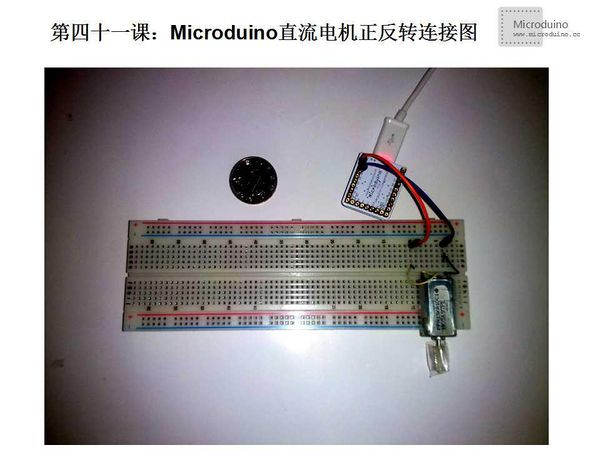
调试步骤一:把代码复制到IDE中,编译 步骤二:电路连接如下图: 步骤三:运行代码 步骤四:查看电机转动情况 结果电机会以不同的速率正转,反转,一直循环下去 视频 |

