“声音检测传感器”的版本间的差异
(→调试) |
853387039@qq.com(讨论 | 贡献) |
||
| 第2行: | 第2行: | ||
|- | |- | ||
| | | | ||
| − | == | + | ==概述== |
| − | + | 声音检测传感器模块。能检测声音的强弱,不能识别指定的声音。 | |
| − | + | <br /> | |
| − | + | 传感器内置一个对声音敏感的电容式驻极体话筒。声波使话筒内的驻极体薄膜振动,导致电容的变化,而产生与之对应变化的微小电压。这一电压随后被转化成0-5V的电压,可以被mCookie-CoreUSB接收并识别。 | |
| − | |||
| − | |||
| − | |||
| + | ==规格== | ||
| + | *电器规格 | ||
| + | **工作电压:3.3V~5V | ||
| + | **输入设备 | ||
| + | *技术参数 | ||
| + | **测量电压: 0~5V(测量频率范围100Hz~4000Hz); | ||
| + | **测量声强:45~120dB; | ||
| + | **精度:±1% | ||
| + | *尺寸 | ||
| + | **传感器大小:5mm*5mm, | ||
| + | **板子大小:20mm*20mm | ||
| + | *1.27mm间距的4Pin接口; | ||
| + | *接法 | ||
| + | **输出:0~5V模拟信号 | ||
| + | **引脚说明:GND、VCC、信号输出、NC(空),该输出信号为模拟信号,需要使用模拟接口来检测(A0~A7)。可以接到Hub的对应使用的引脚为A6,A2,A0。 | ||
| + | ==开发== | ||
| + | ===设备=== | ||
| + | {|class="wikitable" | ||
| + | |- | ||
| + | |模块||数量||功能 | ||
| + | |- | ||
| + | |[[mCookie-CoreUSB/zh]]||1||核心板 | ||
| + | |- | ||
| + | |[[mCookie-Hub/zh]]||1||传感器转接板 | ||
| + | |- | ||
| + | |[[Microduino-Sound/zh]]||1||声音检测传感器 | ||
| + | |} | ||
*其他硬件设备 | *其他硬件设备 | ||
**USB数据连接线 一根 | **USB数据连接线 一根 | ||
| + | [[File:mic-phone.jpg|600px|center]] | ||
| − | == | + | ===准备=== |
| − | + | *Setup 1:将Microduino-Sound和Hub的模拟口(A0)接起来,这个就是检测Sound的引脚,用户可自己更改。 | |
| − | + | [[file:mCookie-Sound-sensor.JPG|600px|center]] | |
| − | + | *Setup 2:将CoreUSB,Hub,Sound连接在一起。通过USB数据线将接入电脑。 | |
| − | + | [[file:mCookie-Sound-pc.JPG|600px|center]] | |
| − | |||
| − | |||
| − | |||
| − | == | ||
| − | |||
| − | |||
| − | |||
| − | [[ | ||
| − | |||
| − | |||
| − | |||
| − | |||
| − | [[ | ||
| − | |||
| − | + | ===实验:检测声音大小=== | |
| − | + | *打开Arduino IDE,将下列代码复制到IDE中。 | |
| − | + | <source lang="cpp"> | |
| + | #define mic_pin A0 | ||
| + | int sensorValue; | ||
| − | + | // the setup routine runs once when you press reset: | |
| − | + | void setup() { | |
| − | + | // initialize serial communication at 9600 bits per second: | |
| + | Serial.begin(9600); | ||
| + | pinMode(mic_pin, INPUT); | ||
| + | } | ||
| − | = | + | // the loop routine runs over and over again forever: |
| + | void loop() { | ||
| + | // read the input on analog pin 0: | ||
| + | sensorValue = analogRead(mic_pin); | ||
| + | // print out the value you read: | ||
| + | Serial.print("Sound:"); | ||
| + | Serial.println(sensorValue); | ||
| + | delay(100); // delay in between reads for stability | ||
| + | } | ||
| + | </source> | ||
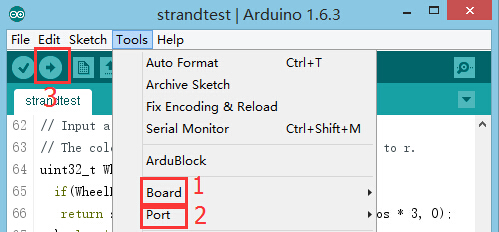
| + | *编译完成后在Arduino IDE的工具(Tools)→端口(Serial Port)里面选择正确的端口号,然后直接下载程序。 | ||
| + | [[file:upload.JPG|thumb|800px|center]] | ||
| + | *下载完毕你可以打开串口监视器,显示的数值大小即反应了当前传感器检测的声音强度。 | ||
| + | [[file:mCookie-Sound-res.JPG|600px|center]] | ||
| − | + | ===程序调试=== | |
| + | *“#define mic_pin A0”定义了控制LED的引脚,A0表示MicroduinoA0引脚,可接A6,A2,A0。 | ||
| + | *采用“analogRead(mic_pin)”来读取声音大小。 | ||
==视频== | ==视频== | ||
|} | |} | ||
2015年10月20日 (二) 07:08的版本
概述声音检测传感器模块。能检测声音的强弱,不能识别指定的声音。
规格
开发设备
准备
实验:检测声音大小
#define mic_pin A0

int sensorValue;

// the setup routine runs once when you press reset:
void setup() {
  // initialize serial communication at 9600 bits per second:
  Serial.begin(9600);
  pinMode(mic_pin, INPUT);
}

// the loop routine runs over and over again forever:
void loop() {
  // read the input on analog pin 0:
  sensorValue = analogRead(mic_pin);
  // print out the value you read:
  Serial.print("Sound:");
  Serial.println(sensorValue);
  delay(100);        // delay in between reads for stability
}
程序调试
视频 |
