“疯狂老鼠”的版本间的差异
Zhangfengfeng(讨论 | 贡献) (→视频) |
|||
| (未显示3个用户的5个中间版本) | |||
| 第7行: | 第7行: | ||
==原理== | ==原理== | ||
| − | + | 利用震动传感器检测老鼠被拍打,然后让电机带动老鼠向前运行一段距离。 | |
| − | + | [[File: _304_DozingDonkey-sch.jpg|600px|center]] | |
==设备== | ==设备== | ||
{|class="wikitable" | {|class="wikitable" | ||
| 第14行: | 第14行: | ||
|模块||数量||功能 | |模块||数量||功能 | ||
|- | |- | ||
| − | |[[ | + | |[[mCookie-CoreUSB/zh]]||1||核心板 |
|- | |- | ||
| − | |[[ | + | |[[mCookie-Hub/zh]]||1||传感器转接板 |
|- | |- | ||
| − | | [[Microduino- | + | |[[Microduino-Shock/zh]]||1||震动传感器 |
|- | |- | ||
| − | | [[ | + | |[[mCookie-BM/zh]]||1||电源管理 |
|- | |- | ||
| − | | [[ | + | |[[mCookie-Motor/zh]]||1||直流电机驱动模块 |
| − | |||
| − | |||
|} | |} | ||
| − | + | [[File: _304_DozingDonkey-module.jpg|600px|center]] | |
| + | |||
| + | ==准备== | ||
| + | *Setup 1:用连接线将传感器安装到Hub模块的D10接口上。 | ||
| + | [[File: _304_DozingDonkey _hub.jpg|600px|center]] | ||
| + | *Setup 2:将CoreUSB,Hub,Sound连接在一起。通过USB数据线将接入电脑。 | ||
| + | [[file:mCookie-mouse-pc.JPG|600px|center]] | ||
| + | ==代码== | ||
| + | *打开Arduino IDE,将下列代码复制到IDE中。 | ||
| + | <source lang="cpp"> | ||
| + | #define motor_pinB 6 | ||
| + | #define motor_pinA 8 | ||
| + | |||
| + | //#define servo_pinB 5 | ||
| + | //#define servo_pinA 7 | ||
| + | |||
| + | const int vibrationPin = 10; // the number of the pushbutton pin | ||
| + | |||
| + | int vibrationState = 0; | ||
| + | |||
| + | void setup() { | ||
| + | Serial.begin(9600); | ||
| + | pinMode(vibrationPin, INPUT); | ||
| + | |||
| + | pinMode(motor_pinB, OUTPUT); | ||
| + | pinMode(motor_pinA, OUTPUT); | ||
| + | } | ||
| − | = | + | void loop() { |
| − | + | ||
| − | [[ | + | vibrationState = digitalRead(vibrationPin); |
| − | * | + | if (vibrationState == HIGH) { |
| − | [[file: | + | Serial.println("ONONONON"); |
| − | + | fullForward(); | |
| + | } else { | ||
| + | stop(); | ||
| + | } | ||
| + | } | ||
| + | |||
| + | //stop | ||
| + | void stop() { | ||
| + | digitalWrite(motor_pinB, LOW); | ||
| + | digitalWrite(motor_pinA, LOW); | ||
| + | //delay(2000); | ||
| + | } | ||
| + | |||
| + | //full forward | ||
| + | void fullForward() { | ||
| + | //digitalWrite(motor_pinB, HIGH); | ||
| + | analogWrite(motor_pinB,255);//0-255 | ||
| + | digitalWrite(motor_pinA, LOW); | ||
| + | delay(3000); | ||
| + | } | ||
| + | </source> | ||
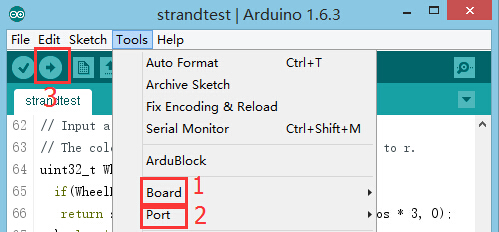
| + | *在Arduino IDE的工具(Tools)→端口(Serial Port)里面选择正确的端口号。 | ||
| + | [[file:upload.JPG|600px|center]] | ||
| + | *编译完成后直接下载程序。[[file:upload-hum.JPG|600px|center]] | ||
==软件调试== | ==软件调试== | ||
*控制引脚定义说明。 | *控制引脚定义说明。 | ||
<source lang="cpp"> | <source lang="cpp"> | ||
| − | #define | + | #define motor_pinB 6 //电机1 |
| − | #define | + | #define motor_pinA 8 //电机1 |
| + | //#define servo_pinB 5 //电机2 | ||
| + | //#define servo_pinA 7 //电机2 | ||
| + | |||
| + | const int vibrationPin = 10; // 震动传感器 | ||
</source> | </source> | ||
| − | * | + | *找到下面这段代码,其中255是电机的最大速度值,你可以根据需要调整为0-255的任意值(建议数值不要小于60,否则可能会影传感器触发的稳定性)。 |
| + | *Delay可以控制触发电机后运转的时间,预设为3000毫秒,即3秒,你可以根据需要修改。 | ||
<source lang="cpp"> | <source lang="cpp"> | ||
| − | + | void fullForward() { | |
| − | + | //digitalWrite(motor_pinB, HIGH); | |
| − | + | analogWrite(motor_pinB,255);//0-255 | |
| − | digitalWrite( | + | digitalWrite(motor_pinA, LOW); |
delay(3000); | delay(3000); | ||
| − | |||
} | } | ||
| − | |||
</source> | </source> | ||
| − | + | ==搭建硬件== | |
| + | *Setup 1:将电机连接到Motor模块如上图所示的接口上。 | ||
| + | [[File: _304_DozingDonkey _Motor.jpg|600px|center]] | ||
| + | *Setup 2:你可以根据应用的需要将配件安装在电机和轴上,并固定在其他材料上。。 | ||
| + | [[File: _304_DozingDonkey _Motor1.jpg|400px|center]] | ||
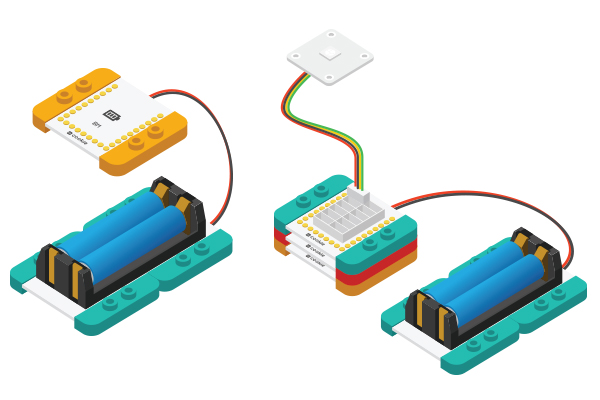
| + | *Setup 3:将激活后的电池盒与BM模块相连. | ||
| + | [[File:CoreUSB_Ble_steup2.jpg|600px|center]] | ||
| + | *Setup 4:将所有模块堆叠在一起,顺序随意,电路部分搭建完成。 | ||
| + | [[File: _304_DozingDonkey _steup-ok.jpg|600px|center]] | ||
==结果== | ==结果== | ||
拍打老鼠的身体,震动传感器检测到震动,老鼠向前运行3秒钟。 | 拍打老鼠的身体,震动传感器检测到震动,老鼠向前运行3秒钟。 | ||
| − | + | ||
|} | |} | ||
2017年4月12日 (三) 03:33的最新版本
| Language | English |
|---|
目的拍打老鼠的身体就会向前狂奔一段距离。 原理利用震动传感器检测老鼠被拍打,然后让电机带动老鼠向前运行一段距离。 设备
准备
代码
#define motor_pinB 6
#define motor_pinA 8

//#define servo_pinB 5
//#define servo_pinA 7

const int vibrationPin = 10;     // the number of the pushbutton pin

int vibrationState = 0;

void setup() {
  Serial.begin(9600);
  pinMode(vibrationPin, INPUT);

  pinMode(motor_pinB, OUTPUT);
  pinMode(motor_pinA, OUTPUT);
}

void loop() {

  vibrationState = digitalRead(vibrationPin);
  if (vibrationState == HIGH) {
    Serial.println("ONONONON");
    fullForward();
  } else {
    stop();
  }
}

//stop
void stop() {
  digitalWrite(motor_pinB, LOW);
  digitalWrite(motor_pinA, LOW);
  //delay(2000);
}

//full forward
void fullForward() {
  //digitalWrite(motor_pinB, HIGH);
  analogWrite(motor_pinB,255);//0-255
  digitalWrite(motor_pinA, LOW);
  delay(3000);
}
软件调试
#define motor_pinB 6  //电机1
#define motor_pinA 8  //电机1

//#define servo_pinB 5   //电机2
//#define servo_pinA 7   //电机2

const int vibrationPin = 10;  // 震动传感器
void fullForward() {
  //digitalWrite(motor_pinB, HIGH);
  analogWrite(motor_pinB,255);//0-255
  digitalWrite(motor_pinA, LOW);
  delay(3000);
}
搭建硬件
结果拍打老鼠的身体,震动传感器检测到震动,老鼠向前运行3秒钟。
|

