“蓝牙小夜灯”的版本间的差异
853387039@qq.com(讨论 | 贡献) (→软件调试) |
(→APP调试) |
||
| (未显示3个用户的12个中间版本) | |||
| 第4行: | 第4行: | ||
| | | | ||
==目的== | ==目的== | ||
| − | + | 周围环境暗下来,小夜灯就开始工作了,当小夜灯亮起来的时候,你可以通过蓝牙来控制灯的颜色和亮度的变化。 | |
| + | [[File:ble_night_light.jpg|600px|center]] | ||
==原理== | ==原理== | ||
| + | 通过Light光线传感器检测光的强弱,系统判断光为强还是弱,如果光强关闭彩灯,否则就可以通过手机蓝牙来控制灯的颜色。 | ||
| + | [[File:ble_night_light-sch.jpg|600px|center]] | ||
==设备== | ==设备== | ||
| 第21行: | 第24行: | ||
| [[Microduino-Light/zh]]||1||光敏传感器 | | [[Microduino-Light/zh]]||1||光敏传感器 | ||
|- | |- | ||
| − | | [[Microduino- | + | | [[Microduino-Color led/zh]]||2||彩灯 |
|- | |- | ||
| [[Microduino-BM/zh]]||1||电源管理 | | [[Microduino-BM/zh]]||1||电源管理 | ||
|} | |} | ||
| − | [[File: | + | [[File:ble_night_light-moduino.jpg|600px|center]] |
| − | == | + | ==准备== |
| − | + | *Setup 1:用USB线将CoreUSB模块与PC/Mac相连,并打开Arduino IDE。 | |
| − | + | [[File:CoreUSB_Ble_pc.jpg|600px|center]] | |
| + | *Setup 2:点击文件 >示例 > mCookie > _201_CowardlyNightLight_BLE, 加载程序。 | ||
| + | [[File: light_indicator-ino.jpg|600px|center]] | ||
| + | * Setup 3:加载代码,将程序代买拷贝到IDE中。程序编译通过后选择好板卡和COM端口下载程序。 | ||
| + | [[File: light_indicator-com.jpg|600px|center]] | ||
| + | ==程序说明== | ||
| + | “ble()”函数是蓝牙接收数据及控制彩灯。 | ||
| + | *定义蓝牙通讯串口 | ||
| + | <source lang="cpp"> | ||
| + | #define my_Serial Serial1 | ||
| + | </source> | ||
| + | *定义传感器引脚,及可连接的灯的数量。 | ||
| + | <source lang="cpp"> | ||
| + | #define PIXEL_PIN 6 // Digital IO pin connected to the NeoPixels. | ||
| + | #define PIXEL_COUNT 2 | ||
| − | + | #define lightSensorPin A0 | |
| + | </source> | ||
| − | |||
| − | |||
| − | |||
| − | |||
| − | |||
| − | |||
| − | |||
| − | |||
| − | |||
| − | |||
| − | |||
| − | |||
| − | |||
| − | |||
| − | |||
| − | |||
| − | |||
| − | |||
| − | |||
| − | |||
| − | |||
| − | |||
| − | |||
| − | |||
| − | |||
| − | |||
| − | |||
*环境光预设值,更改Light的大小就可以改变在某个亮度下开启灯光。 | *环境光预设值,更改Light的大小就可以改变在某个亮度下开启灯光。 | ||
<source lang="cpp"> | <source lang="cpp"> | ||
| − | #define | + | #define lightSwitch 700 |
</source> | </source> | ||
*读取亮度函数 | *读取亮度函数 | ||
<source lang="cpp"> | <source lang="cpp"> | ||
| − | + | sensorValue = analogRead(lightSensorPin); | |
</source> | </source> | ||
| − | * | + | *判断环境参数低于预设值则开启灯光,并且通过蓝牙控制,否则关闭灯光。 |
<source lang="cpp"> | <source lang="cpp"> | ||
| − | if ( | + | if(sensorValue>lightSwitch) { |
| − | + | Serial.println(sensorValue); | |
| − | + | strip.setPixelColor(0, strip.Color(0, 0, 0)); | |
| − | + | strip.setPixelColor(1, strip.Color(0, 0, 0)); | |
| + | strip.show(); | ||
| + | } else { | ||
| + | ble(); | ||
| + | if (!color_en) { | ||
| + | for (int i = 0; i < 1; i++) | ||
| + | rainbow(10); | ||
| + | } | ||
| + | } | ||
| + | </source> | ||
| + | ==调试代码== | ||
| + | *通过CoreUSB模块连接电脑并加载程序后,点击串口监视器,会弹出一个窗口,里面会显示光线传感器接收到的光线值的变化。 | ||
| + | [[File:CoreUSB_light_ino1.jpg|600px|center]] | ||
| + | 当前设定的感光值是700,你可以尝试根据之前监测出来的数据在程序中更改这一数值,重新刷入程序,看看会产生什么效果。 | ||
| − | + | ==搭建硬件== | |
| − | + | *Setup 1:将彩灯接到Sensorhub的D6引脚上,将光敏传感器接到A0引脚上。 | |
| − | + | [[File:night_colorled_ble.jpg|600px|center]] | |
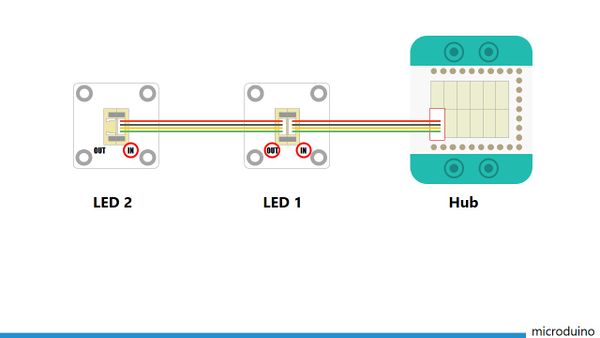
| − | + | LED灯的连接方法如图,请注意连接顺序,从LED的IN接口接入,从OUT接口接出本应用最多可控制2个LED灯。 | |
| − | + | [[File:CoreUSB_Ble_steup11.jpg|600px|center]] | |
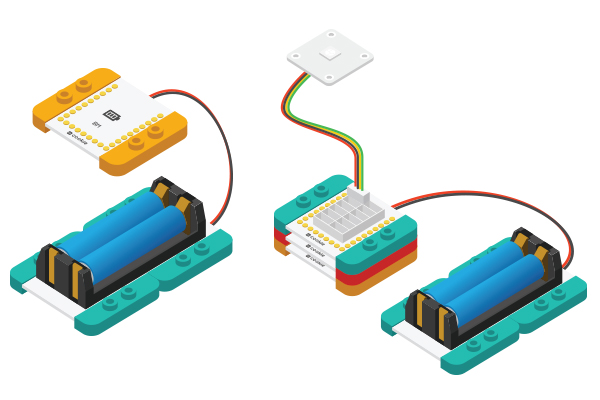
| − | + | *Setup 2:将激活后的电池盒与BM模块相连. | |
| − | + | [[File:CoreUSB_Ble_steup2.jpg|600px|center]] | |
| − | + | *Setup 3:将所有模块堆叠在一起,顺序随意,电路部分搭建完成。 | |
| − | + | [[File:CoreUSB_night led_steup3.jpg|600px|center]] | |
| − | |||
| − | |||
| − | + | ==APP调试== | |
| − | + | *Setup 1:扫描左侧的二维码,下载Bluetooth Light APP。 | |
| − | + | [[File:app_Ble_steup1V1.png|600px|center]] | |
| − | + | *Setup 2:载安装App后,打开应用,如果没有打开蓝牙,系统会提示,选择打开。 | |
| − | + | [[File:app_Ble_steup2.jpg|600px|center]] | |
| − | + | *Setup 3:点击Scan,手机会开始搜索蓝牙设备,并显示在下方,选择名称为Microduino的设备. | |
| − | + | [[File:app_Ble_steup3.jpg|600px|center]] | |
| − | + | *Setup 4:连接成功后,你就可以用手机来控制灯光了 | |
| − | + | [[File:app_Ble_steup4.jpg|600px|center]] | |
| − | |||
| − | |||
==结果== | ==结果== | ||
| − | + | 遮住光线传感器,或进入较暗环境下,LED灯就会发光,这时你就可以用蓝牙来控制灯光的颜色。你也可以通过乐高搭建一个漂亮的外观。 | |
| − | + | [[File:legao_night_led.jpg|600px|center]] | |
==视频== | ==视频== | ||
|} | |} | ||
2016年7月24日 (日) 14:53的最新版本
| Language | English |
|---|
目的周围环境暗下来,小夜灯就开始工作了,当小夜灯亮起来的时候,你可以通过蓝牙来控制灯的颜色和亮度的变化。 原理通过Light光线传感器检测光的强弱,系统判断光为强还是弱,如果光强关闭彩灯,否则就可以通过手机蓝牙来控制灯的颜色。 设备
准备
程序说明“ble()”函数是蓝牙接收数据及控制彩灯。
#define my_Serial Serial1
#define PIXEL_PIN    6    // Digital IO pin connected to the NeoPixels.
#define PIXEL_COUNT  2

#define lightSensorPin  A0
#define lightSwitch 700
sensorValue = analogRead(lightSensorPin);
  if(sensorValue>lightSwitch) {
    Serial.println(sensorValue);
    strip.setPixelColor(0, strip.Color(0, 0, 0));
    strip.setPixelColor(1, strip.Color(0, 0, 0));
    strip.show();
  } else {
      ble();
      if (!color_en) {
        for (int i = 0; i < 1; i++)
          rainbow(10);
      }
  }
调试代码
当前设定的感光值是700,你可以尝试根据之前监测出来的数据在程序中更改这一数值,重新刷入程序,看看会产生什么效果。 搭建硬件
LED灯的连接方法如图,请注意连接顺序,从LED的IN接口接入,从OUT接口接出本应用最多可控制2个LED灯。
APP调试
结果遮住光线传感器,或进入较暗环境下,LED灯就会发光,这时你就可以用蓝牙来控制灯光的颜色。你也可以通过乐高搭建一个漂亮的外观。 视频 |

