“Microduino-CC3000”的版本间的差异
Jasonsheng(讨论 | 贡献) |
(→Arduino library and supported package) |
||
| (未显示3个用户的6个中间版本) | |||
| 第1行: | 第1行: | ||
| + | {{Language|Microduino-CC3000}} | ||
{| style="width: 800px;" | {| style="width: 800px;" | ||
|- | |- | ||
| | | | ||
| − | [[file:Microduino- | + | [[file:Microduino-cc3000-rect.jpg|400px|thumb|right|Microduino-CC3000]] |
| − | '''[[Microduino-CC3000]]''' is a well-equipped wireless network | + | '''[[Microduino-CC3000]]''' is a well-equipped wireless network module, which simplifies the implementation process of Internet connectivity. SimpleLink ™ Wi-Fi can significantly reduce a host microcontroller (MCU) software requirements, making it ideal for using in any low-cost and low-power MCU solution of embedded applications. |
| 第42行: | 第43行: | ||
| | | | ||
===About SmartConfig=== | ===About SmartConfig=== | ||
| − | SimpleLink ™ Wi-Fi SmartConfig ™ technology | + | SimpleLink ™ Wi-Fi SmartConfig ™ technology is an unique one-step activation process of Wi-Fi, the developer or end-user could configure current wireless network through other devices, such as smart phones, tablet PCs installed SmartConfig App program, and through the program CC3000 is equipped with a hardware circuit. The configuration information of Wifi environment includes SSID, wireless password, security authentication, and so on. Just one simple step can make no more than one display device connected to Wifi network to solve wirelessly connect to your home network and the cloud. |
|- | |- | ||
| 第95行: | 第96行: | ||
*2.4G antenna:AT8010-T2R9HAA '''[[File:AT8010-T2R9HAA.pdf]]''' | *2.4G antenna:AT8010-T2R9HAA '''[[File:AT8010-T2R9HAA.pdf]]''' | ||
| − | *[http://processors.wiki.ti.com/index.php/CC3000_Serial_Port_Interface_(SPI) TI | + | *[http://processors.wiki.ti.com/index.php/CC3000_Serial_Port_Interface_(SPI) TI Official SPI Stack] |
| − | *[http://processors.wiki.ti.com/index.php/CC3000 | + | *[http://processors.wiki.ti.com/index.php/CC3000 TI Official WIKI] |
|- | |- | ||
| | | | ||
| − | == | + | ==Development== |
| − | * | + | * Make sure +3.3 v power supply current can reach 200ma, not recommended for using FT232R debugging directly because FT232R output +3.3 v current is too small. The FT232R datasheet says you can draw up to 50 mA from its 3.3V output. |
| − | === | + | ===Arduino library and supported package=== |
| − | * | + | *https://github.com/Microduino/Microduino_Tutorials/tree/master/Microduino_Libraries/_03_Microduino_WIFI_CC3000 |
| − | * | + | *https://github.com/Microduino/Microduino_Tutorials/tree/master/Microduino_Libraries/_03_Microduino_WIFI_CC3000_MDNS |
| − | * | + | *https://github.com/Microduino/Microduino_Tutorials/tree/master/Microduino_Libraries/_01_Microduino_OLED_U8glib |
| − | === | + | ===Notes for how to use the library=== |
| − | * | + | *CC3000 patch libry is used for upgarde the firmware and can't run it with Adafruit_CC3000's libray. |
| − | * | + | *If you want to make these two libraries compatible Microduino Core+: |
| − | ** | + | **You need open the “Adafruit_CC3000_4Patching.cpp”(CC3000Patch)or “Adafruit_CC3000.cpp”(Adafruit_CC3000)in library's fold firstly; |
| − | ** | + | **Find line that“#elif defined(__AVR_ATmega1281__) || defined(__AVR_ATmega2561__) || defined(__AVR_ATmega2560__) || defined(__AVR_ATmega1280__)” in file; |
| − | ** | + | **Add this “ || defined(__AVR_ATmega1284P__) || defined(__AVR_ATmega644P__) ” in the tial of the last line. |
*CC3000Patch: | *CC3000Patch: | ||
| − | ** | + | **When using CC3000PATCH, please make sure any other cc3000 library should be removed to avoid conflict. And recommend use "Aroduino 1.01 or upper release", if you are using lower release, please re-install it again from zero. |
| − | ** | + | **CC3000Patch can be used to upgarde the firmware of CC3000,you need copy the CC3000Patch.ino to "\examples\CC3000Patch\"; |
| − | ** | + | **You need set the IRP,VBAT and CI correctly in your program,as follows:“#define CC3000_IRQ 2 ”、“#define ADAFRUIT_CC3000_VBAT 9”、“#define ADAFRUIT_CC3000_CS 10”; |
| + | **Detailed usage, please refer to [https://github.com/cmagagna/CC3000Patch/blob/master/README.md author's README] | ||
*Adafruit_CC3000: | *Adafruit_CC3000: | ||
| − | ** | + | **You need set the IRP,VBAT and CI correctly in your program,as follows:“#define CC3000_IRQ 2 ”、“#define ADAFRUIT_CC3000_VBAT 9”、“#define ADAFRUIT_CC3000_CS 10” |
| − | == | + | ==Application== |
| − | === | + | ===Upgrade the frimware of CC3000=== |
| − | * | + | *Recommend that upgarde the firmware of CC3000 to 1.24 using CC3000Patch,detaile usage refer to [https://github.com/cmagagna/CC3000Patch/blob/master/README.md author's README] |
| − | ** | + | **(Note:Firmware upgrade process is operated via the serial port monitor, set the Arduino IDE newline terminator serial monitor is set to "newline and carriage return") |
| + | *After upgraed, delete the CC3000Patch library,and then start the Adafruit_CC3000 libray,you can run the included examples! | ||
| − | * | + | ===SimpleLink™ Wi-Fi SmartConfig™ Function=== |
| + | *If you want to use SimpleLink™ Wi-Fi SmartConfig™ function: | ||
| + | **Take the IOS as example,download the "TI WIFI SMARTCINFIG" from App Store firstly; | ||
| + | **Connect the IOS device to router,open the "TI WIFI SMARTCINFIG",fill the route key in Password; | ||
| + | **Download the SmartConfigCreate to Microduino from the Adafruit_CC3000 library's examples; | ||
| + | **Open the serial port monitor(baud rade:115200),When “Waiting for a SmartConfig connection (~60s) ...” displayed,click the "Start" of TI WIFI SMARTCINFIG,waiting for result。 | ||
| − | === | + | ==Bug== |
| − | |||
| − | |||
| − | |||
| − | |||
| − | |||
| − | == | + | ==History== |
| − | == | + | ==Picture== |
| + | [[File:Microduino-cc3000-t1.jpg|thumb|600px|center|Front]] | ||
| + | [[File:Microduino-cc3000-b1.jpg|thumb|600px|center|Back]] | ||
| − | == | + | ==Video== |
| − | |||
| − | |||
| − | |||
| − | |||
*[http://www.kaltura.com/index.php/kwidget/wid/0_yp64zx3k/uiconf_id/2342281 Texas Instruments SimpleLink™ Wi-Fi SmartConfig™Technology] | *[http://www.kaltura.com/index.php/kwidget/wid/0_yp64zx3k/uiconf_id/2342281 Texas Instruments SimpleLink™ Wi-Fi SmartConfig™Technology] | ||
|} | |} | ||
2014年7月2日 (三) 06:05的最新版本
| Language | English |
|---|
|
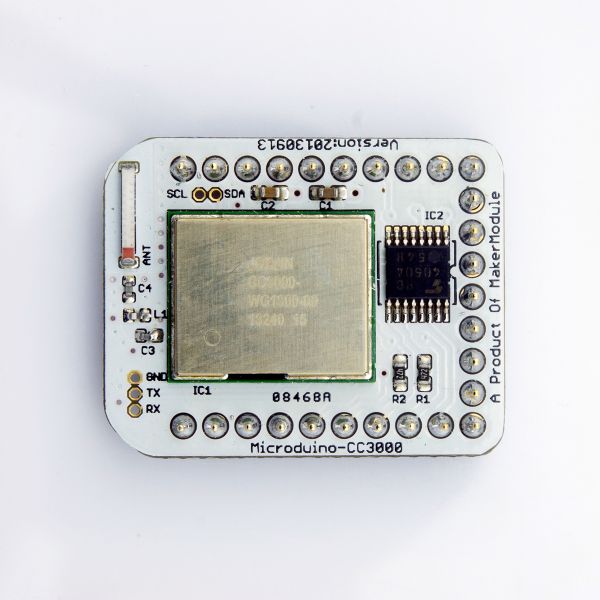
Microduino-CC3000 is a well-equipped wireless network module, which simplifies the implementation process of Internet connectivity. SimpleLink ™ Wi-Fi can significantly reduce a host microcontroller (MCU) software requirements, making it ideal for using in any low-cost and low-power MCU solution of embedded applications.
| ||||||||||||||||||||||||||||
目录Features
| ||||||||||||||||||||||||||||
Specifications
文件:CC3000-Pinout-2.jpg Microduino-CC3000-Pinout | ||||||||||||||||||||||||||||
About SmartConfigSimpleLink ™ Wi-Fi SmartConfig ™ technology is an unique one-step activation process of Wi-Fi, the developer or end-user could configure current wireless network through other devices, such as smart phones, tablet PCs installed SmartConfig App program, and through the program CC3000 is equipped with a hardware circuit. The configuration information of Wifi environment includes SSID, wireless password, security authentication, and so on. Just one simple step can make no more than one display device connected to Wifi network to solve wirelessly connect to your home network and the cloud. | ||||||||||||||||||||||||||||
Pins
| ||||||||||||||||||||||||||||
DocumentsEagle PCB 文件:Microduino-CC3000.zip Main Components
| ||||||||||||||||||||||||||||
Development
Arduino library and supported package
Notes for how to use the library
ApplicationUpgrade the frimware of CC3000
SimpleLink™ Wi-Fi SmartConfig™ Function
BugHistoryPictureVideo |


