“Microduino-Core/ko”的版本间的差异
| (未显示2个用户的4个中间版本) | |||
| 第6行: | 第6行: | ||
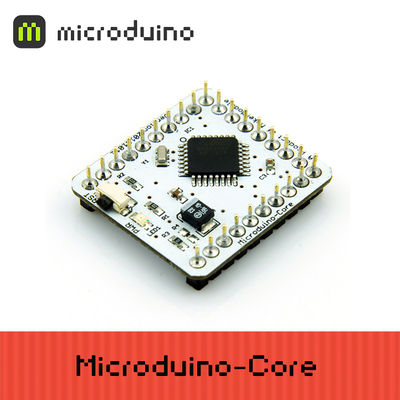
'''[[Microduino-Core/ko|마이크로두이노 코어모듈]]'''는 마이크로두이노 시리즈 코어 모듈중에 하나이다. '''[[Microduino-Core/ko|마이크로두이노 코어모듈]]'''는 아두이노 우노(UNO) 보드와 호환되는 오픈 소스 하드웨어이다. [http://www.atmel.com Atmel]사의 ATmega328P/ATmega168PA 시리즈를 기반으로 한 8비트 마이크로컨트롤러 개발보드이다. | '''[[Microduino-Core/ko|마이크로두이노 코어모듈]]'''는 마이크로두이노 시리즈 코어 모듈중에 하나이다. '''[[Microduino-Core/ko|마이크로두이노 코어모듈]]'''는 아두이노 우노(UNO) 보드와 호환되는 오픈 소스 하드웨어이다. [http://www.atmel.com Atmel]사의 ATmega328P/ATmega168PA 시리즈를 기반으로 한 8비트 마이크로컨트롤러 개발보드이다. | ||
| − | 아두이노 우노보드와 비교해 보면, '''[[Microduino-Core/ko|마이크로두이노 코어모듈]] | + | 아두이노 우노보드와 비교해 보면, '''[[Microduino-Core/ko|마이크로두이노 코어모듈]]'''의 특징은 아래와 같다. |
| − | *'''[http://arduino.cc/en/Main/ArduinoBoardUno 아두이노 우노보드]'''를 마이크로컨트롤러 부분인 '''[[Microduino-Core/ko|마이크로두이노 코어모듈]]'''와 | + | *'''[http://arduino.cc/en/Main/ArduinoBoardUno 아두이노 우노보드]'''를 마이크로컨트롤러 부분인 '''[[Microduino-Core/ko|마이크로두이노 코어모듈]]'''와 '''[[Microduino-FT232R|마이크로두이노-FT232R 모듈]]'''로 분리했다. '''[[Microduino-Core/ko|마이크로두이노 코어모듈]]'''에 프로그램을 업로딩 하고 난 후 '''[[Microduino-FT232R]]'''모듈은 항상 필요없으므로 마이크로두이노 코어/코어 플러스 모듈이 여러개여도 '''[[Microduino-FT232R]]'''모듈은 하나만 가지고 있어도 된다. 보드사이즈는 사각형으로 25.4mm X 27.94mm로 매우 작다. |
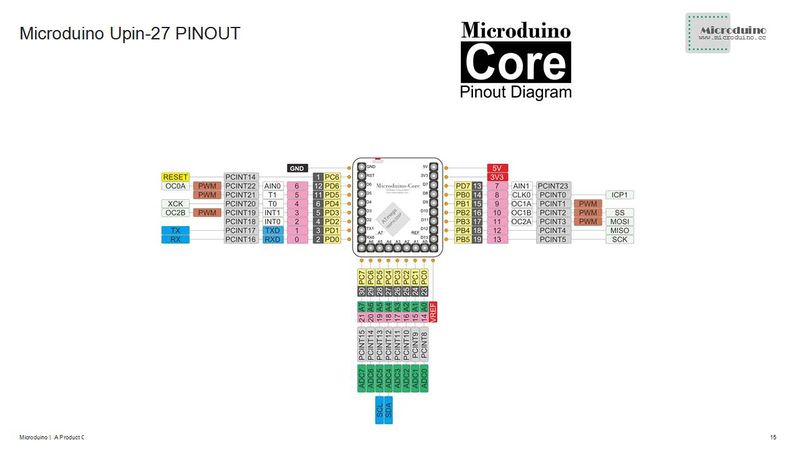
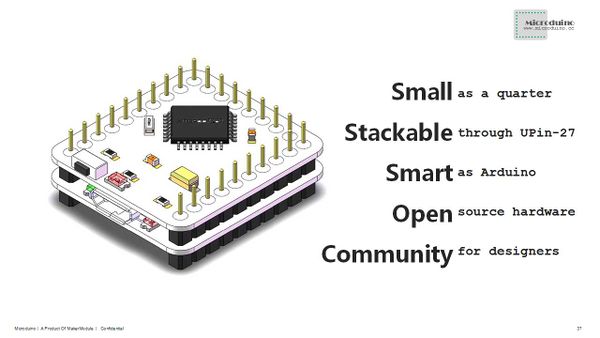
* 마이크로두이노는 'U'자 모양의 27핀 인터페이스를 사용한다(UPin-27). 모든 마이크로두이노 코어 모듈, 확장 모듈, 확장 보드는 동일한 인터페이스를 사용하기 때문에 간단하게 연결해서 사용할 수 있다. | * 마이크로두이노는 'U'자 모양의 27핀 인터페이스를 사용한다(UPin-27). 모든 마이크로두이노 코어 모듈, 확장 모듈, 확장 보드는 동일한 인터페이스를 사용하기 때문에 간단하게 연결해서 사용할 수 있다. | ||
| 第64行: | 第64行: | ||
|- | |- | ||
| | | | ||
| − | == | + | ==마이크로두이노 코어/코어 플러스 비교== |
| − | * | + | * 마이크로두이노는 '''[[Microduino-Core+|마이크로두이노 코어 플러스]]'''모듈이 있는데 SRAM/EEPROM/플레쉬의 용량이 더 크고 더 많은 I/O 포트를 제공하기 위한 목적이다. |
| − | * | + | * '''[[Microduino-Core|마이크로두이노 코어]]'''와 '''[[Microduino-Core+|마이크로두이노 코어 플러스]]'''모듈 둘 다 '''[[UPin-27]]''' 인터페이스를 사용하다. '''[[UPin-27]]''' 인터페이스는 마이크로두이노 시리즈의 기본 인터페이스이다. 두 모듈에서 다른 것은 사용한 MCU인데 코어모듈은 아두이노 우노와 동일한 ATmega328P/ATmega168PA을 사용했고, 코어 플러스 모듈은 아두이노 Mega2560과 비슷한 성능을 가지고 있다. |
* Configuration difference between '''[[Microduino-Core]]''' and '''[[Microduino-Core+]]''' | * Configuration difference between '''[[Microduino-Core]]''' and '''[[Microduino-Core+]]''' | ||
| + | * '''[[Microduino-Core|마이크로두이노 코어]]'''과 '''[[Microduino-Core+|마이크로두이노 코어 플러스]]'''모듈의 차이점은 | ||
:{|class="wikitable" | :{|class="wikitable" | ||
! Microduino | ! Microduino | ||
| 第120行: | 第121行: | ||
|} | |} | ||
| − | * | + | * 위의 테이블을 보면, 코어와 코어 플러스 모듈은 플레쉬, EEPROM, SRAM 사이즈가 다른 것을 볼 수 있다. 또한, 코어 플러스 모듈은 10개의 더 많은 디지털 I/O와 하드웨어 시리얼 포트가 한개 더 있다. 디자이너는 기능, 성능, 전원등 상황에 따라 다른 모듈을 선택하여 사용할 수 있다. |
| − | * | + | * 코어와 코어 플러스 모듈은 UPin-27 인터페이스를 사용하고 있으며 마이크로두이노는 약간의 수정을 통해 두 보드에 포팅이 가능하다. |
|- | |- | ||
| | | | ||
| − | == | + | ==특징== |
| − | * | + | * 작고, 쌓을수 있고, 강력하다. |
| − | * | + | * 아두이노(Arduino)와 동일한 개발환경을 사용하는 오픈소프 하드웨어 |
| − | * '''[[Microduino-Core]]''' | + | * '''[[Microduino-Core/ko|마이크로두이노 코어모듈]]'''아두이노(Arduino)와 동일하게 ISP(In System Programming) 포트로 부트로더를 구울수 있다. |
| − | * | + | * 마이크로두이노의 모든 모듈은 'U'자 모양의 27핀 인터페이스(UPin-27)를 사용한다. |
| + | * 마이크로두이노 모듈과 센서들은 손쉽게 연결할 수 있으며 계속 확장할 수 있다. | ||
| + | * 2.54mm (0.1 inch) 핀피치로 되어 있어 브레드 보드와 호환된다. | ||
| − | + | ==사양== | |
| − | + | * 마이크로컨트롤러: ATmega328P/ATmega168PA | |
| − | + | * 동작주파수: 5V/3.3V | |
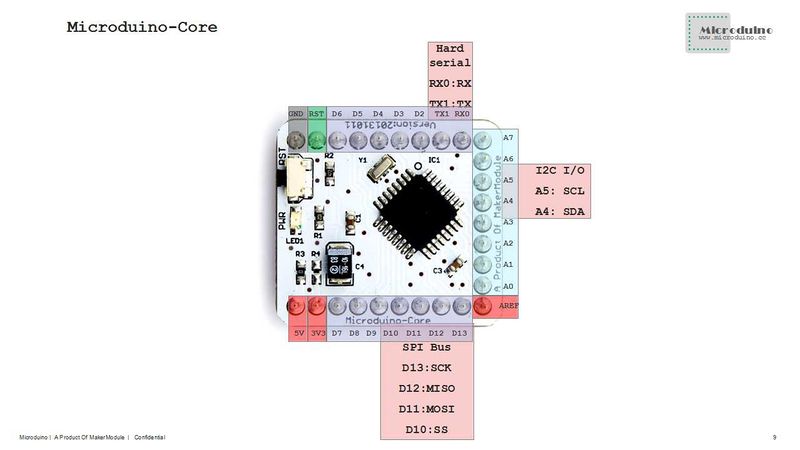
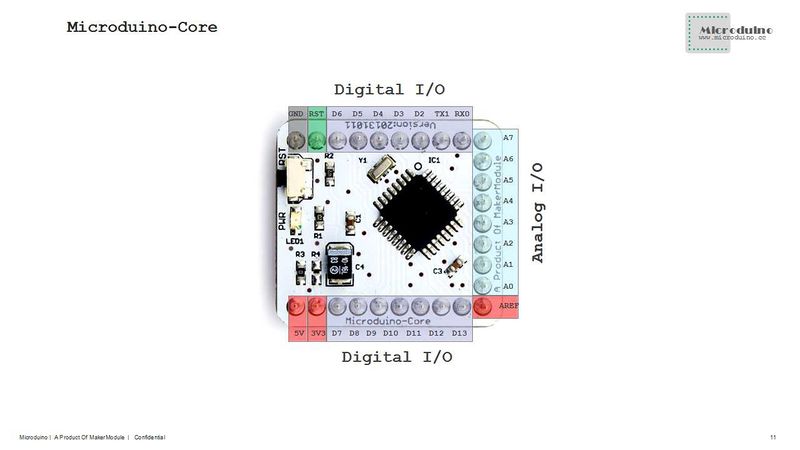
| − | + | * 디지털 I/O 핀: 14개 (이중 6개는 PWM 출력으로 사용가능 : D3,D5,D6,D9,D10, D11) | |
| − | + | * 아날로그 I/O 핀: 8개 (아두이노 우노보드보다 2개 더 많음) | |
| − | + | * I/O 핀당 DC 전류: 40 mA | |
| − | == | + | * 시리얼 포트 : 0번핀(RX), 1번핀(TX). TTL 레벨 시리얼 데이터 송수신 |
| − | * | + | * 외부 인터럽트 : 2, 3번핀. 로우 인터럽트, 상승/하강 에지 인터럽트, 상태변이 인터럽트로 사용가능하다. 자세한 사항은 attachInterrupt() 함수를 참고하라. |
| − | * | + | * PWM : 3, 5, 6, 9, 10, 11핀. analogWrite() 함수를 사용하여 8비트 PWM 출력 |
| − | * | + | * SPI : 10 (SS), 11 (MOSI), 12 (MISO), 13 (SCK). |
| − | * | + | * TWI : SDA 또는 A4, SCL 또는 A5핀 사용. Wire 라이브러리를 통해서 TWI 통신지원. |
| − | * | + | * AREF. 아날로그 입력으 기준전압. analogRefernce()를 사용한다. |
| − | * | + | * 부트로더가 사용하는 0.5KB를 포함하여 32KB(ATmega328P) 플레쉬메모리 |
| − | |||
| − | * | ||
| − | * PWM: 3, 5, 6, 9, 10, | ||
| − | * SPI: 10 (SS), 11 (MOSI), 12 (MISO), 13 (SCK) | ||
| − | |||
| − | |||
| − | * TWI: A4 | ||
| − | * AREF. | ||
| − | * | ||
* SRAM 2 KB (ATmega328P) | * SRAM 2 KB (ATmega328P) | ||
* EEPROM 1 KB (ATmega328P) | * EEPROM 1 KB (ATmega328P) | ||
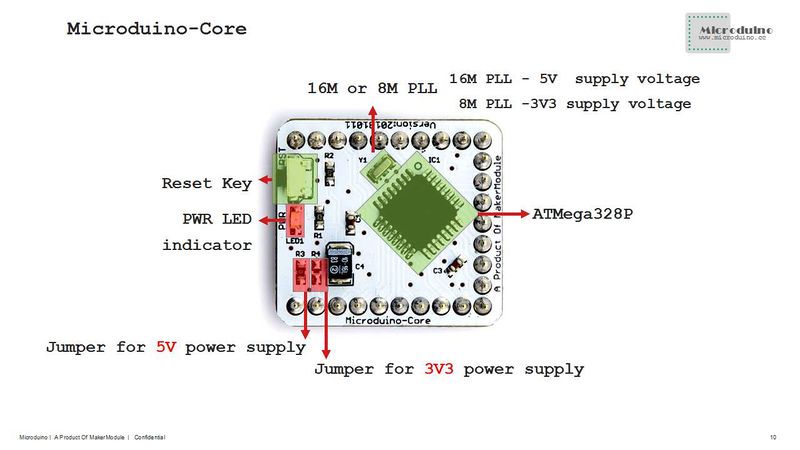
* Clock Speed 16MHz(5V) / 8Mhz(3.3V) | * Clock Speed 16MHz(5V) / 8Mhz(3.3V) | ||
| − | * | + | * 현재, '''[[Microduino-Core/ko|마이크로두이노 코어]]'''모듈은 4개의 버젼이 제공된다 |
:{|class="wikitable" | :{|class="wikitable" | ||
! Type | ! Type | ||
| 第206行: | 第200行: | ||
| | | | ||
| − | == | + | ==문서== |
| − | * '''[[Microduino-Core]]''' Eagle | + | * '''[[Microduino-Core/ko|마이크로두이노 코어]]''' Eagle 소스화일 : '''[[media:Microduino-Core.zip|다운로드]]''' |
| − | * '''[[Microduino-Core]]''' | + | * '''[[Microduino-Core/ko|마이크로두이노 코어]]''' 메인칩 ATmega168PA/328P 데이터쉬트 : '''[[media:ATmega168PA328P.pdf|다운로드]]''' |
| − | |||
|- | |- | ||
| | | | ||
| − | == | + | ==개발== |
| − | * | + | * 마이크로두이노를 위한 아두이노 IDE 설정 |
| − | + | # 아두이노(Arduino) 통합개발환경 설치 : 마이크로두이노는 아두이노와 동일한 통합개발환경(IDE)를 사용한다. '''[http://arduino.cc/en/Main/Software Arduino IDE official]'''에서 아두이노 IDE를 다운로드하고 디스크에 설치한다.(설치되있으면 다음단계로 이동) '''[http://arduino.cc/en/Reference/HomePage Reference]'''과 '''[http://arduino.cc/en/Tutorial/HomePage Workshop]'''를 참고하여 아두이노 IDE를 확인해 본다. | |
| − | + | # 마이크로두이노 패키지 패치 : '''[[https://github.com/wasdpkj/Microduino-IDE/tree/master/arduino-1.0.6-windows/hardware/Microduino 마이크로두이노 패키지]]'''를 다운로드한 후 ''' '{아두이노 설치 폴더}/hardware' ''' 폴더 밑에 압축을 푼다. 자세한 사항은 '''[[Arduino IDE Microduino Configuration|마이크로두이노를 위한 아두이노 IDE 설정하기]]'''문서를 참조한다. | |
| − | + | # 프로그래밍 : 아두이노 IDE를 이용하여 마이크로두이노 코어/코어 플러스 모듈에 프로그램을 업로드하기 위해서, '''[[Microduino-FT232R]]'''모듈을 사용할 것을 권장한다. | |
| − | + | # 마이크로두이노의 세상에 빠져라!! | |
| − | |||
* Burn Microduino BootLoader | * Burn Microduino BootLoader | ||
| − | + | # 개발자가 마이크로두이노 코어/코어 플러스 펌웨어를 업데이트했을 경우 부트로더를 구워야 한다. 개발자는 아두이노 우노 또는 부트로더가 구워져 있는 마이크로두이노 코어/코어 플러스를 이용해서 만들수 있다. | |
| − | + | # 마이크로두이노 부트로러 굽기 : '''[[Burn Bootloader to Microduino-Core/Core+ with an Arduino|관련문서 보기]]''' | |
| − | + | # 부트로더는 마이크로두이노 코어/코어 플러스 설정이 다르므로 모듈과 일치하는 것을 선택해서 구워야 한다. | |
| − | + | # 초기 부트로더는 ATmegaX8 시리즈의 'optiboot'으로 디자인되어 있으므로 단지 512 바이트의 용량만 차지한다. | |
| − | * | + | |
| + | * 아두이노 통합개발환경(IDE)에서 마이크로두이노로 프로그램 다운로딩하기 : '''[[Media:Arduino-Miccroduino-e.pdf|관련문서 보기]]''' | ||
|- | |- | ||
| | | | ||
| − | == | + | ==응용== |
| − | + | ||
| − | |||
| − | |||
| − | |||
| − | |||
|- | |- | ||
| | | | ||
| − | == | + | ==FAQ== |
| − | * | + | * 마이크로두이노를 어떻게 사용하면 되나요? |
| − | + | # 아두이노 IDE를 설치한다. | |
| − | + | # 마이크로두이노를 위한 아두이노 패키지를 다운로드한다. ['''[[https://github.com/wasdpkj/Microduino-IDE/tree/master/arduino-1.0.6-windows/hardware/Microduino 마이크로두이노 설치패키지]]'''] | |
| − | + | # 아두이노 IDE에 코드를 입력한다. 릴리즈 버전 1.0 이나 상위버전 사용을 권장한다. | |
| − | + | # 마이크로두이노 코어/코어 플러스와 마이크로두이노-USBTTL 모듈을 연결하고 아두이노 IDE에서 사용하고 있는 보드를 선택한 후 작성된 프로그램을 다운로드한다. | |
**If download failed, please check the hardware connection firstly, and then reset the board, try again | **If download failed, please check the hardware connection firstly, and then reset the board, try again | ||
| − | + | # 다운로드가 실패하면 하드웨어 연결상태를 확인하고 보드의 리셋버튼을 누른 후 다시 시도해 본다. | |
| − | * | + | # 계속 실패하면, 인터넷에서 실패정보를 찾아볼 수 있으며, 필요하면 부트로드를 다시 굽는다. 부트로더 굽는 방법은 다음 문서를 참조한다. ['''[[Burn Bootloader to Microduino-Core/Core+ with an Arduino|아두이노 IDE를 이용한 마이크로두이노 코어/코어 플러스 부트로더 굽는 방법]]'''] |
| − | + | * 3.3V 버전 보드가 출시되는가? | |
| − | * | + | # 아직없음 |
| − | + | * 마이크로두이노 코어모듈에서 PWM 핀은? | |
| − | + | # 6개의 PWM 출력을 지원하며 3, 5, 6, 9, 10, 11번핀이며, 마이크로두이노 코어 플러스도 6개의 PWM 출력을 지원하며, 7, 8, 9, 10, 22, 23번핀 이다. | |
| − | |||
| − | |||
| − | + | ==구매== | |
| − | + | * 대한민국 구매처 | |
| − | == | ||
| − | * | ||
| − | |||
| − | |||
|- | |- | ||
| | | | ||
| − | == | + | ==사진== |
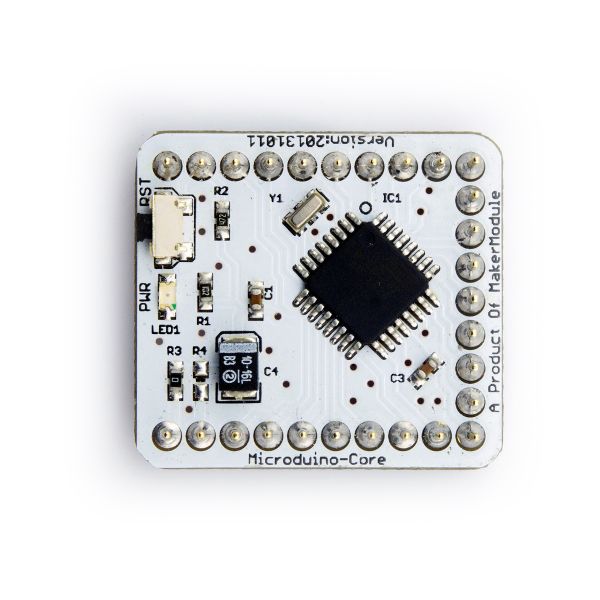
| − | :[[file:Microduino-Core-t.JPG|thumb|600px|center| | + | :[[file:Microduino-Core-t.JPG|thumb|600px|center|마이크로두이노 코어모듈 전면]] |
<br style="clear: left"/> | <br style="clear: left"/> | ||
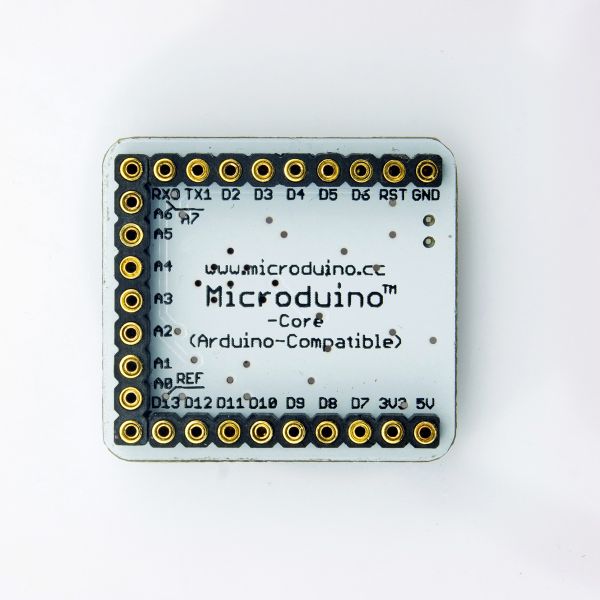
| − | :[[file:Microduino-Core-b.JPG|thumb|600px|center| | + | :[[file:Microduino-Core-b.JPG|thumb|600px|center|마이크로두이노 코어모듈 후면]] |
<br style="clear: left"/> | <br style="clear: left"/> | ||
| − | :[[file:Microduino-Core-3d.jpg|thumb|600px|center| | + | :[[file:Microduino-Core-3d.jpg|thumb|600px|center|마이크로두이노 코어모듈 3D 모델]] |
<br style="clear: left"/> | <br style="clear: left"/> | ||
| − | :[[file:Microduino-Core-Upin27.jpg|thumb|600px|center| | + | :[[file:Microduino-Core-Upin27.jpg|thumb|600px|center|마이크로두이노 코어모듈 UPin-27 model]] |
<br style="clear: left"/> | <br style="clear: left"/> | ||
|} | |} | ||
2014年12月4日 (四) 14:18的最新版本
| Language | English |
|---|
|
마이크로두이노 코어모듈는 마이크로두이노 시리즈 코어 모듈중에 하나이다. 마이크로두이노 코어모듈는 아두이노 우노(UNO) 보드와 호환되는 오픈 소스 하드웨어이다. Atmel사의 ATmega328P/ATmega168PA 시리즈를 기반으로 한 8비트 마이크로컨트롤러 개발보드이다. 아두이노 우노보드와 비교해 보면, 마이크로두이노 코어모듈의 특징은 아래와 같다.
마이크로두이노는 아두이노와 동일한 개발환경을 사용하고 있고, 아두이노 IDE, 프로세싱을 이용하여 아이디어를 현실화하고 시제품을 개발하고 소량생산 할 수 있다. 마이크로두이노는 optiboot 부트로더를 사용하고 있으므로 아두이노 디폴트 엔진보다 작은 메모리를 사용하여 프로그램 업로딩을 최적화했다. 현재, 마이크로두이노 코어모듈은 4개 다른 구성을 가지고 있다.
주파수와 공급전원의 설정:
| |||||||||||||||||||||||||||||||||||||||||||
마이크로두이노 코어/코어 플러스 비교
| |||||||||||||||||||||||||||||||||||||||||||
특징
사양
| |||||||||||||||||||||||||||||||||||||||||||
문서
| |||||||||||||||||||||||||||||||||||||||||||
개발
| |||||||||||||||||||||||||||||||||||||||||||
응용 | |||||||||||||||||||||||||||||||||||||||||||
FAQ
구매
| |||||||||||||||||||||||||||||||||||||||||||
사진
|
