“MicroMV 人脸识别”的版本间的差异
(→基本原理) |
502748957@qq.com(讨论 | 贡献) |
||
| (未显示另一用户的1个中间版本) | |||
| 第58行: | 第58行: | ||
效果如下: | 效果如下: | ||
[[File:microMVGettingStart8.png||600px|center]] | [[File:microMVGettingStart8.png||600px|center]] | ||
| + | |||
| + | |||
| + | |||
| + | |||
| + | [[MicroMV 简介|返回MicroMV目录页面]] | ||
2018年12月7日 (五) 03:19的最新版本
基本原理
- MicroMV捕捉人脸得到人脸坐标
MicroMV的代码准备
# Face Detection Example
#
# This example shows off the built-in face detection feature of the OpenMV Cam.
#
# Face detection works by using the Haar Cascade feature detector on an image. A
# Haar Cascade is a series of simple area contrasts checks. For the built-in
# frontalface detector there are 25 stages of checks with each stage having
# hundreds of checks a piece. Haar Cascades run fast because later stages are
# only evaluated if previous stages pass. Additionally, your OpenMV Cam uses
# a data structure called the integral image to quickly execute each area
# contrast check in constant time (the reason for feature detection being
# grayscale only is because of the space requirment for the integral image).

import sensor, time, image

# Reset sensor
sensor.reset()

# Sensor settings
sensor.set_contrast(1)
sensor.set_gainceiling(16)
# HQVGA and GRAYSCALE are the best for face tracking.
sensor.set_framesize(sensor.HQVGA)
sensor.set_pixformat(sensor.GRAYSCALE)

# Load Haar Cascade
# By default this will use all stages, lower satges is faster but less accurate.
face_cascade = image.HaarCascade("frontalface", stages=25)
print(face_cascade)

# FPS clock
clock = time.clock()

while (True):
    clock.tick()

    # Capture snapshot
    img = sensor.snapshot()

    # Find objects.
    # Note: Lower scale factor scales-down the image more and detects smaller objects.
    # Higher threshold results in a higher detection rate, with more false positives.
    objects = img.find_features(face_cascade, threshold=0.75, scale_factor=1.25)

    # Draw objects
    for r in objects:
        img.draw_rectangle(r)

    # Print FPS.
    # Note: Actual FPS is higher, streaming the FB makes it slower.
    print(clock.fps())
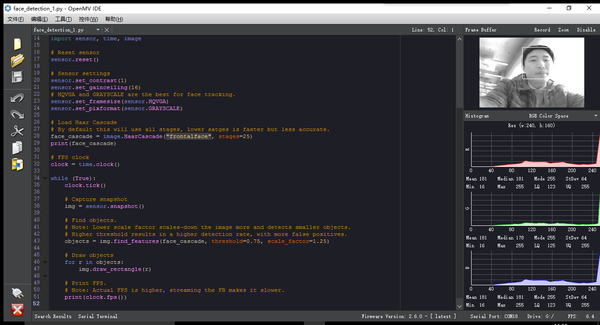
效果如下:
