“Sensor-Number”的版本间的差异
502748957@qq.com(讨论 | 贡献) |
|||
| (未显示4个用户的10个中间版本) | |||
| 第1行: | 第1行: | ||
{| style="width: 800px;" | {| style="width: 800px;" | ||
|- | |- | ||
| − | |[[File: | + | |[[File: Sensor-Number-rect.jpg|300px|left]] || |
::<p style="color: #000000;font-size:200%"><br><br><br><br><br>'''Sensor-Number'''</p> | ::<p style="color: #000000;font-size:200%"><br><br><br><br><br>'''Sensor-Number'''</p> | ||
::产品编号:'''<big style="color: #00A0A6">MSLL41</big>''' | ::产品编号:'''<big style="color: #00A0A6">MSLL41</big>''' | ||
|- | |- | ||
|[[File: Add-to-cart.jpg|300px|left|link=https://shop108263663.taobao.com/?spm=a230r.7195193.1997079397.2.ek3cAW]]|| | |[[File: Add-to-cart.jpg|300px|left|link=https://shop108263663.taobao.com/?spm=a230r.7195193.1997079397.2.ek3cAW]]|| | ||
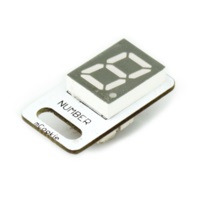
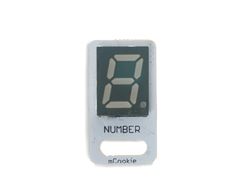
| − | ::<p style="color: #000000;font-size:120%"> | + | ::<p style="color: #000000;font-size:120%">Sensor-Number是8段数码管模块,通常用来显示数字,也可控制每段显示一些简单字符。内嵌了一个STM8芯片用于驱动八个单独LED并与核心通信。它采用串口通信,波特率9600。可以使用单线串行级联,只需一个引脚就可以控制线路上每个数码管,可以无限级联。</p> |
|} | |} | ||
<br> | <br> | ||
| 第48行: | 第48行: | ||
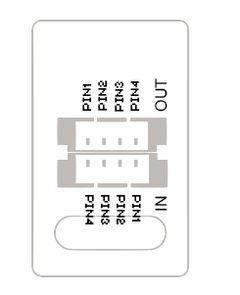
**PIN2:VCC | **PIN2:VCC | ||
**PIN3:NC | **PIN3:NC | ||
| − | ** | + | **PIN4:数字信号输出 |
|width="35%" valign="top" align="center"| | |width="35%" valign="top" align="center"| | ||
[[file: Sensor-Number-INOUT.JPG|240px|center]] | [[file: Sensor-Number-INOUT.JPG|240px|center]] | ||
| 第64行: | 第64行: | ||
您可以通过[[AVR核心:Getting_started/zh|Getting Started]]了解使用Arduino IDE编程控制模块。【Sensor_Number】库参考页面提供了有关如何使用数码管的完整详细信息和示例。 | 您可以通过[[AVR核心:Getting_started/zh|Getting Started]]了解使用Arduino IDE编程控制模块。【Sensor_Number】库参考页面提供了有关如何使用数码管的完整详细信息和示例。 | ||
*<p style="font-size:125%">库语法手册</p>[[Sensor_Number_Reference]] | *<p style="font-size:125%">库语法手册</p>[[Sensor_Number_Reference]] | ||
| − | *<p style="font-size:125%">库GitLab下载</p>[https://git.microduino.cn/hardware/libraries/tree/master/ | + | *<p style="font-size:125%">库GitLab下载</p>[https://git.microduino.cn/hardware/libraries/tree/master/_07_m_Sensor_Number Sensor_Number库下载] |
<br> | <br> | ||
| − | + | ||
<br> | <br> | ||
---- | ---- | ||
| 第82行: | 第82行: | ||
*为什么数码管设置亮度为0时,不会灭? | *为什么数码管设置亮度为0时,不会灭? | ||
**数码管做了限制,亮度只能在50到255之间可选。 | **数码管做了限制,亮度只能在50到255之间可选。 | ||
| + | *为什么数码管会闪烁? | ||
| + | **控制一个数码管指令需要6ms,确保重复执行时间不能过快。 | ||
<br> | <br> | ||
<br> | <br> | ||
| 第97行: | 第99行: | ||
|width="50%" valign="top" align="left"| | |width="50%" valign="top" align="left"| | ||
[[file: Sensor-Number-F.JPG|250px|center]] | [[file: Sensor-Number-F.JPG|250px|center]] | ||
| − | |||
| − | |||
|} | |} | ||
|} | |} | ||
| + | |||
| + | |||
| + | [[MCookie 传感器系列|返回Sensor界面]] | ||
| + | <br> | ||
| + | <br> | ||
2018年12月24日 (一) 09:55的最新版本
| |
|
|
技术规格
引脚
编程手册 您可以通过Getting Started了解使用Arduino IDE编程控制模块。【Sensor_Number】库参考页面提供了有关如何使用数码管的完整详细信息和示例。
相关教程
Q&A
历史 已是最新版本
图库 |


