|
|
| (未显示同一用户的1个中间版本) |
| 第73行: |
第73行: |
| | |} | | |} |
| | | | |
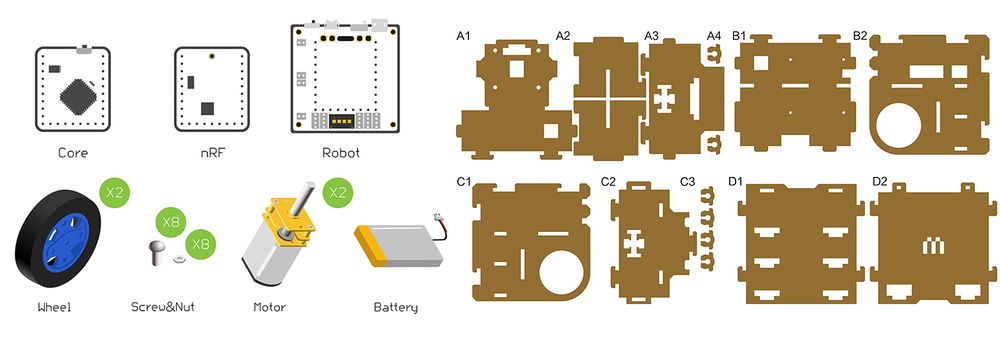
| − | [[File:Boxz物料.jpg||900px|center]] | + | [[File:Cube Robot Material List.jpg||1000px|center]] |
| | | | |
| | ==实验原理== | | ==实验原理== |
| 第107行: |
第107行: |
| | | | |
| | ==拼装过程== | | ==拼装过程== |
| − | {| border="0" cellpadding="10" width="100%"
| |
| − | |-
| |
| − | |width="50%" valign="top" align="left"|
| |
| | | | |
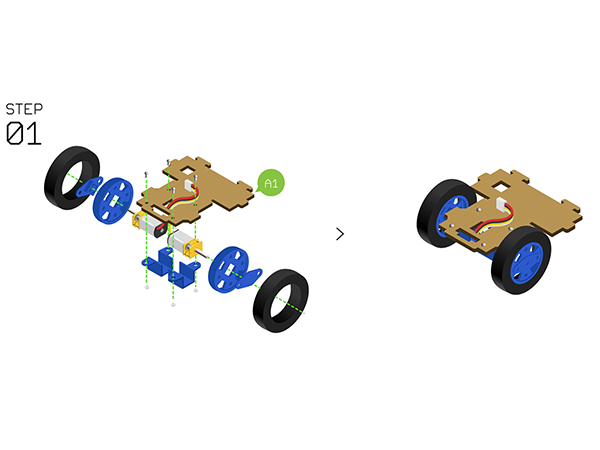
| − | *Step1:
| + | [[File:Cube Robot 1.jpg||1000px|center]] |
| − | *利用电机固定座将两个作为动力的N20减速电机固定在结构-A1上
| + | <br> |
| − | *将车轮、轮胎、联轴器组装后与固定后的N20减速电机进行装配
| + | [[File:Cube Robot 2.jpg||1000px|center]] |
| − | | + | <br> |
| − | | + | [[File:Cube Robot 3.jpg||1000px|center]] |
| − | |width="50%" valign="top" align="left"|
| + | <br> |
| − | | + | [[File:Cube Robot 4.jpg||1000px|center]] |
| − | [[File:Cubestep1.jpg||535px|center]] | + | <br> |
| − | | + | [[File:Cube Robot 5.jpg||1000px|center]] |
| − | |}
| + | <br> |
| − | | + | [[File:Cube Robot 6.jpg||1000px|center]] |
| − | {| border="0" cellpadding="10" width="100%"
| |
| − | |-
| |
| − | |width="50%" valign="top" align="left"|
| |
| − | | |
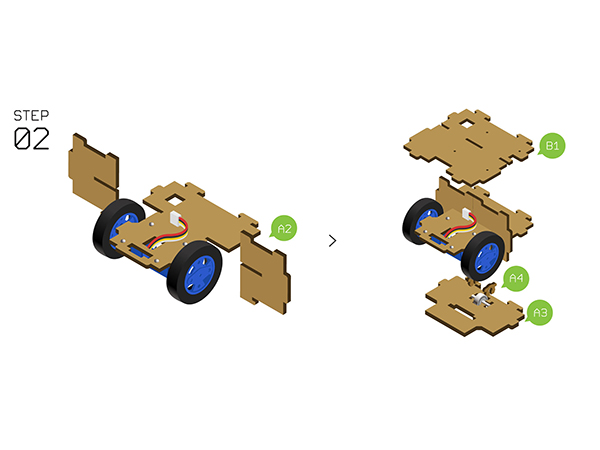
| − | *Step2:
| |
| − | *将结构-A2垂直插入结构-A1两边的凹进结构
| |
| − | *用两个结构-A4将辅助轮从底部固定在结构-A3上
| |
| − | *再如图示将结构-A3和结构-B1从上到下依次准备好
| |
| − | | |
| − | | |
| − | |width="50%" valign="top" align="left"|
| |
| − | | |
| − | [[File:Cubestep2.jpg||535px|center]] | |
| − | | |
| − | |}
| |
| − | | |
| − | {| border="0" cellpadding="10" width="100%"
| |
| − | |-
| |
| − | |width="50%" valign="top" align="left"|
| |
| − | | |
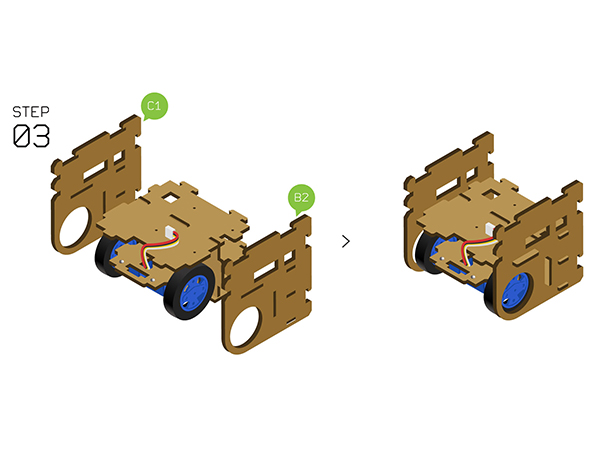
| − | *Step3:
| |
| − | *将结构-B2和结构-C1分别用于两侧面固定
| |
| − | | |
| − | |width="50%" valign="top" align="left"|
| |
| − | | |
| − | [[File:Cubestep3.jpg||535px|center]] | |
| − | | |
| − | |}
| |
| − | | |
| − | | |
| − | {| border="0" cellpadding="10" width="100%"
| |
| − | |-
| |
| − | |width="50%" valign="top" align="left"|
| |
| − | | |
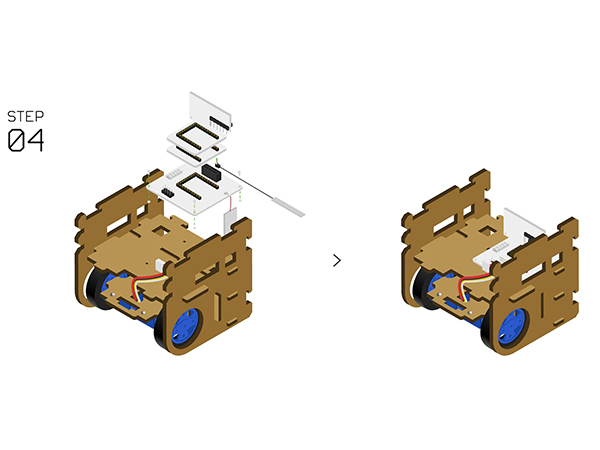
| − | *Step4:
| |
| − | *将以下模块堆叠在[[Microduino-Shield Robot/zh]]底板上
| |
| − | **核心模块:[[Microduino-Core/zh]]模块
| |
| − | **通讯模块:
| |
| − | ***Joypad模式下,通讯模块为[[Microduino-Module nRF/zh]](注意先安装天线)
| |
| − | ***蓝牙模式下,通讯模块为[[Microduino-Module BLE/zh]]
| |
| − | *将电池连接在[[Microduino-Shield Robot/zh]]底板的电池接口
| |
| − | *将两个N20减速电机分别连在[[Microduino-Shield Robot/zh]]底板的电机接口A.A/A.B上
| |
| − | *使用螺丝将[[Microduino-Shield Robot/zh]]底板固定在结构-B1上
| |
| − | | |
| − | |width="50%" valign="top" align="left"|
| |
| − | | |
| − | [[File:Cubestep4.jpg||535px|center]] | |
| − | | |
| − | |}
| |
| − | | |
| − | {| border="0" cellpadding="10" width="100%"
| |
| − | |-
| |
| − | |width="50%" valign="top" align="left"|
| |
| − | | |
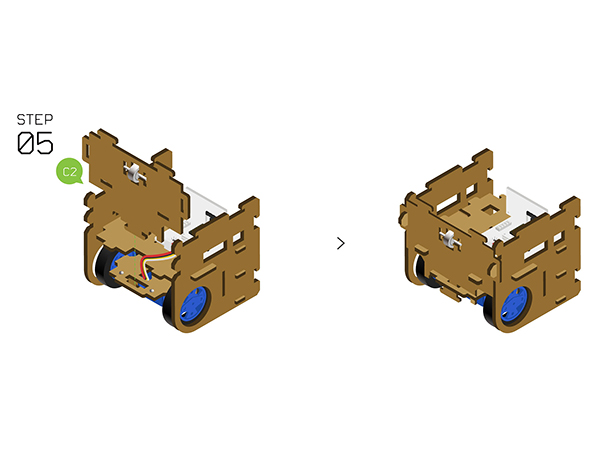
| − | *Step5:
| |
| − | *用两个结构-C3将辅助轮从底部固定在结构-C2上
| |
| − | *将结构-C2拼接在正侧面
| |
| − | | |
| − | |width="50%" valign="top" align="left"|
| |
| − | | |
| − | [[File:Cubestep5.jpg||535px|center]] | |
| − | | |
| − | |}
| |
| − | | |
| − | | |
| − | {| border="0" cellpadding="10" width="100%"
| |
| − | |-
| |
| − | |width="50%" valign="top" align="left"|
| |
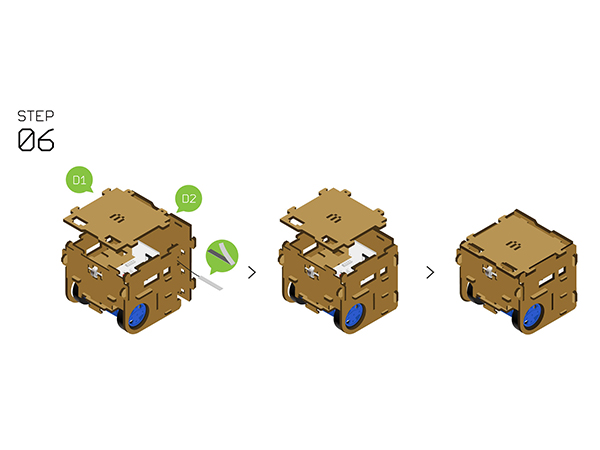
| − | *Step6:
| |
| − | *将结构-D2拼接在后侧面,可利用天线背面贴纸将天线贴在任意位置
| |
| − | *将结构-D1作为顶面盖住,安装到此完成
| |
| − | | |
| − | |width="50%" valign="top" align="left"|
| |
| − | | |
| − | [[File:Cubestep6.jpg||535px|center]] | |
| − | | |
| − | |}
| |
| | | | |
| | ==操作说明== | | ==操作说明== |
