“开源音乐播放器/zh”的版本间的差异
(→存储音频) |
1196357542(讨论 | 贡献) |
||
| (未显示7个用户的31个中间版本) | |||
| 第14行: | 第14行: | ||
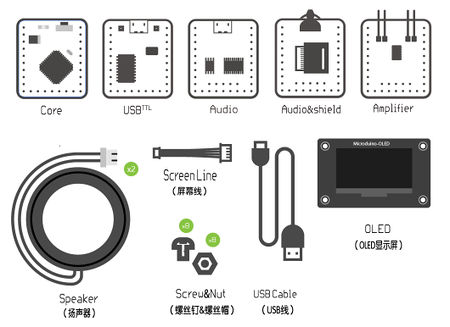
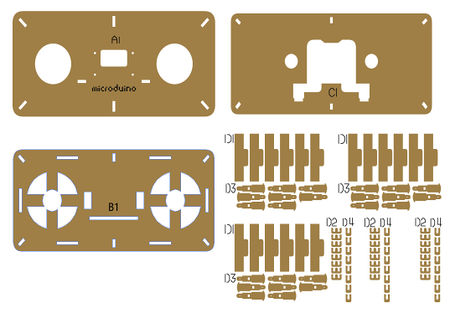
==材料清单== | ==材料清单== | ||
| − | + | {| border="0" cellpadding="10" width="100%" | |
| + | |- | ||
| + | |width="50%" valign="top" align="left"| | ||
| + | ===Microduino设备=== | ||
{|class="wikitable" | {|class="wikitable" | ||
|- | |- | ||
| 第25行: | 第28行: | ||
|[[Microduino-Audio/zh]](with shield) ||1||解码,存储音乐文件 | |[[Microduino-Audio/zh]](with shield) ||1||解码,存储音乐文件 | ||
|- | |- | ||
| − | |[[Microduino-Amplifier/zh]] ||1|| | + | |[[Microduino-Amplifier/zh]] ||1||公放 |
|- | |- | ||
|[[Microduino-OLED/zh]] ||1||显示 | |[[Microduino-OLED/zh]] ||1||显示 | ||
| 第31行: | 第34行: | ||
|[[Microduino-Cube-S1/zh]] ||1||扩展板OLED接口 | |[[Microduino-Cube-S1/zh]] ||1||扩展板OLED接口 | ||
|} | |} | ||
| − | + | |width="50%" valign="top" align="left"| | |
| + | |||
| + | ===其他设备=== | ||
{|class="wikitable" | {|class="wikitable" | ||
|- | |- | ||
| 第52行: | 第57行: | ||
|M2尼龙螺母 ||8||固定 | |M2尼龙螺母 ||8||固定 | ||
|} | |} | ||
| − | + | |} | |
| − | [[File: | + | {| border="0" cellpadding="10" width="100%" |
| − | [[File: | + | |- |
| + | |width="50%" valign="top" align="left"| | ||
| + | [[File:Musicmaterial1.jpg||450px|center]] | ||
| + | |width="50%" valign="top" align="left"| | ||
| + | [[File:Musicmaterial2.jpg||450px|center]] | ||
| + | |} | ||
==程序下载== | ==程序下载== | ||
| − | + | *音乐播放器代码Github:[https://github.com/Microduino/SimplePlayer_Microduino SimplePlayer_Microduino] | |
| − | 音乐播放器代码Github:[https://github.com/Microduino/ | ||
==程序烧写== | ==程序烧写== | ||
| − | *将 | + | *将[[Microduino-Core/zh]]、[[Microduino-USBTTL/zh]]堆叠在一起。 |
| − | **用数据线连接其中的 | + | **用数据线连接其中的[[Microduino-USBTTL/zh]]准备上传程序。 |
**注意:最好不要将所有模块堆叠在一起之后再上传程序 | **注意:最好不要将所有模块堆叠在一起之后再上传程序 | ||
| − | *打开Arduino IDE for Microduino,环境,(搭建参考: | + | *打开Arduino IDE for Microduino,环境,(搭建参考:[[AVR核心:Getting started/zh]]) |
| − | * | + | *点击【工具】,确认板卡(Microduino-Core)处理器(Atmega328P@16M,5V)选择无误,并选中对应端口号(COMX) |
| − | * | + | *点击【文件】->【打开】,浏览到项目程序地址,点击“Simple_player_V2.ino”程序打开 |
| − | *几项都无误后,点击 | + | *几项都无误后,点击"→"按钮下载程序到开发板上 |
==存储音频== | ==存储音频== | ||
*音频文件需要提前储存在储存器,播放器就可以对其进行播放,有两种储存方式: | *音频文件需要提前储存在储存器,播放器就可以对其进行播放,有两种储存方式: | ||
| − | **模块板载FLASH: | + | **模块板载FLASH:[[Microduino-Audio/zh]]板载了4MByte的FLASH |
| − | ***音频存储方法请参考以下页面: | + | ***音频存储方法请参考以下页面:[https://www.microduino.cn/wiki/index.php/Microduino-Module_Audio/zh#.E5.BC.80.E5.8F.91 音频下载] |
| − | **SD外扩容量:使用 | + | **SD外扩容量:使用[[Microduino-Audio/zh]]模块的Shield模块进行MicroSD卡扩容 |
***SD卡最大支持32G容量 | ***SD卡最大支持32G容量 | ||
==搭建步骤== | ==搭建步骤== | ||
| − | * | + | {| border="0" cellpadding="10" width="100%" |
| − | *按图1- | + | |- |
| − | * | + | |width="50%" valign="top" align="left"| |
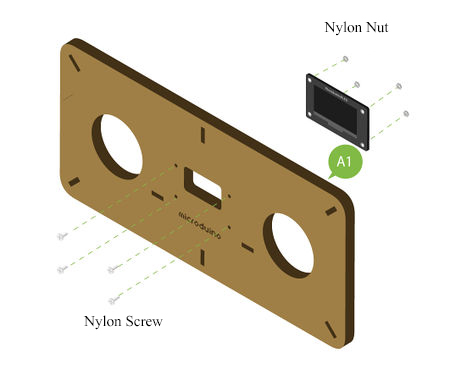
| + | *Step1: | ||
| + | *按图1-1所示用尼龙螺丝和尼龙螺母将[[Microduino-OLED/zh]]固定在结构-A1上 | ||
| + | *注意:注意OLED显示屏的安装方向,请以“Microduino”LOGO作为参考,LOGO位于正方向,说明安装方向正确。 | ||
| + | |width="50%" valign="top" align="left"| | ||
[[File:Musicstep1-1.jpg||450px|center]] | [[File:Musicstep1-1.jpg||450px|center]] | ||
| + | |} | ||
| + | {| border="0" cellpadding="10" width="100%" | ||
| + | |- | ||
| + | |width="50%" valign="top" align="left"| | ||
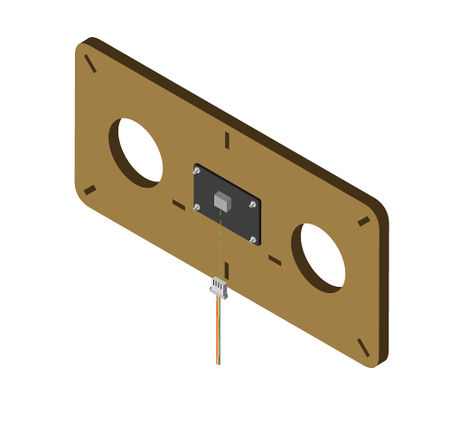
*OLED显示屏安装完后,请将传感器线接入OLED背面的接口 | *OLED显示屏安装完后,请将传感器线接入OLED背面的接口 | ||
| + | |width="50%" valign="top" align="left"| | ||
[[File:Musicstep1-2.jpg||450px|center]] | [[File:Musicstep1-2.jpg||450px|center]] | ||
| − | * | + | |} |
| − | *按图2- | + | {| border="0" cellpadding="10" width="100%" |
| + | |- | ||
| + | |width="50%" valign="top" align="left"| | ||
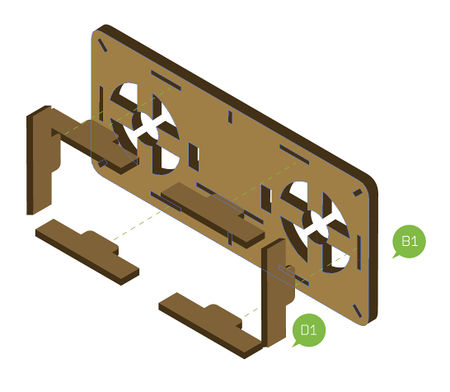
| + | *Step2: | ||
| + | *按图2-1所示将结构-D1插入结构-B1的对应接口 | ||
| + | |width="50%" valign="top" align="left"| | ||
[[File:Musicstep2-1.jpg||450px|center]] | [[File:Musicstep2-1.jpg||450px|center]] | ||
| − | *按图2- | + | |} |
| + | {| border="0" cellpadding="10" width="100%" | ||
| + | |- | ||
| + | |width="50%" valign="top" align="left"| | ||
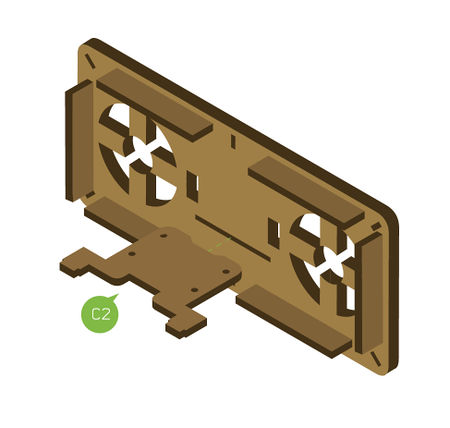
| + | *按图2-2所示将结构-C2插入结构-B1的对应接口 | ||
| + | |width="50%" valign="top" align="left"| | ||
[[File:Musicstep2-2.jpg||450px|center]] | [[File:Musicstep2-2.jpg||450px|center]] | ||
| − | * | + | |} |
| + | {| border="0" cellpadding="10" width="100%" | ||
| + | |- | ||
| + | |width="50%" valign="top" align="left"| | ||
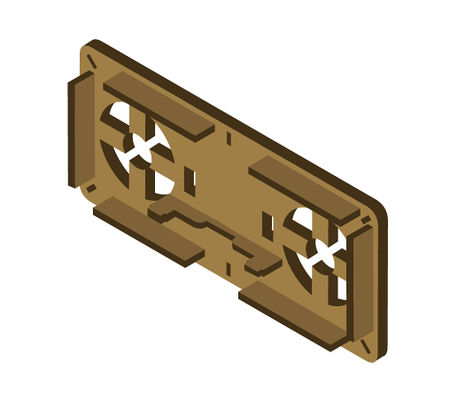
| + | *步骤2完成后组成播放器骨架 | ||
| + | |width="50%" valign="top" align="left"| | ||
[[File:Musicstep2-3.jpg||450px|center]] | [[File:Musicstep2-3.jpg||450px|center]] | ||
| − | * | + | |} |
| − | *按图3- | + | {| border="0" cellpadding="10" width="100%" |
| + | |- | ||
| + | |width="50%" valign="top" align="left"| | ||
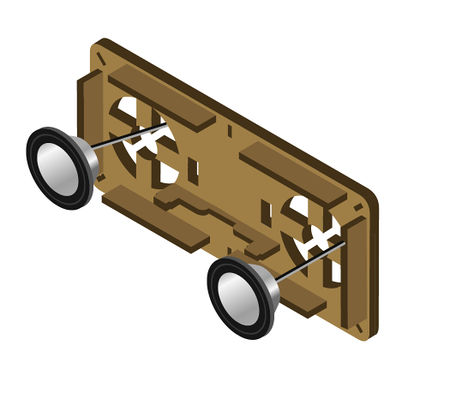
| + | *Step3: | ||
| + | *按图3-1所示将喇叭嵌入如图位置,注意喇叭的安装方向,喇叭线需要提前穿到结构-B1后面 | ||
| + | |width="50%" valign="top" align="left"| | ||
[[File:Musicstep3-1.jpg||450px|center]] | [[File:Musicstep3-1.jpg||450px|center]] | ||
| − | *按图3- | + | |} |
| + | {| border="0" cellpadding="10" width="100%" | ||
| + | |- | ||
| + | |width="50%" valign="top" align="left"| | ||
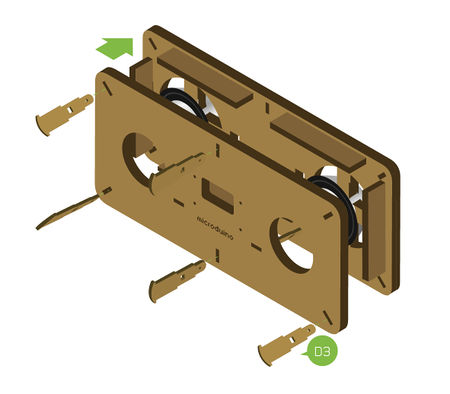
| + | *按图3-2所示将安装好OLED显示屏的结构-A1拼到播放器骨架的前面,然后用结构-D3卡入结构-A1和结构-B1的卡槽内 | ||
| + | |width="50%" valign="top" align="left"| | ||
[[File:Musicstep3-2.jpg||450px|center]] | [[File:Musicstep3-2.jpg||450px|center]] | ||
| + | |} | ||
| + | {| border="0" cellpadding="10" width="100%" | ||
| + | |- | ||
| + | |width="50%" valign="top" align="left"| | ||
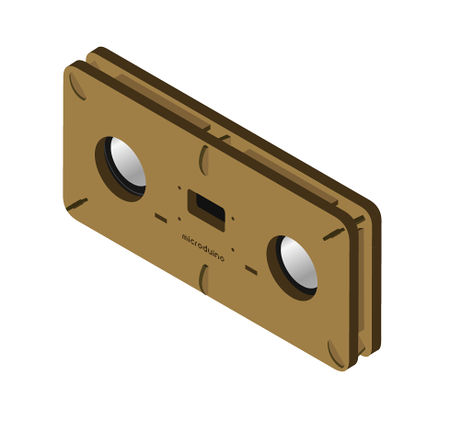
*步骤3完成后播放器的正面已组装完成 | *步骤3完成后播放器的正面已组装完成 | ||
| + | |width="50%" valign="top" align="left"| | ||
[[File:Musicstep3-3.jpg||450px|center]] | [[File:Musicstep3-3.jpg||450px|center]] | ||
| − | * | + | |} |
| − | *按图4- | + | {| border="0" cellpadding="10" width="100%" |
| + | |- | ||
| + | |width="50%" valign="top" align="left"| | ||
| + | *Step4: | ||
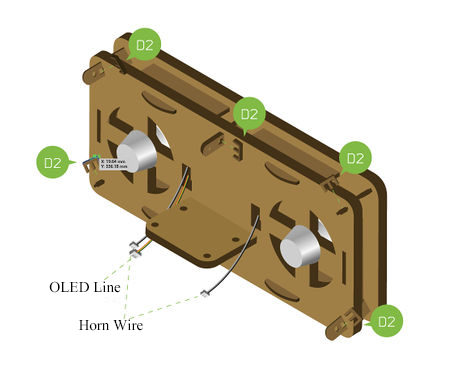
| + | *按图4-1所示翻到播放器的背面,用结构-D2卡住结构-D3的卡槽 | ||
| + | **注意用力均匀,避免用力过大折断,同时将2个喇叭线和OLED线从背面的过孔穿出来 | ||
| + | |width="50%" valign="top" align="left"| | ||
[[File:Musicstep4-1.jpg||450px|center]] | [[File:Musicstep4-1.jpg||450px|center]] | ||
| − | *按图4- | + | |} |
| + | {| border="0" cellpadding="10" width="100%" | ||
| + | |- | ||
| + | |width="50%" valign="top" align="left"| | ||
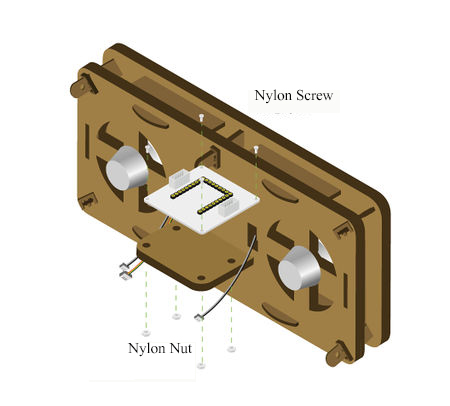
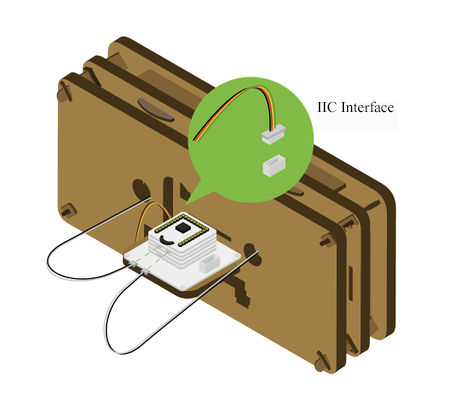
| + | *按图4-2所示用尼龙螺丝、尼龙螺柱和尼龙螺母将[[Microduino-Cube-S1/zh]]底板固定在结构-C2上 | ||
| + | **注意[[Microduino-Cube-S1/zh]]底板上的USB口需要朝外 | ||
| + | |width="50%" valign="top" align="left"| | ||
[[File:Musicstep4-2.jpg||450px|center]] | [[File:Musicstep4-2.jpg||450px|center]] | ||
| + | |} | ||
| + | {| border="0" cellpadding="10" width="100%" | ||
| + | |- | ||
| + | |width="50%" valign="top" align="left"| | ||
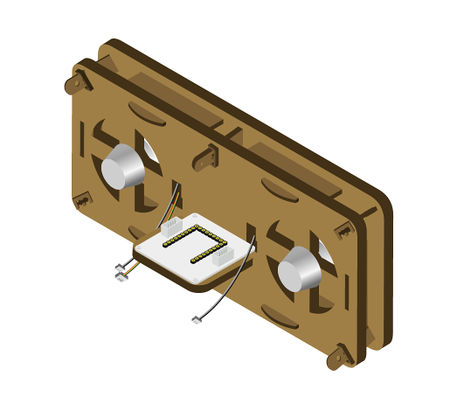
*步骤4完成组成图如下: | *步骤4完成组成图如下: | ||
| + | |width="50%" valign="top" align="left"| | ||
[[File:Musicstep4-3.jpg||450px|center]] | [[File:Musicstep4-3.jpg||450px|center]] | ||
| − | * | + | |} |
| − | *按图5- | + | {| border="0" cellpadding="10" width="100%" |
| + | |- | ||
| + | |width="50%" valign="top" align="left"| | ||
| + | *Step5: | ||
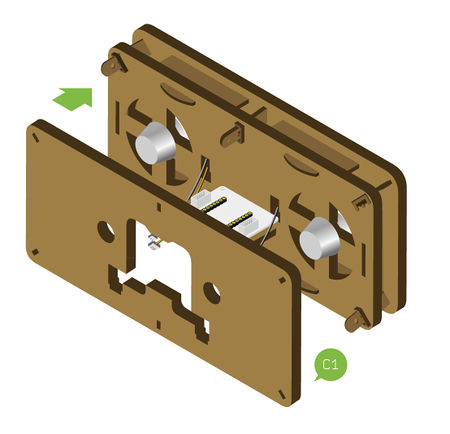
| + | *按图5-1所示将结构-C1插在播放器的背面 | ||
| + | |width="50%" valign="top" align="left"| | ||
[[File:Musicstep5-1.jpg||450px|center]] | [[File:Musicstep5-1.jpg||450px|center]] | ||
| − | *按图5- | + | |} |
| + | {| border="0" cellpadding="10" width="100%" | ||
| + | |- | ||
| + | |width="50%" valign="top" align="left"| | ||
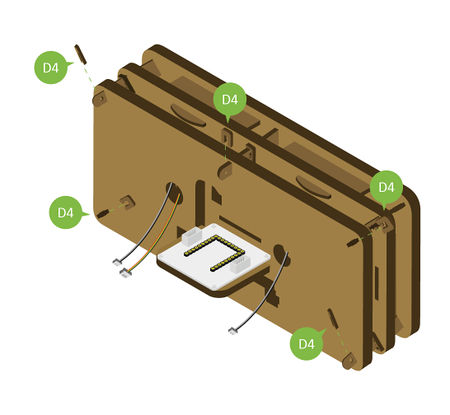
| + | *按图5-2所示用结构-D4卡住结构-C1的边角,同时将2个喇叭线和OLED线从结构-C1的过孔穿出来 | ||
| + | |width="50%" valign="top" align="left"| | ||
[[File:Musicstep5-2.jpg||450px|center]] | [[File:Musicstep5-2.jpg||450px|center]] | ||
| − | *按图5-3所示将以下模块叠加到[[Microduino-Cube-S1/zh]]底板上, | + | |} |
| + | {| border="0" cellpadding="10" width="100%" | ||
| + | |- | ||
| + | |width="50%" valign="top" align="left"| | ||
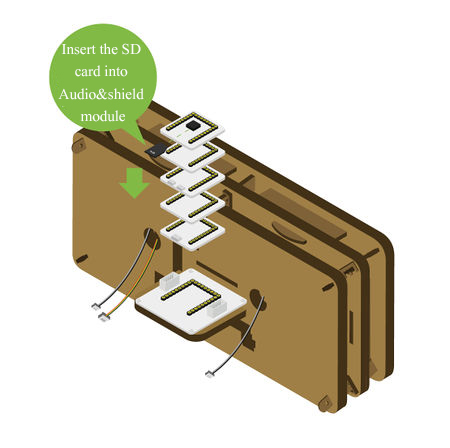
| + | *按图5-3所示将以下模块叠加到[[Microduino-Cube-S1/zh]]底板上,注意提前将MicroSD卡安装到[[Microduino-Module Audio/zh]]的Shield模块上 | ||
**[[Microduino-Core/zh]] | **[[Microduino-Core/zh]] | ||
**[[Microduino-Module Audio/zh]] | **[[Microduino-Module Audio/zh]] | ||
**[[Microduino-Module Amplifier/zh]] | **[[Microduino-Module Amplifier/zh]] | ||
| + | |width="50%" valign="top" align="left"| | ||
[[File:Musicstep5-3.jpg||450px|center]] | [[File:Musicstep5-3.jpg||450px|center]] | ||
| − | * | + | |} |
| − | *按图6-1所示将OLED线接到到[[Microduino-Cube-S1/zh]]底板左侧的IIC接口(接口附近标有SCL, | + | {| border="0" cellpadding="10" width="100%" |
| + | |- | ||
| + | |width="50%" valign="top" align="left"| | ||
| + | *Step6: | ||
| + | *按图6-1所示将OLED线接到到[[Microduino-Cube-S1/zh]]底板左侧的IIC接口(接口附近标有SCL,SDA字样) | ||
| + | *再将2个喇叭线接到[[Microduino-Module Amplifier/zh]]模块上的音频接口 | ||
| + | |width="50%" valign="top" align="left"| | ||
[[File:Musicstep6-1.jpg||450px|center]] | [[File:Musicstep6-1.jpg||450px|center]] | ||
| − | * | + | |} |
| + | {| border="0" cellpadding="10" width="100%" | ||
| + | |- | ||
| + | |width="50%" valign="top" align="left"| | ||
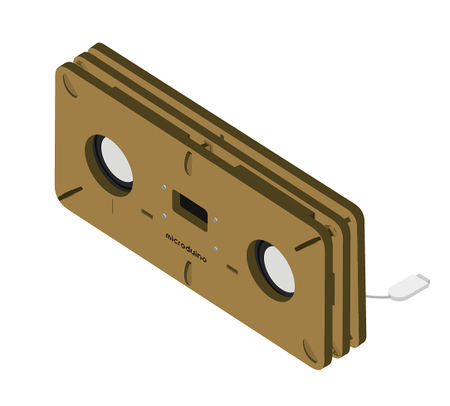
| + | *至此开源音乐播放器已搭建完成 | ||
| + | |width="50%" valign="top" align="left"| | ||
[[File:Musicstep6-2.jpg||450px|center]] | [[File:Musicstep6-2.jpg||450px|center]] | ||
| + | |} | ||
==操作说明== | ==操作说明== | ||
===播放器供电=== | ===播放器供电=== | ||
| − | *按下图所示,将USB供电线接到[[Microduino-Cube-S1/zh]] | + | *按下图所示,将USB供电线接到[[Microduino-Cube-S1/zh]]底板的USB接口上 |
| + | **USB供电可使用电脑USB口,USB充电器,移动电源等多种形式 | ||
[[File:Musicpower.jpg||600px|center]] | [[File:Musicpower.jpg||600px|center]] | ||
| + | |||
===播放器使用=== | ===播放器使用=== | ||
| − | *在[[Microduino-Module Audio | + | *在[[Microduino-Module Audio/zh]]的shield模块上有一个拨轮开关,可通关该拨轮开关控制音乐播放,控制方式如下 |
{|class="wikitable" | {|class="wikitable" | ||
|- | |- | ||
| 第142行: | 第236行: | ||
|拨轮右长拨||播放音量增加 | |拨轮右长拨||播放音量增加 | ||
|} | |} | ||
| − | * | + | *播放器上电之后默认是选中SD卡的第一首歌曲,并处于暂停状态,可以按一下拨轮开始播放音乐 |
*播放器的音量范围是0~30,数字越大,音量越大,播放器默认选择音量20 | *播放器的音量范围是0~30,数字越大,音量越大,播放器默认选择音量20 | ||
==代码说明== | ==代码说明== | ||
| − | * | + | *在“userDef.h”文件是我们的配置文件 |
*以下代码可以设置拨轮开关的阈值 | *以下代码可以设置拨轮开关的阈值 | ||
<source lang = "cpp"> | <source lang = "cpp"> | ||
| − | #define PUSH_BUTTON 50 | + | #define PUSH_BUTTON 50 //如果这个值无效,请改成 50 |
| − | #define LEFT_BUTTON 100 | + | #define LEFT_BUTTON 100 150 |
| − | #define RIGHT_BUTTON 200 | + | #define RIGHT_BUTTON 200 250 |
</source> | </source> | ||
*如果发生:只能增加音量不能减少音量,只能增加歌曲号不能减少歌曲号,或反之。 | *如果发生:只能增加音量不能减少音量,只能增加歌曲号不能减少歌曲号,或反之。 | ||
| − | + | 原因:“userDef.h”中拨轮开关阈值设定不合理。 | |
{|class="wikitable" | {|class="wikitable" | ||
|- | |- | ||
| 第167行: | 第261行: | ||
|向右 ||2.6||531.96||450~600 | |向右 ||2.6||531.96||450~600 | ||
|} | |} | ||
| − | + | 请在“userDef.h”中更改阈值设定到拨轮的实际使用值 | |
==视频== | ==视频== | ||
| + | |||
| + | |||
| + | <br> | ||
| + | <br> | ||
| + | ==新版== | ||
| + | [[开源音乐播放器|进入新开源音乐播放器界面]] | ||
2017年8月11日 (五) 07:03的最新版本
目录概述
材料清单
程序下载
程序烧写
存储音频
搭建步骤
操作说明播放器供电
播放器使用
代码说明
#define PUSH_BUTTON    50     //如果这个值无效,请改成  50
#define LEFT_BUTTON    100                             150
#define RIGHT_BUTTON   200                             250
原因:“userDef.h”中拨轮开关阈值设定不合理。
请在“userDef.h”中更改阈值设定到拨轮的实际使用值 视频
新版 |
