“Lesson 7--Microduino “RGB LED””的版本间的差异
(→Connection Methods) |
|||
| (未显示4个用户的6个中间版本) | |||
| 第4行: | 第4行: | ||
| | | | ||
==Objective== | ==Objective== | ||
| − | + | By now you are familiar with using an LED. Let's take a look at the RGB LED. This new type of LED allows us to display different colors. We can also replicate the breathing light effect from last lesson. | |
==Equipment== | ==Equipment== | ||
*'''[[Microduino-Core]]''' | *'''[[Microduino-Core]]''' | ||
*'''[[Microduino-FT232R]]''' | *'''[[Microduino-FT232R]]''' | ||
*Other hardware equipment | *Other hardware equipment | ||
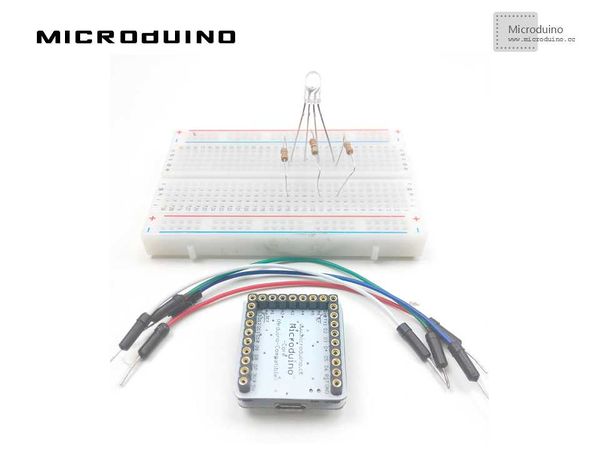
| − | ** | + | **1x Box of breadboard jumper wires |
| − | **Breadboard | + | **1x Breadboard |
| − | **RGB LED | + | **1x RGB LED |
| − | **220Ω resistor | + | **1x 220Ω resistor |
| − | **USB Data cable | + | **1x USB Data cable |
| + | |||
| + | [[File:lesson7All.jpg|600px|center|thumb]] | ||
===RGB=== | ===RGB=== | ||
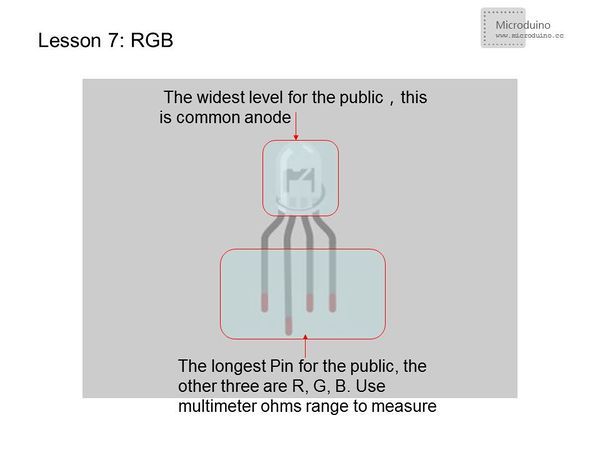
| − | RGB LED contains three LEDs | + | RGB LED contains three LEDs: red, green, and blue. |
| − | By controlling three LED's brightness, you can | + | By controlling the three LED's brightness, you can create any color you want. |
[[File:lesson7-RGB.jpg|600px|center|thumb]] | [[File:lesson7-RGB.jpg|600px|center|thumb]] | ||
| − | ===Connection | + | ===Connection Methods=== |
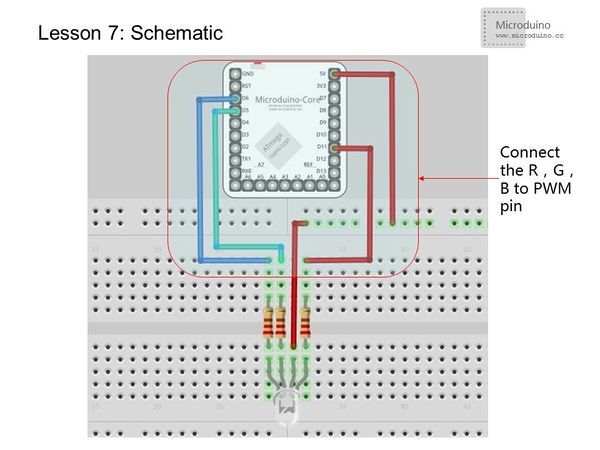
| − | *Method 1: | + | *Method 1: Connect the longest lead wire (anode) to +5V. The other three pins are connected to a 220Ω resistor and then connected to a Microduino PWM output port. We attach resistors to prevent too much current flow from damaging the LEDs. |
| − | |||
| − | == | + | *Method 2: Connect the anode through a 220Ω resistor to +5V. The other three pins are connected to PWM output ports. Since three LEDs share a single resistor, the brightness will be dimmer. |
| + | |||
| + | ==Experiment Schematic== | ||
The following connection uses method 1 and uses D5,D6,D11. | The following connection uses method 1 and uses D5,D6,D11. | ||
[[File:lesson7-schematic.jpg|600px|center|thumb]] | [[File:lesson7-schematic.jpg|600px|center|thumb]] | ||
| 第30行: | 第33行: | ||
==Program== | ==Program== | ||
<source lang="cpp"> | <source lang="cpp"> | ||
| − | + | int redPin = 11; | |
| − | + | int greenPin = 5; | |
| − | + | int bluePin = 6; | |
| − | + | void setup() | |
| − | + | { | |
| − | + | pinMode(redPin, OUTPUT); | |
| − | + | pinMode(greenPin, OUTPUT); | |
| − | + | pinMode(bluePin, OUTPUT); | |
| − | + | } | |
| − | + | void loop() | |
| − | + | { | |
| − | + | setColor(255, 0, 0); // Red | |
| − | + | delay(1000); | |
| − | + | setColor(0, 255, 0); // Green | |
| − | + | delay(1000); | |
| − | + | setColor(0, 0, 255); // Blue | |
| − | + | delay(1000); | |
| − | + | setColor(255, 255, 0); // Yellow | |
| − | + | delay(1000); | |
| − | + | setColor(80, 0, 80); // Purple | |
| − | + | delay(1000); | |
| − | + | setColor(255, 255, 255);// White | |
| − | + | delay(1000); | |
| − | + | setColor(0, 0, 0); //Black | |
| − | + | delay(1000); | |
| − | + | for(int i=0;i<255;i+=5)//Red coming on | |
| − | + | { | |
| − | + | setColor(i, 0, 0); | |
| − | + | delay(30); | |
| − | + | } | |
| − | + | delay(100); | |
| − | + | for(int i=255;i>0;i-=5)//Red coming off | |
| − | + | { | |
| − | + | setColor(i, 0, 0); | |
| − | + | delay(30); | |
| − | + | } | |
| − | + | delay(100); | |
| − | + | for(int i=0;i<255;i+=5)//Blue coming on | |
| − | + | { | |
| − | + | setColor(0, i, 0); | |
| − | + | delay(30); | |
| − | + | } | |
| − | + | delay(100); | |
| − | + | for(int i=255;i>0;i-=5)//Blue coming off | |
| − | + | { | |
| − | + | setColor(0, i, 0); | |
| − | + | delay(30); | |
| − | + | } | |
| − | + | delay(100); | |
| − | + | for(int i=0;i<255;i+=5)//Green coming on | |
| − | + | { | |
| − | + | setColor(0, 0, i); | |
| − | + | delay(30); | |
| − | + | } | |
| − | + | delay(100); | |
| − | + | for(int i=255;i>0;i-=5)//Green coming off | |
| − | + | { | |
| − | + | setColor(0, 0, i); | |
| − | + | delay(30); | |
| − | + | } | |
| − | + | delay(100); | |
| − | + | } | |
| − | + | void setColor(int red, int green, int blue)//Color display program | |
| − | + | { | |
| − | + | analogWrite(redPin, 255 - red); | |
| − | + | analogWrite(greenPin, 255 - green); | |
| − | + | analogWrite(bluePin, 255 - blue); | |
| − | + | } | |
</source> | </source> | ||
| − | + | We wrote a setColor() function so that it can be invoked in loop() directly. This makes the program look cleaner and clearer. | |
| − | + | The above program only lists a few colors you can make. You can search online for RGB values for any color you want. | |
==Result== | ==Result== | ||
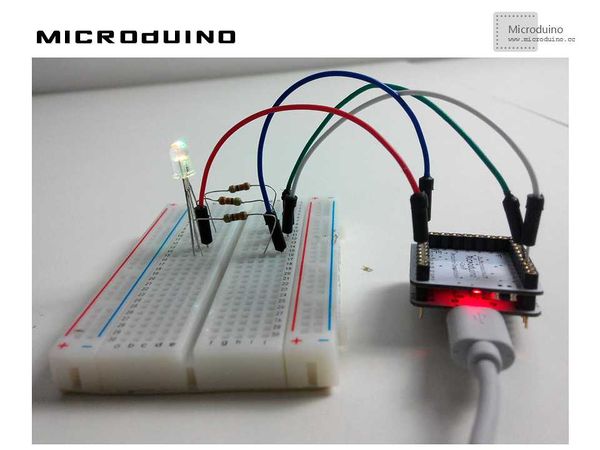
| − | + | The light will go from red, green, blue, yellow, purple, black, and to white. Then, it will behave like a breathing light as in Lesson 6. | |
| + | |||
| + | [[File:lesson7Result.jpg|600px|center|thumb]] | ||
==Video== | ==Video== | ||
| + | http://v.youku.com/v_show/id_XNzEwMDA0Njg0.html | ||
|} | |} | ||
2015年7月15日 (三) 00:07的最新版本
| Language | English |
|---|
目录ObjectiveBy now you are familiar with using an LED. Let's take a look at the RGB LED. This new type of LED allows us to display different colors. We can also replicate the breathing light effect from last lesson. Equipment
RGBRGB LED contains three LEDs: red, green, and blue. By controlling the three LED's brightness, you can create any color you want. Connection Methods
Experiment SchematicThe following connection uses method 1 and uses D5,D6,D11. Programint redPin = 11;
int greenPin = 5;
int bluePin = 6;
void setup()
{
pinMode(redPin, OUTPUT);
pinMode(greenPin, OUTPUT);
pinMode(bluePin, OUTPUT);
}
void loop()
{
setColor(255, 0, 0); // Red
delay(1000);
setColor(0, 255, 0); // Green
delay(1000);
setColor(0, 0, 255); // Blue
delay(1000);
setColor(255, 255, 0); // Yellow
delay(1000);
setColor(80, 0, 80); // Purple
delay(1000);
setColor(255, 255, 255);// White
delay(1000);
setColor(0, 0, 0); //Black
delay(1000);
for(int i=0;i<255;i+=5)//Red coming on
{
setColor(i, 0, 0);
delay(30);
}
delay(100);
for(int i=255;i>0;i-=5)//Red coming off
{
setColor(i, 0, 0);
delay(30);
}
delay(100);
for(int i=0;i<255;i+=5)//Blue coming on
{
setColor(0, i, 0);
delay(30);
}
delay(100);
for(int i=255;i>0;i-=5)//Blue coming off
{
setColor(0, i, 0);
delay(30);
}
delay(100);
for(int i=0;i<255;i+=5)//Green coming on
{
setColor(0, 0, i);
delay(30);
}
delay(100);
for(int i=255;i>0;i-=5)//Green coming off
{
setColor(0, 0, i);
delay(30);
}
delay(100);
}
void setColor(int red, int green, int blue)//Color display program
{
analogWrite(redPin, 255 - red);
analogWrite(greenPin, 255 - green);
analogWrite(bluePin, 255 - blue);
}
We wrote a setColor() function so that it can be invoked in loop() directly. This makes the program look cleaner and clearer. The above program only lists a few colors you can make. You can search online for RGB values for any color you want. ResultThe light will go from red, green, blue, yellow, purple, black, and to white. Then, it will behave like a breathing light as in Lesson 6. Video |


