“语音情景灯/zh”的版本间的差异
502748957@qq.com(讨论 | 贡献) (→程序说明) |
502748957@qq.com(讨论 | 贡献) (→搭建) |
||
| (未显示同一用户的12个中间版本) | |||
| 第58行: | 第58行: | ||
*语音控制 | *语音控制 | ||
采集并识别语音内容。 | 采集并识别语音内容。 | ||
| − | [[File:Emotionlightstruct.jpg||600px|center | + | [[File:Emotionlightstruct.jpg||600px|center]] |
*主要传感器 | *主要传感器 | ||
*[[Microduino-Lamp/zh]] | *[[Microduino-Lamp/zh]] | ||
套件使用Microduino-Lamp模块作为发光设备,该模块级联了6盏RGB3色彩灯,并可以使用相应的库函数控制每盏彩灯的颜色,为了清晰说明彩灯的控制方法,用一个简单的程序举例。 | 套件使用Microduino-Lamp模块作为发光设备,该模块级联了6盏RGB3色彩灯,并可以使用相应的库函数控制每盏彩灯的颜色,为了清晰说明彩灯的控制方法,用一个简单的程序举例。 | ||
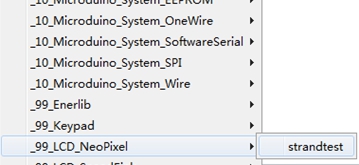
打开Arduino IDE,在文件(File)—>示例(Examples)—>_99_LCD_NeoPixel目录下,点开例程strandtest。 | 打开Arduino IDE,在文件(File)—>示例(Examples)—>_99_LCD_NeoPixel目录下,点开例程strandtest。 | ||
| − | [[File:Emotionlightlib.jpg||600px|center | + | [[File:Emotionlightlib.jpg||600px|center]] |
<source lang="cpp"> | <source lang="cpp"> | ||
#include <Adafruit_NeoPixel.h> | #include <Adafruit_NeoPixel.h> | ||
| 第157行: | 第157行: | ||
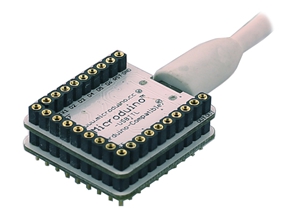
将[[Microduino-Core+/zh]]、[[Microduino-USBTTL/zh]]堆叠在一起.用数据线将写好的程序通过[[Microduino-USBTTL/zh]]上传到[[Microduino-Core+/zh]]上。 | 将[[Microduino-Core+/zh]]、[[Microduino-USBTTL/zh]]堆叠在一起.用数据线将写好的程序通过[[Microduino-USBTTL/zh]]上传到[[Microduino-Core+/zh]]上。 | ||
注意:最好不要将所有模块堆叠在一起之后再上传程序 | 注意:最好不要将所有模块堆叠在一起之后再上传程序 | ||
| − | [[File:download1.jpg|| | + | [[File:download1.jpg||400px|center]] |
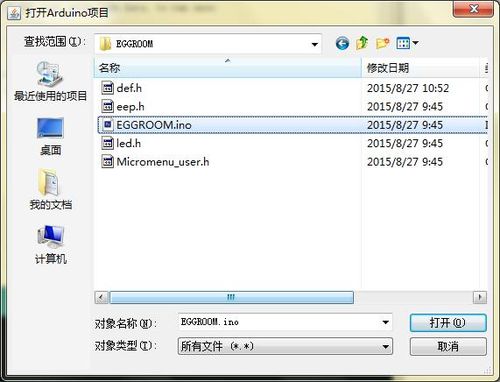
找到该程序的物理位置,"语音情景灯/ EGGROOM/ EGGROOM.ino",双击即可 | 找到该程序的物理位置,"语音情景灯/ EGGROOM/ EGGROOM.ino",双击即可 | ||
| − | [[File:Emotionlightopen.jpg|| | + | [[File:Emotionlightopen.jpg||500px|center]] |
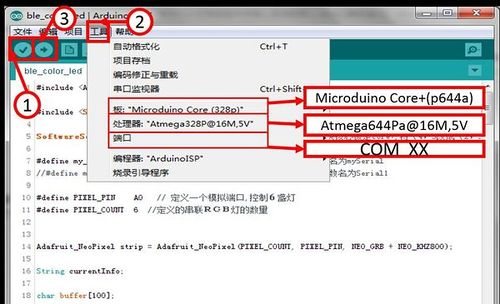
程序下载 | 程序下载 | ||
点击"√",编译程序。 | 点击"√",编译程序。 | ||
点击【工具】,选择正确的板+处理器+端口。 | 点击【工具】,选择正确的板+处理器+端口。 | ||
点击"→",进行上传。 | 点击"→",进行上传。 | ||
| − | [[File:Downloadselectcore+.jpg||600px|center| | + | [[File:Downloadselectcore+.jpg||500px|center]] |
| + | *音频下载 | ||
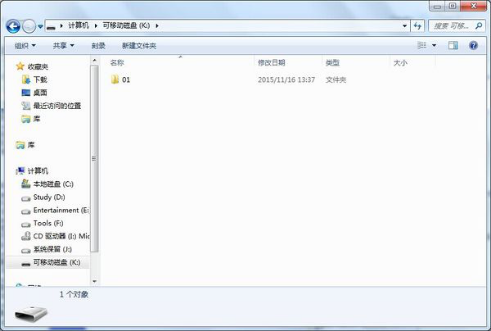
| + | 将TF卡安装到Audio模块上,之后使用USB线将Audio模块连接到电脑上。此时会识别出一个可移动磁盘。 | ||
| + | [[File:Tf1.png||600px|center]] | ||
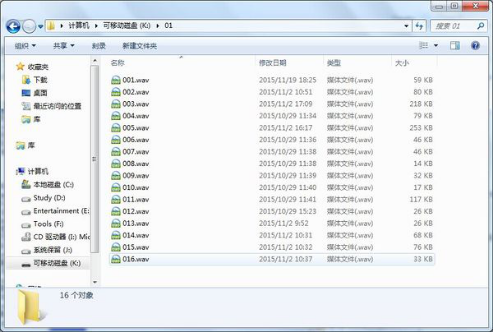
| + | 在识别到的磁盘中新建文件夹命名为01,之后将语音按命名的数字顺序复制到文件夹01中。至此音频存储完毕。 | ||
| + | [[File:Tf2.png||600px|center]] | ||
| + | |||
| + | [[File:Tf3.png||600px|center]] | ||
| + | |||
==搭建== | ==搭建== | ||
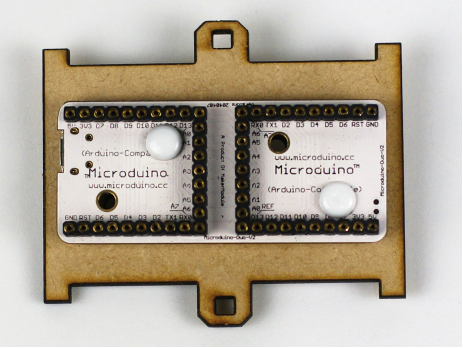
| − | + | 将Microduino-Duo-V底板用螺丝固定在顶板上,顶板与底板形状相同,可任选其一。 | |
| − | + | [[File:Pp1.png||600px|center]] | |
| − | + | 搭建硬件电路,将用到的设备叠加起来 | |
| − | + | Microduino-Amplifier | |
| − | Microduino- | + | Microduino-Audio |
| − | Microduino- | ||
Microduino-sensorhub | Microduino-sensorhub | ||
| + | 以上模块放置在Duo-V的一端 | ||
| + | Microduino-Duo-V | ||
| + | 以下模块放置在Duo-V的另一端 | ||
Microduino-Lamp | Microduino-Lamp | ||
| − | + | Microduino-Core+ | |
| − | [[File: | + | Microduin-USBTTL |
| − | + | 注: | |
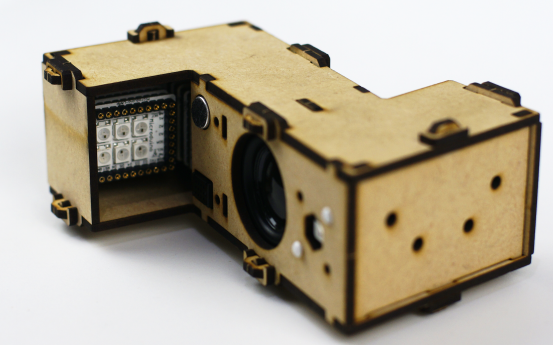
| − | + | Microduino-DUO-V作为底板,降低整体高度,同时固定Lamp模块在一侧提供照明功能。Microduino-Lamp和Microduino-sensorhub放在两侧的最上面。拼装时,先不要装上Sensorhub,这样方便下面的安装。 | |
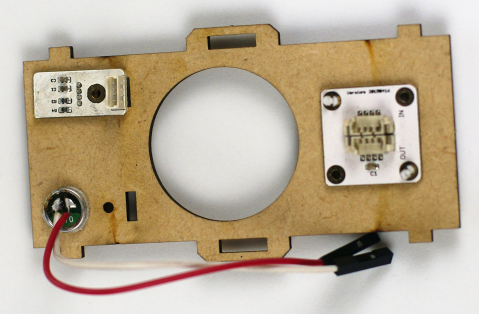
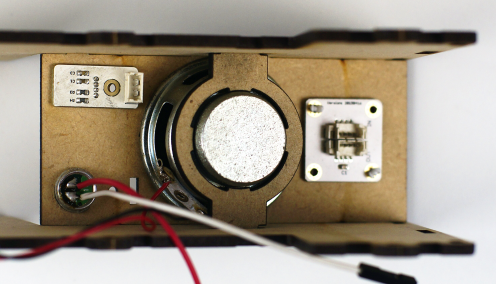
| − | [[File: | + | 按照如图方式,将温湿度传感器、麦克风和ColorLED装在前面板上。用螺丝固定。 |
| − | + | [[File:Pp2.png||600px|center]] | |
| − | [[File: | + | 使用如图所示的方式,用底座将喇叭固定在侧板上,喇叭的连线留在朝向图左侧的方向,方便后续安装。此时不要将左右两块板与前面板拼接在一起,先拿掉一侧的侧板,方便后续安装 |
| − | [[File: | + | [[File:Pp3.png||600px|center]] |
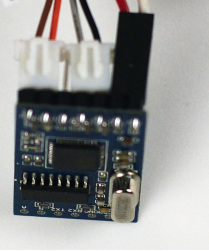
| − | + | 使用连线连接语音模块,注意连线方向,左数第一个双头接口是GND及VCC,第二个双头端口是RX,DX,如果无法确定方向就按照图中的方向连接语音识别模块。 | |
| − | + | [[File:Pp4.png||350px|center]] | |
| − | [[File: | + | 注意:如果想直接使用USBTTL+Sensorhub测试语音识别模块,则语音模块端的RX和TX要和上图方向反过来连接。 |
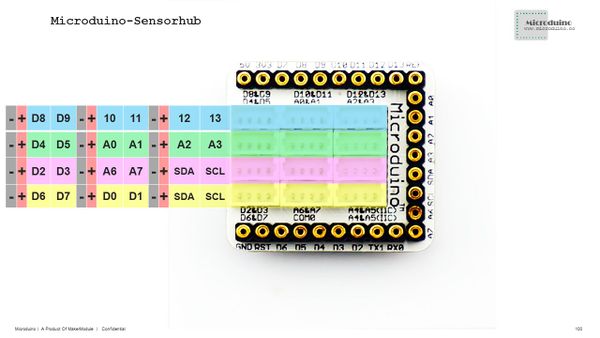
| − | [[File: | + | 对应下图,使用传感器线连接传感器,ColorLED连接A2端口,温湿度传感器连接右下角SDASCL接口,语音模块连接D2/D3接口。连接好后,将Sensorhub插在Audio模块上面,置于最上端. |
| + | [[File:Microduino-sensorhub rule.JPG||600px|center]] | ||
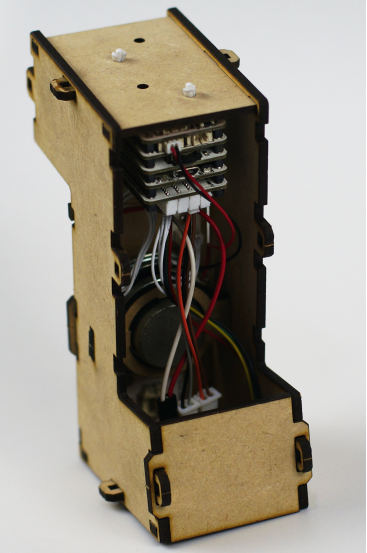
| + | 此时的状态应该是传感器都已经连接到Sensorhub上,所有模块都已经拼接在底板上。喇叭用卡子固定在侧板上。之后将剩下的底板插在侧板上,然后扣上另一块侧板。 | ||
| + | [[File:Pp6.png||600px|center]] | ||
| + | 之后将前板和后板插上用于固定两块侧板。最后将上下两个头部插好。 | ||
| + | 最后使用插销将所有固定扣固定住即可。 | ||
| + | [[File:Pp7.png||600px|center]] | ||
| + | |||
| + | ==整体调试== | ||
| + | 打开语音情景灯的电源,首先等待指示灯亮起2-3秒钟,之后熄灭。这时对麦克风说“泡泡”,是语音输入的开关语句,也就是说要先说这句话,看到语音输入指示灯(ColorLED)亮起后,再说各种语音命令,每说一条指令后都有5秒时间继续说下一条指令,若没有语音输入则指示灯熄灭,需要重新说“泡泡”进入语音输出状态。 | ||
| + | 本例的语音开关指令是“泡泡”,所以请用普通话清晰发声“泡泡”,观察ColorLED是否点亮,如果点亮就继续说出命令,如“讲故事”,灯光模块就会被点亮,如果没有语音回复“hi,我是泡泡”,则继续说“泡泡”直到ColorLED点亮并有语音回复再说指令。 | ||
| + | |||
==注意问题== | ==注意问题== | ||
*每次语音输入命令,都要先说f1对应的内容,本例是“美科”读者可根据自己的设置输入 | *每次语音输入命令,都要先说f1对应的内容,本例是“美科”读者可根据自己的设置输入 | ||
*二极管极性的判断,反接的话二极管不会发光 | *二极管极性的判断,反接的话二极管不会发光 | ||
==程序说明== | ==程序说明== | ||
| − | * | + | *语音模块配置 |
<source lang="cpp"> | <source lang="cpp"> | ||
| − | + | void writecommand() | |
| − | + | { | |
| − | + | VOICE.println("{d1}"); | |
| − | + | delay(200); | |
| − | + | VOICE.println("{d1}"); //确认进入调试模式 | |
| − | + | delay(200); | |
| − | + | VOICE.println("{c0}"); //清除已有指令 | |
| − | + | delay(200); | |
| − | + | VOICE.println("{a0pao pao|s0pp}"); //开启语音指令 | |
| − | + | delay(200); | |
| − | + | VOICE.println("{a0ni de ming zi|s0mz}"); //你的名字 | |
| − | + | delay(200); | |
| − | + | VOICE.println("{a0ni de nian ling|s0nl}"); // 你的年龄 | |
| − | + | delay(200); | |
| − | + | VOICE.println("{a0jiang gu shi|s0gs}"); //讲故事 | |
| − | + | delay(200); | |
| − | + | VOICE.println("{a0bei shi|s0sg}"); //背诗 | |
| − | + | delay(200); | |
| − | + | VOICE.println("{a0sha gua|s0sm}"); //傻瓜 | |
| − | + | delay(200); | |
| − | + | VOICE.println("{a0tian qi ru he|s0wd}"); //天气如何 | |
| − | + | delay(200); | |
| − | + | VOICE.println("{a0hao hei|s0kd}"); //好黑 | |
| − | + | delay(200); | |
| − | + | VOICE.println("{a0guan deng|s0gd}"); //关灯 | |
| − | + | delay(200); | |
| − | + | VOICE.println("{a0zai jian|s0zj}"); //再见 | |
| − | + | delay(200); | |
| − | + | VOICE.println("{a0xie xie|s0xx}"); //谢谢 | |
| − | + | delay(200); | |
| − | + | VOICE.println("{l0}"); //加载 | |
| − | + | delay(200); | |
| − | + | VOICE.println("{d0}"); //退出调试 | |
| − | + | delay(200); | |
| − | + | } | |
| − | |||
| − | |||
| − | |||
| − | |||
| − | |||
| − | |||
| − | |||
| − | |||
| − | |||
| − | |||
| − | |||
| − | |||
| − | |||
| − | |||
| − | |||
| − | |||
| − | |||
| − | |||
| − | |||
| − | |||
| − | |||
| − | |||
| − | |||
| − | |||
| − | |||
| − | |||
| − | |||
| − | |||
| − | |||
| − | |||
| − | |||
| − | |||
| − | |||
| − | |||
| − | |||
| − | |||
| − | |||
| − | |||
| − | |||
| − | |||
| − | |||
| − | |||
| − | |||
| − | |||
| − | |||
| − | |||
| − | |||
| − | |||
| − | |||
| − | |||
| − | |||
| − | |||
| − | |||
| − | |||
| − | |||
| − | |||
| − | |||
| − | |||
| − | |||
| − | |||
| − | |||
| − | |||
| − | |||
| − | |||
| − | |||
| − | |||
| − | |||
| − | |||
| − | |||
| − | |||
| − | |||
| − | |||
| − | |||
| − | |||
| − | |||
| − | |||
| − | |||
| − | |||
| − | |||
| − | |||
| − | |||
| − | |||
| − | |||
| − | |||
| − | |||
| − | |||
| − | |||
| − | |||
| − | |||
| − | |||
| − | |||
| − | |||
| − | |||
| − | |||
| − | |||
| − | |||
| − | |||
| − | |||
| − | |||
| − | |||
| − | |||
| − | |||
| − | |||
| − | |||
| − | |||
| − | |||
| − | |||
| − | |||
| − | |||
| − | |||
| − | |||
| − | |||
| − | |||
| − | |||
| − | |||
| − | |||
| − | |||
| − | |||
| − | |||
| − | |||
| − | |||
| − | |||
| − | |||
| − | |||
| − | |||
| − | |||
| − | |||
| − | |||
| − | |||
| − | |||
| − | |||
| − | |||
| − | |||
| − | |||
| − | |||
| − | |||
| − | |||
| − | |||
| − | |||
| − | |||
| − | |||
| − | |||
| − | |||
| − | |||
| − | |||
| − | |||
| − | |||
| − | |||
| − | |||
| − | |||
| − | |||
| − | |||
| − | |||
| − | |||
| − | |||
| − | |||
| − | |||
| − | |||
| − | |||
| − | |||
| − | |||
| − | |||
| − | |||
| − | |||
| − | |||
| − | |||
| − | |||
| − | |||
| − | |||
| − | |||
| − | |||
| − | |||
| − | |||
| − | |||
| − | |||
| − | |||
| − | |||
| − | |||
| − | |||
| − | |||
| − | |||
| − | |||
| − | |||
| − | |||
| − | |||
| − | |||
| − | |||
| − | |||
| − | |||
| − | |||
| − | |||
| − | |||
| − | |||
| − | |||
| − | |||
| − | |||
| − | |||
| − | |||
| − | |||
| − | |||
| − | |||
| − | |||
| − | |||
| − | |||
| − | |||
| − | |||
| − | |||
| − | |||
| − | |||
| − | |||
| − | |||
| − | |||
| − | |||
| − | |||
| − | |||
| − | |||
| − | |||
| − | } | ||
| − | |||
| − | |||
| − | |||
| − | |||
| − | |||
| − | |||
| − | |||
</source> | </source> | ||
| − | * | + | *程序中的语音识别 |
<source lang="cpp"> | <source lang="cpp"> | ||
| − | + | if (VOICE.available()) | |
| − | + | { | |
| − | + | String cmd = ""; | |
| − | + | if (VOICE.available()) //如果从语音芯片接收到用户的语音输入数据 | |
| − | + | { | |
| − | + | cmd += char(VOICE.read()); //读出串口内的内容 | |
| − | + | delay(10); | |
| − | + | cmd += char(VOICE.read()); | |
| − | + | delay(10); | |
| − | + | } | |
| − | + | } | |
| − | |||
| − | |||
| − | |||
| − | |||
| − | |||
| − | |||
| − | |||
| − | |||
| − | |||
| − | |||
| − | |||
| − | |||
| − | |||
| − | |||
| − | |||
| − | |||
| − | |||
| − | |||
| − | |||
| − | |||
| − | |||
| − | |||
</source> | </source> | ||
| − | * | + | *功能实现(以温度为例) |
<source lang="cpp"> | <source lang="cpp"> | ||
| − | // | + | case 5: //天气如何 |
| − | + | timer_voice = 0; //重置计时 | |
| − | + | am2321.read(); //读取传感器 | |
| − | + | temperature = am2321.temperature / 10.0; | |
| − | + | Serial.println(temperature); //Debug使用 | |
| − | + | if(temperature < 20)AUDIO.choose(15); //根据温度播放不同语音 | |
| − | + | if(temperature >= 20 && temperature < 27)AUDIO.choose(14); | |
| − | + | if(temperature >= 27)AUDIO.choose(16); | |
| − | + | timer_voice = millis(); //同步时间 | |
| − | + | break; | |
| − | |||
| − | |||
| − | |||
| − | |||
| − | |||
| − | |||
| − | |||
| − | |||
| − | |||
| − | |||
| − | |||
| − | |||
| − | |||
| − | |||
| − | |||
| − | |||
| − | |||
| − | |||
| − | |||
| − | |||
| − | |||
| − | |||
| − | |||
| − | |||
| − | |||
| − | |||
| − | |||
| − | |||
| − | |||
| − | |||
| − | |||
| − | |||
| − | |||
| − | |||
| − | |||
| − | |||
| − | |||
| − | |||
| − | |||
| − | |||
| − | |||
| − | |||
| − | |||
| − | |||
| − | |||
| − | |||
| − | |||
| − | |||
| − | |||
| − | |||
| − | |||
| − | |||
| − | |||
| − | |||
| − | |||
| − | |||
| − | |||
| − | |||
| − | |||
| − | |||
| − | |||
| − | |||
| − | |||
| − | |||
| − | |||
| − | |||
| − | |||
| − | |||
| − | |||
| − | |||
| − | |||
| − | |||
| − | |||
| − | |||
| − | |||
| − | |||
| − | |||
| − | |||
| − | |||
| − | |||
| − | |||
| − | |||
| − | |||
| − | |||
| − | |||
| − | |||
| − | |||
| − | |||
| − | |||
| − | |||
| − | |||
| − | |||
| − | |||
| − | |||
| − | |||
| − | |||
| − | |||
| − | |||
| − | |||
| − | |||
| − | |||
| − | |||
| − | |||
| − | |||
| − | |||
| − | |||
| − | |||
| − | |||
| − | |||
| − | |||
| − | |||
| − | |||
| − | |||
| − | |||
| − | |||
| − | |||
| − | |||
| − | |||
| − | |||
| − | |||
| − | |||
| − | |||
| − | |||
| − | |||
| − | |||
| − | |||
| − | |||
| − | |||
| − | |||
| − | |||
| − | |||
| − | |||
| − | |||
| − | |||
| − | |||
| − | |||
| − | |||
| − | |||
| − | |||
| − | |||
| − | |||
| − | |||
| − | |||
| − | |||
| − | |||
| − | |||
| − | |||
| − | |||
| − | |||
| − | |||
| − | |||
| − | |||
| − | |||
| − | |||
| − | |||
| − | |||
| − | |||
| − | |||
| − | |||
| − | |||
| − | |||
| − | |||
| − | |||
| − | |||
| − | |||
| − | |||
| − | |||
| − | |||
| − | |||
| − | |||
| − | |||
| − | |||
| − | |||
| − | |||
| − | |||
| − | |||
| − | |||
| − | |||
| − | |||
| − | |||
| − | |||
| − | |||
| − | |||
| − | |||
| − | |||
| − | |||
| − | |||
| − | |||
| − | |||
| − | |||
| − | |||
| − | |||
| − | |||
| − | |||
| − | |||
| − | |||
| − | |||
| − | |||
| − | |||
| − | |||
| − | |||
| − | |||
| − | |||
| − | |||
| − | |||
| − | |||
| − | |||
| − | |||
| − | |||
| − | |||
| − | |||
| − | |||
| − | |||
| − | |||
| − | |||
| − | |||
| − | |||
| − | |||
| − | |||
| − | |||
| − | |||
| − | |||
| − | |||
| − | |||
| − | |||
| − | |||
| − | |||
| − | |||
| − | |||
| − | |||
| − | |||
| − | |||
| − | |||
| − | |||
| − | |||
| − | |||
| − | |||
| − | |||
| − | |||
| − | |||
| − | |||
| − | |||
| − | |||
| − | |||
| − | |||
| − | |||
| − | |||
| − | |||
| − | |||
| − | |||
| − | |||
| − | |||
| − | |||
| − | |||
| − | |||
| − | |||
| − | |||
| − | |||
| − | |||
| − | |||
| − | |||
| − | |||
| − | |||
| − | |||
| − | |||
| − | |||
| − | |||
| − | |||
| − | |||
| − | |||
| − | |||
| − | |||
| − | |||
| − | |||
| − | |||
| − | |||
| − | |||
| − | |||
| − | |||
| − | |||
| − | |||
| − | |||
| − | |||
| − | |||
| − | |||
| − | |||
| − | |||
| − | |||
| − | |||
| − | |||
| − | |||
| − | |||
| − | |||
| − | |||
| − | |||
| − | |||
| − | |||
| − | |||
| − | |||
| − | |||
| − | |||
| − | |||
| − | |||
| − | |||
| − | |||
| − | |||
| − | |||
| − | |||
| − | |||
| − | |||
| − | |||
| − | |||
| − | |||
| − | |||
| − | |||
| − | |||
| − | |||
| − | |||
| − | |||
| − | |||
| − | |||
| − | |||
| − | |||
| − | |||
| − | |||
| − | // | ||
| − | |||
| − | |||
| − | |||
| − | |||
| − | |||
| − | |||
| − | |||
| − | |||
| − | |||
| − | |||
| − | |||
| − | |||
| − | |||
| − | |||
| − | |||
| − | |||
| − | |||
| − | |||
| − | |||
| − | |||
| − | |||
| − | |||
| − | |||
| − | |||
| − | |||
| − | |||
| − | |||
| − | |||
| − | |||
| − | |||
| − | |||
| − | |||
| − | |||
| − | |||
| − | |||
| − | |||
| − | |||
| − | |||
| − | |||
| − | |||
| − | |||
| − | |||
| − | |||
| − | |||
| − | |||
| − | |||
| − | |||
| − | |||
| − | |||
| − | |||
| − | |||
| − | |||
| − | |||
| − | |||
| − | |||
| − | |||
| − | |||
| − | / | ||
| − | |||
| − | |||
| − | |||
| − | |||
| − | |||
| − | |||
| − | |||
| − | |||
| − | |||
| − | |||
| − | |||
| − | |||
| − | |||
| − | |||
| − | |||
| − | |||
| − | |||
| − | |||
| − | |||
| − | |||
| − | |||
| − | |||
| − | |||
| − | |||
| − | |||
| − | |||
| − | |||
| − | |||
| − | |||
| − | |||
| − | |||
| − | |||
| − | |||
| − | |||
| − | |||
| − | |||
| − | |||
| − | |||
| − | |||
| − | |||
| − | |||
| − | |||
| − | |||
| − | |||
| − | |||
| − | |||
| − | |||
| − | |||
| − | |||
| − | |||
| − | |||
| − | |||
| − | |||
| − | |||
| − | |||
| − | |||
| − | |||
| − | |||
| − | |||
| − | |||
| − | |||
| − | |||
| − | |||
| − | |||
| − | |||
| − | |||
| − | |||
| − | |||
| − | |||
| − | |||
| − | |||
| − | |||
| − | |||
| − | |||
| − | |||
| − | |||
| − | |||
| − | |||
| − | |||
| − | |||
| − | |||
| − | |||
| − | |||
| − | |||
</source> | </source> | ||
==视频== | ==视频== | ||
2015年12月15日 (二) 10:53的最新版本
概述
本次教程我们使用Microduino产品模块快速搭建一个可以识别人类语音的灯光控制系统,玩家可以迅速上手,并且可以通过说话,控制灯光模块的亮灭,选色等功能。 材料清单
实验原理语音情景灯模块的原理是记录语音和情景的一一映射关系,通过拼音识别输入的语音,返回给核心对应的情景编号,核心根据得到的情景编号,通过模拟口控制灯光模块每盏led灯的亮灭,实现不同情境下的不同颜色组合。 整个灯光控制系统包括四个部分:
使用[Microduino-BM]电源管理模块和外接电池组合为语音灯供电
中央处理器是语音情景灯系统的核心。采用Microduino-Core+作为核心。
语音情景灯系统采用Bluetooth无线通讯方案,使用[Microduino-BT(4.0)]模块,通讯速度响应快,在空阔地域的控制范围大概8米左右。
采集并识别语音内容。
套件使用Microduino-Lamp模块作为发光设备,该模块级联了6盏RGB3色彩灯,并可以使用相应的库函数控制每盏彩灯的颜色,为了清晰说明彩灯的控制方法,用一个简单的程序举例。 打开Arduino IDE,在文件(File)—>示例(Examples)—>_99_LCD_NeoPixel目录下,点开例程strandtest。 #include <Adafruit_NeoPixel.h>
#define PIN 6 //定义控制引脚
// 参数 1 = strip中彩灯的数目
// 参数 2 = 引脚号
// 参数 3 = 彩灯类型, 可多选(前两个中选一个,后两个中选一个):
// NEO_RGB Pixels are wired for RGB bitstream
// NEO_GRB Pixels are wired for GRB bitstream
// NEO_KHZ400 400 KHz bitstream (e.g. FLORA pixels)
// NEO_KHZ800 800 KHz bitstream (e.g. High Density LED strip)
Adafruit_NeoPixel strip = Adafruit_NeoPixel(60, PIN, NEO_GRB + NEO_KHZ800);
void setup()
{
strip.begin();
strip.show(); //初始化所有彩灯都为灭
}
void loop()
{
// 点亮彩灯的方法
colorWipe(strip.Color(255, 0, 0), 50); // 点亮红色
colorWipe(strip.Color(0, 255, 0), 50); // 点亮绿色
colorWipe(strip.Color(0, 0, 255), 50); // 点亮蓝色
rainbow(20);
rainbowCycle(20);
}
//用“c”所代表的颜色依次点亮各盏彩灯,每点亮一盏等“wait”秒
void colorWipe(uint32_t c, uint8_t wait)
{
for(uint16_t i = 0; i < strip.numPixels(); i++) //依次点亮
{
strip.setPixelColor(i, c); //这个函数用于把第i盏灯用“c”所指颜色点亮
strip.show(); //这个函数会将setPixelColor函数所写入的控制信息显示
//出来,也就是靠它点亮LAMP模块
delay(wait);
}
}
void rainbow(uint8_t wait) //彩虹显示
{
uint16_t i, j;
for(j = 0; j < 256; j++) //渐变255种颜色
{
for(i = 0; i < strip.numPixels(); i++) //依次点亮彩灯,间隔wait毫秒
{
strip.setPixelColor(i, Wheel((i + j) & 255));
}
strip.show();
delay(wait);
}
}
// 与上面的函数稍有区别,添加了彩虹的循环
void rainbowCycle(uint8_t wait)
{
uint16_t i, j;
for(j = 0; j < 256 * 5; j++) //彩虹循环5次
{
for(i = 0; i < strip.numPixels(); i++)
{
strip.setPixelColor(i, Wheel(((i * 256 / strip.numPixels()) + j) & 255)); //为了循环而添加的数学变换
}
strip.show();
delay(wait);
}
}
// 输入0-255任意一个数得到对应的唯一的一种颜色
// 颜色会从红-绿->蓝->红依次渐变循环
uint32_t Wheel(byte WheelPos)
{
if(WheelPos < 85)
{
return strip.Color(WheelPos * 3, 255 - WheelPos * 3, 0);
}
else if(WheelPos < 170)
{
//因为WheelPos * 3在85到170的情况下会超过255,因此要先自减85
WheelPos -= 85;
return strip.Color(255 - WheelPos * 3, 0, WheelPos * 3);
}
else
{
//因为WheelPos * 3在170以上的情况下会超过255,因此要先自减170
WheelPos -= 170;
return strip.Color(0, WheelPos * 3, 255 - WheelPos * 3);
}
文档调试过程
将Microduino-Core+/zh、Microduino-USBTTL/zh堆叠在一起.用数据线将写好的程序通过Microduino-USBTTL/zh上传到Microduino-Core+/zh上。 注意:最好不要将所有模块堆叠在一起之后再上传程序 找到该程序的物理位置,"语音情景灯/ EGGROOM/ EGGROOM.ino",双击即可 程序下载 点击"√",编译程序。 点击【工具】,选择正确的板+处理器+端口。 点击"→",进行上传。
将TF卡安装到Audio模块上,之后使用USB线将Audio模块连接到电脑上。此时会识别出一个可移动磁盘。 在识别到的磁盘中新建文件夹命名为01,之后将语音按命名的数字顺序复制到文件夹01中。至此音频存储完毕。 搭建将Microduino-Duo-V底板用螺丝固定在顶板上,顶板与底板形状相同,可任选其一。 搭建硬件电路,将用到的设备叠加起来 Microduino-Amplifier Microduino-Audio Microduino-sensorhub 以上模块放置在Duo-V的一端 Microduino-Duo-V 以下模块放置在Duo-V的另一端 Microduino-Lamp Microduino-Core+ Microduin-USBTTL 注: Microduino-DUO-V作为底板,降低整体高度,同时固定Lamp模块在一侧提供照明功能。Microduino-Lamp和Microduino-sensorhub放在两侧的最上面。拼装时,先不要装上Sensorhub,这样方便下面的安装。 按照如图方式,将温湿度传感器、麦克风和ColorLED装在前面板上。用螺丝固定。 使用如图所示的方式,用底座将喇叭固定在侧板上,喇叭的连线留在朝向图左侧的方向,方便后续安装。此时不要将左右两块板与前面板拼接在一起,先拿掉一侧的侧板,方便后续安装 使用连线连接语音模块,注意连线方向,左数第一个双头接口是GND及VCC,第二个双头端口是RX,DX,如果无法确定方向就按照图中的方向连接语音识别模块。 注意:如果想直接使用USBTTL+Sensorhub测试语音识别模块,则语音模块端的RX和TX要和上图方向反过来连接。 对应下图,使用传感器线连接传感器,ColorLED连接A2端口,温湿度传感器连接右下角SDASCL接口,语音模块连接D2/D3接口。连接好后,将Sensorhub插在Audio模块上面,置于最上端. 此时的状态应该是传感器都已经连接到Sensorhub上,所有模块都已经拼接在底板上。喇叭用卡子固定在侧板上。之后将剩下的底板插在侧板上,然后扣上另一块侧板。 之后将前板和后板插上用于固定两块侧板。最后将上下两个头部插好。 最后使用插销将所有固定扣固定住即可。 整体调试打开语音情景灯的电源,首先等待指示灯亮起2-3秒钟,之后熄灭。这时对麦克风说“泡泡”,是语音输入的开关语句,也就是说要先说这句话,看到语音输入指示灯(ColorLED)亮起后,再说各种语音命令,每说一条指令后都有5秒时间继续说下一条指令,若没有语音输入则指示灯熄灭,需要重新说“泡泡”进入语音输出状态。 本例的语音开关指令是“泡泡”,所以请用普通话清晰发声“泡泡”,观察ColorLED是否点亮,如果点亮就继续说出命令,如“讲故事”,灯光模块就会被点亮,如果没有语音回复“hi,我是泡泡”,则继续说“泡泡”直到ColorLED点亮并有语音回复再说指令。 注意问题
程序说明
void writecommand()
{
    VOICE.println("{d1}");
    delay(200);
    VOICE.println("{d1}");    //确认进入调试模式
    delay(200);
    VOICE.println("{c0}");      //清除已有指令
    delay(200);
    VOICE.println("{a0pao pao|s0pp}");  //开启语音指令
    delay(200);
    VOICE.println("{a0ni de ming zi|s0mz}"); //你的名字
    delay(200);
    VOICE.println("{a0ni de nian ling|s0nl}");  // 你的年龄
    delay(200);
    VOICE.println("{a0jiang gu shi|s0gs}");   //讲故事
    delay(200);
    VOICE.println("{a0bei shi|s0sg}"); //背诗
    delay(200);
    VOICE.println("{a0sha gua|s0sm}"); //傻瓜
    delay(200);
    VOICE.println("{a0tian qi ru he|s0wd}"); //天气如何
    delay(200);
    VOICE.println("{a0hao hei|s0kd}");  //好黑
    delay(200);
    VOICE.println("{a0guan deng|s0gd}");  //关灯
    delay(200);
    VOICE.println("{a0zai jian|s0zj}");  //再见
    delay(200);
    VOICE.println("{a0xie xie|s0xx}");  //谢谢
    delay(200);
    VOICE.println("{l0}");     //加载
    delay(200);
    VOICE.println("{d0}");    //退出调试
    delay(200);
}
if (VOICE.available())
{
    String cmd = "";
    if (VOICE.available()) //如果从语音芯片接收到用户的语音输入数据
    {
        cmd += char(VOICE.read()); //读出串口内的内容
        delay(10);
        cmd += char(VOICE.read());
        delay(10);
    }
}
case 5:                       //天气如何
timer_voice = 0;        //重置计时
am2321.read();           //读取传感器
temperature = am2321.temperature / 10.0;
Serial.println(temperature);    //Debug使用
if(temperature < 20)AUDIO.choose(15);   //根据温度播放不同语音
if(temperature >= 20 && temperature < 27)AUDIO.choose(14);
if(temperature >= 27)AUDIO.choose(16);
timer_voice = millis();            //同步时间
break;
视频 |
