“Getting started: Windows”的版本间的差异
853387039@qq.com(讨论 | 贡献) (→IDE 介绍) |
(→The Board Types) |
||
| (未显示2个用户的6个中间版本) | |||
| 第3行: | 第3行: | ||
|- | |- | ||
| | | | ||
| − | = | + | =Download= |
| − | *''' | + | *'''Download the IDE: [https://www.microduino.cc/ftpshare/IDE/Arduino%20IDE%201.6.5%20for%20Microduino.exe Arduino IDE 1.6.5]''' |
| − | = | + | =Installation= |
| − | * | + | *Double click '''Install Microduino IDE.exe'''. Click【Next】. |
| − | [[File: | + | [[File:IDEsetup1.JPG|600px|center|thumb]] |
| − | * | + | *Make sure '''Arduino IDE''', '''USBTTL driver''', and '''Core USB driver''' are all checked. Click【Next】. |
| − | [[File: | + | [[File:IDEsetup2.JPG|600px|center|thumb]] |
| − | * | + | *Click【Browse...】if you would like to choose a different installation destination. Then click【Next】 and 【Install】. |
| − | [[File: | + | [[File:IDEsetup3.JPG|600px|center|thumb]] |
| − | * | + | <br> |
| − | [[File: | + | [[File:IDEsetup4.JPG|600px|center|thumb]] |
| − | * | + | *After the Arduino IDE has been installed, a window for driver installation will appear. Click【Extract】 and follow the instructions. |
| − | = | + | [[File:IDEsetup5.JPG|600px|center|thumb]] |
| − | * | + | *Click【Finish】to complete the installation. |
| + | [[File:IDEsetup6.JPG|600px|center|thumb]] | ||
| + | *After installation, there will be a shortcut to the Arduino IDE on your desktop. | ||
| + | [[File:ArduinoIcon.png|600px|center|thumb]] | ||
| + | =Confirm Drivers Installed Successfully= | ||
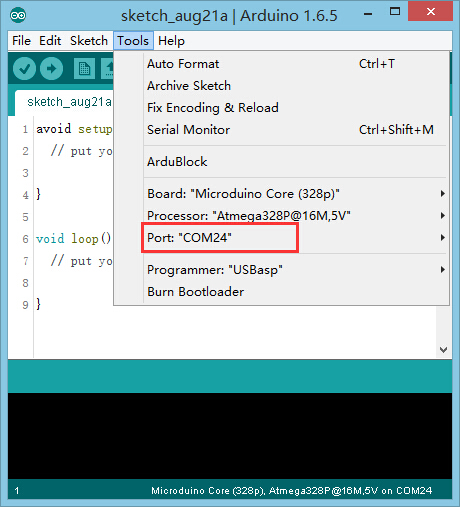
| + | *Connect [[Microduino-USBTTL]] to your computer. Verify that there are available Port options under Tools. | ||
[[File:microduinoGettingStart-USBTTL.jpg|600px|center|thumb]] | [[File:microduinoGettingStart-USBTTL.jpg|600px|center|thumb]] | ||
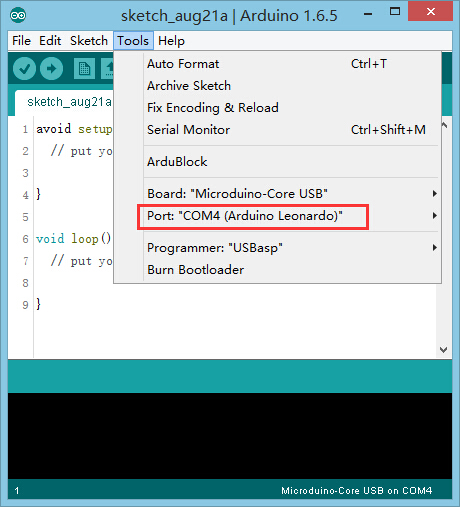
| − | * | + | *Connect [[Microduino-CoreUSB]] or [[mCookie-CoreUSB]] to your computer. Verify that there are available Port options under Tools. |
[[File:microduinoGettingStart-CoreUSB.jpg|600px|center|thumb]] | [[File:microduinoGettingStart-CoreUSB.jpg|600px|center|thumb]] | ||
| − | ==IDE | + | ==Arduino IDE Basics== |
| − | + | ===Interface=== | |
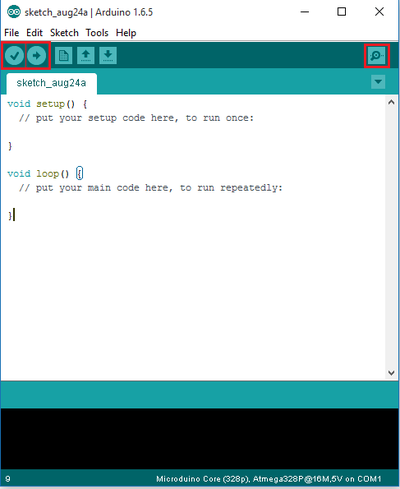
| − | [[File: | + | [[File:Interface.png|500px|center|thumb]] |
| − | + | *【Verify】: Checks for errors in the code. | |
| − | + | *【Upload】: Uploads the program to a MCU. | |
| − | + | *【Serial Monitor】: Useful in debugging programs. | |
| − | + | ===Tools=== | |
| − | [[File: | + | [[File:Tools.JPG|600px|center|thumb]] |
| − | + | *【Board】: Select the corresponding core module to which the program is being uploaded. | |
| − | + | *【Processor】: Select the corresponding processor. | |
| − | + | *【Port】: Select the common USB port. | |
| − | + | ===The Board Types=== | |
{| style="width: 800px;" | colspan="2" | | {| style="width: 800px;" | colspan="2" | | ||
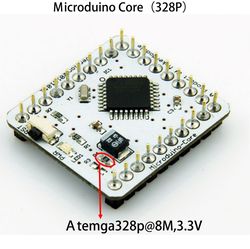
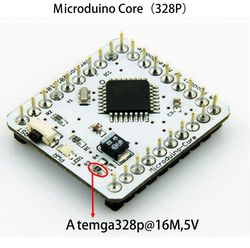
| − | [[Microduino-Core | + | When using [[Microduino-Core]], select the proper processor for your board: |
|- | |- | ||
| style="width:300px" align="left"| | | style="width:300px" align="left"| | ||
| 第60行: | 第65行: | ||
{| style="width: 800px;" | colspan="2" | | {| style="width: 800px;" | colspan="2" | | ||
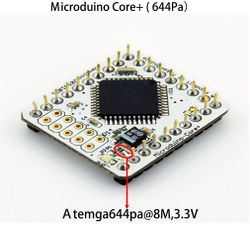
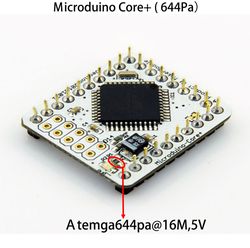
| − | [[Microduino-Core+ | + | When using [[Microduino-Core+]], select the proper processor for your board: |
|- | |- | ||
| style="width:300px" align="left"| | | style="width:300px" align="left"| | ||
| 第77行: | 第82行: | ||
{| style="width: 800px;" | colspan="2" | | {| style="width: 800px;" | colspan="2" | | ||
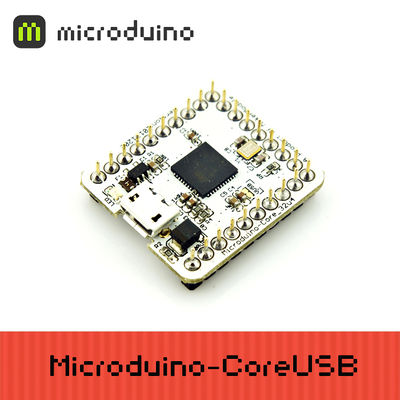
| − | [[Microduino-CoreUSB | + | When using [[Microduino-CoreUSB]] or [[mCookie-CoreUSB]], select Microduino-CoreUSB: |
|- | |- | ||
| style="width:300px" align="left"| | | style="width:300px" align="left"| | ||
| 第93行: | 第98行: | ||
<br> | <br> | ||
| − | + | ===Uploading Code=== | |
| − | + | #Select board type and processor. | |
| − | + | #Select the port. | |
| − | + | #Click upload. | |
|} | |} | ||
2015年8月25日 (二) 08:26的最新版本
| Language | English |
|---|
目录[隐藏]Download
Installation
文件:IDEsetup1.JPG 600px
文件:IDEsetup2.JPG 600px
文件:IDEsetup3.JPG 600px
文件:IDEsetup4.JPG 600px
文件:IDEsetup5.JPG 600px
文件:IDEsetup6.JPG 600px
文件:ArduinoIcon.png 600px Confirm Drivers Installed Successfully
Arduino IDE BasicsInterface
Tools文件:Tools.JPG 600px
The Board TypesWhen using Microduino-Core, select the proper processor for your board:
Uploading Code
|
