“MCookie-RTC/zh”的版本间的差异
Zhangfengfeng(讨论 | 贡献) (→应用) |
502748957@qq.com(讨论 | 贡献) |
||
| (未显示4个用户的10个中间版本) | |||
| 第1行: | 第1行: | ||
| − | { | + | {| style="width: 800px;" |
| + | |- | ||
| + | |[[File:mCookie-rtc-rect.jpg|300px|left]] || | ||
| + | ::<p style="color: #000000;font-size:200%"><br><br><br><br><br>'''mCookie-RTC'''</p> | ||
| + | ::产品编号:'''<big style="color: #00A0A6"> </big>''' | ||
| + | |- | ||
| + | |[[File: Add-to-cart.jpg|300px|left|link=https://shop108263663.taobao.com/?spm=a230r.7195193.1997079397.2.ek3cAW]]|| | ||
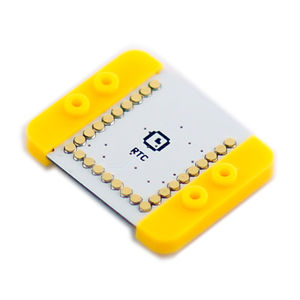
| + | ::<p style="color: #000000;font-size:120%">mCookie-RTC模块是时钟模块,可获取时间,采用IIC接口通信。 超级电容提供了一定的掉电计时能力,断电后时钟芯片还可运行。</p> | ||
| + | |} | ||
| + | <br> | ||
| + | <br> | ||
{| style="width: 800px;" | {| style="width: 800px;" | ||
|- | |- | ||
| | | | ||
| − | + | <p style="color: #333333;font-size:155%">'''技术规格'''</p> | |
| − | + | {| class="wikitable" | |
| − | + | |- | |
| − | + | | '''供电'''||BM模块供电/[[MCookie-Battery]]供电 | |
| − | + | |- | |
| − | + | | '''通信控制'''||IIC协议 | |
| − | + | |- | |
| − | + | | '''特性描述'''||1:同步整流,可降低功耗,直流电动机制动模式,可同时驱动两个直流电机 | |
| − | + | |- | |
| − | + | |''' '''||2:带有世纪标志、秒、分、时、日、星期、月、年 | |
| − | + | |- | |
| − | + | |''' '''||3:带I2C接口的EEPROM存储芯片 | |
| − | + | |- | |
| − | + | |''' '''||4:时钟芯片功耗低,典型电流值为0.25μA,外加超级电容,掉电后时钟芯片依然运行 | |
| − | + | |} | |
| − | |||
| − | |||
| − | |||
| − | |||
*时钟芯片:PCF8563 | *时钟芯片:PCF8563 | ||
**低功耗的CMOS 实时时钟/日历芯片; | **低功耗的CMOS 实时时钟/日历芯片; | ||
| 第35行: | 第41行: | ||
[[File:mCookie-RTC-Pinout-1Big1.jpg|800px|thumb|center|mCookie-RTC-Pinout1]] | [[File:mCookie-RTC-Pinout-1Big1.jpg|800px|thumb|center|mCookie-RTC-Pinout1]] | ||
| + | <br> | ||
| + | ---- | ||
| + | <br> | ||
| + | <p style="color: #333333;font-size:155%">'''引脚'''</p> | ||
| + | {|class="wikitable" | ||
| + | ! rowspan="1" |mCookie引脚||MotorPlus引脚||功能 | ||
| + | |- | ||
| + | | SDA||SDA||IIC通信数据线 | ||
| + | |- | ||
| + | | SCL||SCL||IIC通信时钟线 | ||
| + | |- | ||
| + | | VMOT||VMOT||供电 | ||
| + | |- | ||
| + | | GND||GND||共地 | ||
| + | |} | ||
| − | |||
| − | |||
| − | |||
| − | = | + | |} |
| − | [[ | + | <br> |
| − | + | ---- | |
| − | + | <br> | |
| − | = | + | |
| + | <p style="color: #333333;font-size:135%">'''编程手册'''</p> | ||
| + | **<big>【[[MCookie-RTC Reference|RTC模块库语法手册]]】'''</big> | ||
| + | |||
| + | <br> | ||
| + | ---- | ||
| + | <br> | ||
| + | <p style="color: #333333;font-size:135%">'''示例教程'''</p> | ||
| + | *掉电续时测试 | ||
<source lang="cpp"> | <source lang="cpp"> | ||
#include <Wire.h> | #include <Wire.h> | ||
| 第55行: | 第81行: | ||
{ | { | ||
Serial.begin(9600); | Serial.begin(9600); | ||
| − | settime( | + | settime(2017, 8, 10, 4, 15, 57, 36);//年,月,日,星期,时,分,秒 |
} | } | ||
| 第68行: | 第94行: | ||
Serial.println("CODE_2:"); | Serial.println("CODE_2:"); | ||
| − | |||
Serial.print(rtc.getYear());//获取年 | Serial.print(rtc.getYear());//获取年 | ||
Serial.print("/"); | Serial.print("/"); | ||
| 第96行: | 第121行: | ||
</source> | </source> | ||
| − | + | 运行结果:该示例设置时间。初次设定后 | |
| − | + | DateTime dateTime = {2016, 6, 3, 1, 15, 30, 40}; | |
| − | + | rtc.setDateTime(dateTime); | |
| − | + | 通过此函数设定时间,打开串口后串口显示运行时间,由15:30:40开始。如需要测试掉电时间,将代码中如上函数注释,并重新下载。之后打开串口观察时间是否连续计算。 | |
| − | |||
| − | |||
| − | |||
| − | |||
| − | |||
| − | |||
| − | |||
| − | + | *EEPROM读写测试 | |
<source lang="cpp"> | <source lang="cpp"> | ||
#include <EEPROM.h> | #include <EEPROM.h> | ||
| 第145行: | 第163行: | ||
Serial.println(""); | Serial.println(""); | ||
} | } | ||
| − | + | </source> | |
| − | + | *EEPROM写入 | |
| + | <source lang="cpp"> | ||
void eeprom_write() | void eeprom_write() | ||
{ | { | ||
| 第159行: | 第178行: | ||
*在测试过程中拔掉电源后插上电源,打开串口监视器可以看到“EEPROM Read”的数据为最后写入的“EEPROM Write”值。 | *在测试过程中拔掉电源后插上电源,打开串口监视器可以看到“EEPROM Read”的数据为最后写入的“EEPROM Write”值。 | ||
| − | ==图库== | + | *更多使用方法及函数解析可参照: |
| + | **<big>【[[MCookie-RTC Reference|RTC模块库语法手册]]】'''</big> | ||
| + | <br> | ||
| + | ---- | ||
| + | <br> | ||
| + | <p style="color: #333333;font-size:135%">'''Q&A'''</p> | ||
| + | |||
| + | |||
| + | <br> | ||
| + | ---- | ||
| + | <br> | ||
| + | <p style="color: #333333;font-size:135%">'''应用'''</p> | ||
| + | [[时间获取]]<br> | ||
| + | [[mWatch手表]]<br> | ||
| + | [[算数闹钟]]<br> | ||
| + | [[吼叫闹钟]]<br> | ||
| + | <br> | ||
| + | ---- | ||
| + | <br> | ||
| + | <p style="color: #333333;font-size:135%">'''历史'''</p> | ||
| + | |||
| + | |||
| + | <br> | ||
| + | ---- | ||
| + | <br> | ||
| + | <p style="color: #333333;font-size:135%">'''图库'''</p> | ||
| + | {| border="0" cellpadding="10" width="100%" | ||
[[file:mCookie-rtc-t.jpg|thumb|600px|center|Front]] | [[file:mCookie-rtc-t.jpg|thumb|600px|center|Front]] | ||
[[file:mCookie-rtc-B.jpg|thumb|600px|center|Back]] | [[file:mCookie-rtc-B.jpg|thumb|600px|center|Back]] | ||
|} | |} | ||
| + | |||
| + | |||
| + | [[MCookie_产品系列/zh|返回mCookie产品系列页面]] | ||
2018年12月21日 (五) 07:42的最新版本
| |
|
|
技术规格
引脚
|
编程手册
示例教程
- 掉电续时测试
#include <Wire.h>
#include <Rtc_Pcf8563.h>

//init the real time clock
Rtc_Pcf8563 rtc;

void setup()
{
  Serial.begin(9600);
  settime(2017, 8, 10, 4, 15, 57, 36);//年,月,日,星期,时,分,秒
}

void loop()
{
  //both format functions call the internal getTime() so that the
  //formatted strings are at the current time/date.
  Serial.println("CODE_1:");
  Serial.print(rtc.formatDate());//获取日期
  Serial.print("    ");
  Serial.println(rtc.formatTime());//获取时间

  Serial.println("CODE_2:");
  Serial.print(rtc.getYear());//获取年
  Serial.print("/");
  Serial.print(rtc.getMonth());//获取月
  Serial.print("/");
  Serial.print(rtc.getDay());//获取日
  Serial.print("     ");
  Serial.print(rtc.getHour());//获取时
  Serial.print(":");
  Serial.print(rtc.getMinute());//获取分
  Serial.print(":");
  Serial.println(rtc.getSecond());//获取秒

  delay(1000);
  Serial.print("\r\n");
}
void settime(int _year, int _month, int _day, int _week, int _hour, int _min, int _sec)
{
  //clear out the registers
  rtc.initClock();
  //set a time to start with.
  //day, weekday, month, century(1=1900, 0=2000), year(0-99)
  rtc.setDate(_day, _week, _month, 0, _year);
  //hr, min, sec
  rtc.setTime(_hour, _min, _sec);
}
运行结果:该示例设置时间。初次设定后 DateTime dateTime = {2016, 6, 3, 1, 15, 30, 40}; rtc.setDateTime(dateTime); 通过此函数设定时间,打开串口后串口显示运行时间,由15:30:40开始。如需要测试掉电时间,将代码中如上函数注释,并重新下载。之后打开串口观察时间是否连续计算。
- EEPROM读写测试
#include <EEPROM.h>

long randNumber, data; //定义随机变量使用数据名称

//EEPROM配置
#define EEPROM_write(address, p) {int i = 0; byte *pp = (byte*)&(p);for(; i < sizeof(p); i++) EEPROM.write(address+i, pp[i]);}
#define EEPROM_read(address, p)  {int i = 0; byte *pp = (byte*)&(p);for(; i < sizeof(p); i++) pp[i]=EEPROM.read(address+i);}

//定义EEPROMdata
struct config_type
{
  int EEPROMdata;
};

void setup()
{
  Serial.begin(115200);
  /*EEPROM读取赋值*/
  config_type config_readback;
  EEPROM_read(0, config_readback);
  data = config_readback.EEPROMdata;
}
void loop()
{
  randNumber = random(10, 100);//随机函数,randNumber的值从10到99变化
  delay(1000);//每隔1s刷新一次
  if (randNumber != data) //判断EEPROM数据是否变化,变化则写入
    eeprom_write();//EEPROM写入函数
  Serial.print("EEPROM Write:");
  Serial.println(randNumber);
  Serial.print("EEPROM Read:");
  Serial.println(data);
  delay(1000);
  Serial.println("");
}
- EEPROM写入
void eeprom_write()
{
  config_type config;                  // 定义结构变量config,并定义config的内容
  config.EEPROMdata = randNumber;
  EEPROM_write(0, config);         // 变量config存储到EEPROM,地址0写入
}
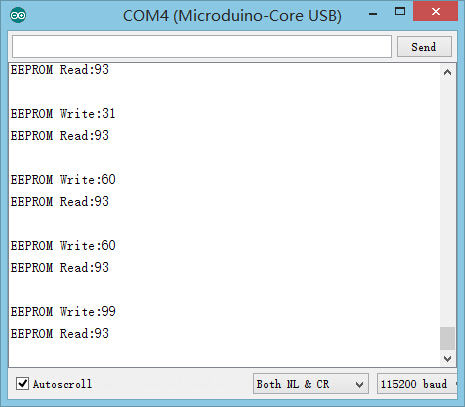
- 将上述程序复制到IDE,下载程序,打开串口监视器,可以看到EEPROM写入的数据和读出的数据。
- 在测试过程中拔掉电源后插上电源,打开串口监视器可以看到“EEPROM Read”的数据为最后写入的“EEPROM Write”值。
- 更多使用方法及函数解析可参照:
Q&A
应用
历史
图库


