“Sensor-Shake/zh”的版本间的差异
小 (Wasdpkj@hotmail.com moved page Microduino-Shake/zh to Sensor-Shake/zh) |
502748957@qq.com(讨论 | 贡献) |
||
| (未显示4个用户的30个中间版本) | |||
| 第1行: | 第1行: | ||
| − | + | {| style="width: 800px;" | |
| − | + | |- | |
| + | |[[File: Microduino-Shake.jpg|300px|left]] || | ||
| + | ::<p style="color: #000000;font-size:200%"><br><br><br><br><br>'''Sensor-Shake'''</p> | ||
| + | ::产品编号:'''<big style="color: #00A0A6">MSDS51</big>''' | ||
| + | |- | ||
| + | |[[File: Add-to-cart.jpg|300px|left|link=https://shop108263663.taobao.com/?spm=a230r.7195193.1997079397.2.ek3cAW]]|| | ||
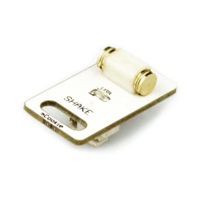
| + | ::<p style="color: #000000;font-size:120%">Sensor-Shake是震动检测传感器模块,振动传感器是检测物体机械振动量的一种传感器。 | ||
| + | </p> | ||
| + | |} | ||
| + | <br> | ||
| + | <br> | ||
{| style="width: 800px;" | {| style="width: 800px;" | ||
|- | |- | ||
| | | | ||
| − | + | <p style="color: #333333;font-size:155%">'''技术规格'''</p> | |
| − | + | *传感器电压 | |
| − | + | **3.3V~5V工作电压 | |
| − | |||
| − | |||
| − | |||
| − | |||
| − | |||
| − | |||
| − | |||
| − | |||
| − | |||
| − | |||
| − | |||
| − | |||
| − | |||
| − | |||
| − | |||
| − | |||
| − | |||
| − | |||
| − | |||
| − | **3.3V~ | ||
*技术参数 | *技术参数 | ||
| − | ** | + | **传感器信号'''<big style="color: #F0483C">没震动时为LOW,有震动后信号变为HIGH</big>''' |
| − | + | **机械开关在一般存在机械抖动,在使用时最好加上程序防抖 | |
| − | |||
| − | |||
| − | |||
| − | |||
| − | ** | ||
| − | |||
*接法 | *接法 | ||
| − | ** | + | **本传感器可连接到核心的以下接口:'''D2~D13''','''A0~A7''' |
| − | + | <br> | |
| − | [[file: | + | ---- |
| − | [[ | + | <br> |
| + | <p style="color: #333333;font-size:155%">'''引脚'''</p> | ||
| + | {| border="0" cellpadding="10" width="90%" | ||
| + | |- | ||
| + | |width="35%" valign="center" align="left"| | ||
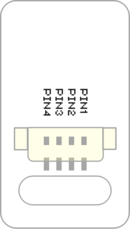
| + | *IN'''<big style="color: #00A0A6">(数字信号)</big>''' | ||
| + | **PIN1:GND | ||
| + | **PIN2:VCC | ||
| + | **PIN3:数字信号输入 | ||
| + | **PIN4:NC(空) | ||
| + | |width="35%" valign="top" align="center"| | ||
| + | [[file: Sensor_backpin.png|130px|center]] | ||
| + | |width="25%" valign="top" align="center"| | ||
| + | |} | ||
| + | <br> | ||
| + | ---- | ||
| + | <br> | ||
| + | <p style="color: #333333;font-size:135%">'''编程手册'''</p> | ||
| + | 您可通过[[AVR核心:Getting_started/zh|Getting Started]]了解使用Arduino IDE编程控制模块。 | ||
| + | <p style="color: #333333;font-size:120%">'''普通用法'''</p> | ||
| + | 可通过[[digitalRead()]]来直接读取触摸开关的信号:高(1、真)或低(0、假)。 | ||
| + | <source lang="cpp"> | ||
| + | #include <Arduino.h> | ||
| + | void setup() { | ||
| + | // put your setup code here, to run once: | ||
| + | Serial.begin(9600); //初始化串口,并设置波特率为9600 | ||
| + | } | ||
| − | ==文档== | + | void loop() { |
| + | // put your main code here, to run repeatedly: | ||
| + | Serial.println(digitalRead(D4)); //打印从模拟引脚读取的震动状态到串口 | ||
| + | delay(10); //延时1秒 | ||
| + | } | ||
| + | </source> | ||
| + | <p style="color: #333333;font-size:120%">'''高级用法'''</p> | ||
| + | 【_07_m_Sensor_Key】库参考页面提供了有关如何使用按键开关的完整详细信息和示例。 | ||
| + | *<p style="font-size:125%">库语法手册</p>[[Sensor_Key_Reference]] | ||
| + | <br> | ||
| + | [[file: Sensor_Key-idecode.JPG|400px|center]] | ||
| + | <br> | ||
| + | ---- | ||
| + | <br> | ||
| + | <p style="color: #333333;font-size:135%">'''文档'''</p> | ||
| + | *传感器CAD图纸:'''[[File:Sensor_CAD.zip]]''' | ||
| + | *库GitLab下载:[https://git.microduino.cn/hardware/libraries/tree/master/_07_m_Sensor_Key _07_m_Sensor_Key库下载] | ||
| + | <br> | ||
| + | ---- | ||
| + | <br> | ||
| + | <p style="color: #333333;font-size:135%">'''相关教程'''</p> | ||
| + | *[[开关短按与长按]] | ||
| + | *[[开关状态与动作]] | ||
| + | <br> | ||
| + | ---- | ||
| + | <br> | ||
| + | <p style="color: #333333;font-size:135%">'''Q&A'''</p> | ||
| + | *为什么感觉震动很灵敏? | ||
| + | **因为震动传感器是机械开关,机械开关会抖动。 | ||
| − | |||
| − | + | <br> | |
| − | + | <br> | |
| − | + | ---- | |
| − | + | <br> | |
| − | + | <p style="color: #333333;font-size:135%">'''历史'''</p> | |
| − | + | *最新版本更新了[[Sensor_Key_Reference]]库使用说明。 | |
| − | + | *[https://wiki.microduino.cn/index.php?title=Sensor-Shake/zh&oldid=20493 2017/5/31] | |
| − | + | <br> | |
| − | + | <br> | |
| − | = | + | ---- |
| − | + | <br> | |
| − | + | <p style="color: #333333;font-size:135%">'''图库'''</p> | |
| − | + | {| border="0" cellpadding="10" width="100%" | |
| − | + | |- | |
| − | + | |width="50%" valign="top" align="left"| | |
| − | + | [[file: MicroduinoShake-F.JPG|250px|center]] | |
| − | + | |width="50%" valign="top" align="left"| | |
| − | + | [[file: Microduino-Shake-b.JPG|250px|center]] | |
| − | + | |} | |
| − | |||
| − | |||
| − | [[ | ||
| − | * | ||
| − | |||
| − | |||
| − | |||
| − | |||
| − | |||
| − | |||
| − | |||
| − | == | ||
| − | |||
| − | |||
| − | |||
| − | |||
| − | |||
| − | |||
| − | |||
| − | |||
| − | = | ||
| − | |||
| − | |||
| − | |||
| − | == | ||
| − | |||
| − | |||
| − | [[file: | ||
| − | |||
| − | [[file: Microduino-Shake -b.JPG| | ||
|} | |} | ||
| + | <br> | ||
| + | <p style="font-size:150%">[[MCookie 传感器系列|返回Sensor界面]]</p> | ||
| + | <br> | ||
| + | <br> | ||
2018年11月14日 (三) 05:59的最新版本
| |
|
|
技术规格
引脚
编程手册 您可通过Getting Started了解使用Arduino IDE编程控制模块。 普通用法 可通过digitalRead()来直接读取触摸开关的信号:高(1、真)或低(0、假)。 #include <Arduino.h>
void setup() {
// put your setup code here, to run once:
Serial.begin(9600); //初始化串口,并设置波特率为9600
}
void loop() {
// put your main code here, to run repeatedly:
Serial.println(digitalRead(D4)); //打印从模拟引脚读取的震动状态到串口
delay(10); //延时1秒
}
高级用法 【_07_m_Sensor_Key】库参考页面提供了有关如何使用按键开关的完整详细信息和示例。
文档
相关教程
Q&A
历史
图库 |


