“CoreESP32:Micropython Getting started/zh”的版本间的差异
Radiumray9(讨论 | 贡献) (→安装uPyCraft IDE) |
(→flash_download_tools工具烧录) |
||
| (未显示2个用户的25个中间版本) | |||
| 第18行: | 第18行: | ||
==如何安装官方micropython for ESP32固件== | ==如何安装官方micropython for ESP32固件== | ||
*下载地址:https://micropython.org/download#esp32 | *下载地址:https://micropython.org/download#esp32 | ||
| − | |||
| − | |||
| − | |||
| − | |||
| − | * | + | ==烧录方式== |
| − | + | *flash_download_tools工具烧录 | |
| + | *esptool烧录 | ||
| − | + | ==flash_download_tools工具烧录== | |
| − | [[File: | + | 烧写固件所用工具 |
| + | :flash_download_tools | ||
| + | :下载地址:https://www.espressif.com/en/support/download/other-tools?keys=&field_type_tid%5B%5D=13 | ||
| + | [[File:micropythonGettingStartFlashDownloadTools.png||600px|center]] | ||
| − | + | 下载flash_download_tools并解压,打开后如下: | |
| − | [[File: | + | [[File:micropythonGettingStartFlashDownloadTools1.png||600px|center]] |
| − | + | ||
| − | [[File: | + | 烧写固件步骤: |
| + | 点击ESPFlashDownloadTool_v3.6.4.exe | ||
| + | 选择ESP32 DownloadTool | ||
| + | 固件选择esp32Python.bin | ||
| + | 使用FLASH_DOWNLOAD_TOOLS时,按照下面参数配置,重点是地址为0x1000,以及选中DoNotChgBin选项,并勾选前面的对勾 | ||
| + | |||
| + | [[File:micropythonGettingStartFlashDownloadTools2.png||300px]] | ||
| + | [[File:micropythonGettingStartFlashDownloadTools3.png||300px]] | ||
| + | |||
| + | USB线连接MiroRobot并开机,串口就会识别,选择识别的串口 | ||
| + | 点击[Start],就会有进度条显示烧录过程 | ||
| + | |||
| + | [[File:micropythonGettingStartFlashDownloadTools4.png||300px]] | ||
| + | [[File:micropythonGettingStartFlashDownloadTools5.png||300px]] | ||
| − | + | 到此,micropython固件就成功烧写进MicroRobot里边了 | |
| − | |||
| − | |||
| − | |||
| − | |||
| − | + | 另一种烧录方式是esptool烧录:[[esptool烧录|'''esptool烧录''']] | |
| − | |||
| − | |||
| − | |||
| − | [[ | ||
| − | |||
| − | + | ==测试方法== | |
| − | + | 你可以用串口调试工具测试一下: | |
| − | + | [[File:micropythonGettingStart4.png||600px|center]] | |
| − | |||
| − | |||
| − | [[File: | ||
| − | |||
| − | |||
| − | |||
| − | |||
| − | |||
| − | |||
| − | + | ==安装OpenIOE IDE PRO== | |
| + | 下载地址:http://openide.celerstar.com/ | ||
| + | [[File:micropythonGettingStartOpenIOE.png||600px|center]] | ||
| + | 这里有一些microduino的驱动库可以使用:https://github.com/radiumray/micropythonESP32 包括: | ||
| + | *蜂鸣器 | ||
| + | *MicroRobot | ||
| + | *LM75温度 | ||
| + | *SHT2X温湿度 | ||
| + | *ws2812彩灯 | ||
| + | *OLED屏幕 | ||
| + | *SD卡 | ||
| − | |||
| − | |||
| − | |||
| − | + | 另一种个开发IDE是:[[uPyCraft IDE|'''uPyCraft IDE''']] | |
| − | [[ | ||
2018年5月17日 (四) 06:23的最新版本
目录
引言&概述
MicroPython是脱胎于Python, 是一个叫Damien George的人花费数月时间打造的, 基于ANSI C(C语言标准), 然后在语法上又遵循了Python的规范, 主要是为了能在嵌入式硬件上(这里特指微控制器级别)更易于的实现对底层的操作.
截止到目前, 已经有不少嵌入式硬件成功移植了Micropython, 如:
- pyboard
- esp8266
- ESP32
- WiPy
- Espruino Pico
- STM32F4 Discovery
本教程就是教大家如何在Microduino-CoreESP32开发板上运行micropython
应用背景
- 在Microduino-CoreESP上用python语言编程开发
如何安装官方micropython for ESP32固件
烧录方式
- flash_download_tools工具烧录
- esptool烧录
flash_download_tools工具烧录
烧写固件所用工具
- flash_download_tools
- 下载地址:https://www.espressif.com/en/support/download/other-tools?keys=&field_type_tid%5B%5D=13
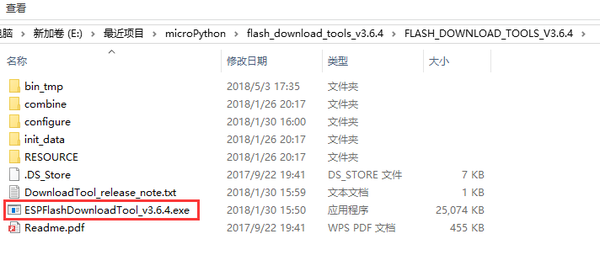
下载flash_download_tools并解压,打开后如下:
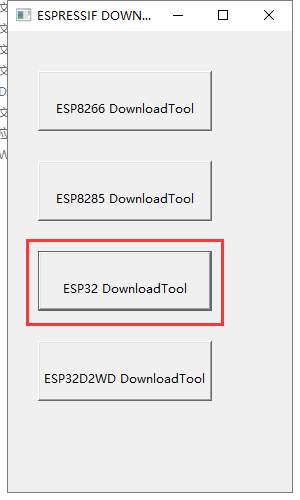
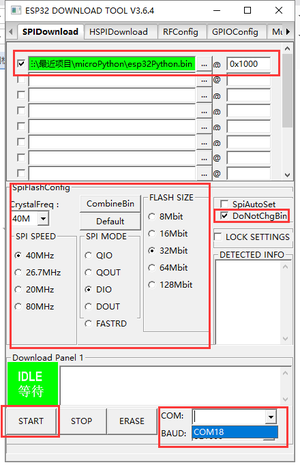
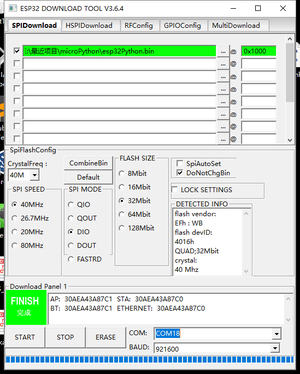
烧写固件步骤: 点击ESPFlashDownloadTool_v3.6.4.exe 选择ESP32 DownloadTool 固件选择esp32Python.bin 使用FLASH_DOWNLOAD_TOOLS时,按照下面参数配置,重点是地址为0x1000,以及选中DoNotChgBin选项,并勾选前面的对勾
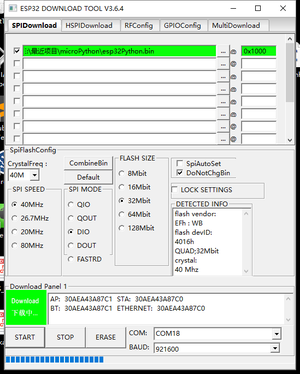
USB线连接MiroRobot并开机,串口就会识别,选择识别的串口 点击[Start],就会有进度条显示烧录过程
到此,micropython固件就成功烧写进MicroRobot里边了
另一种烧录方式是esptool烧录:esptool烧录
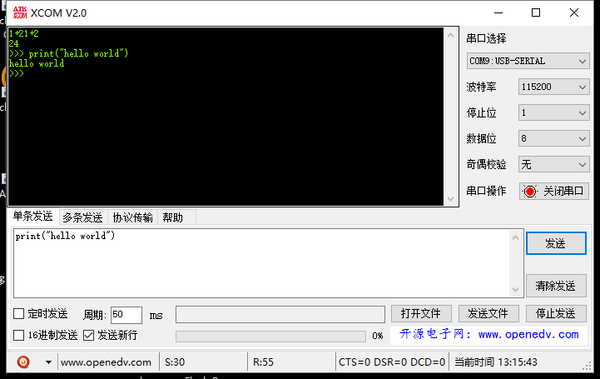
测试方法
你可以用串口调试工具测试一下:
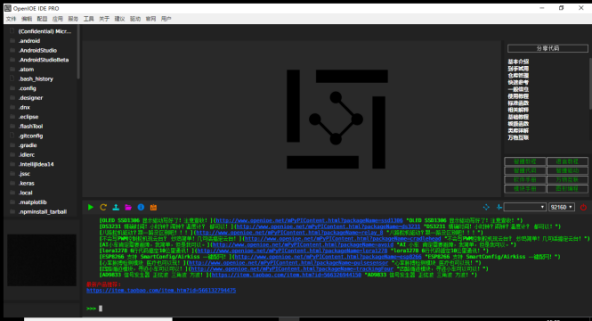
安装OpenIOE IDE PRO
下载地址:http://openide.celerstar.com/
这里有一些microduino的驱动库可以使用:https://github.com/radiumray/micropythonESP32 包括:
- 蜂鸣器
- MicroRobot
- LM75温度
- SHT2X温湿度
- ws2812彩灯
- OLED屏幕
- SD卡
另一种个开发IDE是:uPyCraft IDE

