“Sensor-PIR/zh”的版本间的差异
Zhangfengfeng(讨论 | 贡献) (→文档) |
502748957@qq.com(讨论 | 贡献) |
||
| (未显示2个用户的26个中间版本) | |||
| 第1行: | 第1行: | ||
| − | { | + | {| style="width: 800px;" |
| − | - | + | |- |
| + | |[[File: Microduino-Passive Infrared.jpg|300px|left]] || | ||
| + | ::<p style="color: #000000;font-size:200%"><br><br><br><br><br>'''Sensor-PIR'''</p> | ||
| + | ::产品编号:'''<big style="color: #00A0A6">MSDI51</big>''' | ||
| + | |- | ||
| + | |[[File: Add-to-cart.jpg|300px|left|link=https://shop108263663.taobao.com/?spm=a230r.7195193.1997079397.2.ek3cAW]]|| | ||
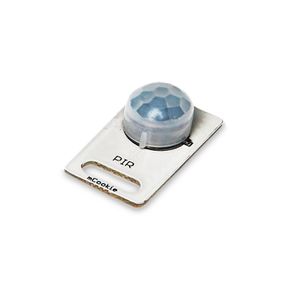
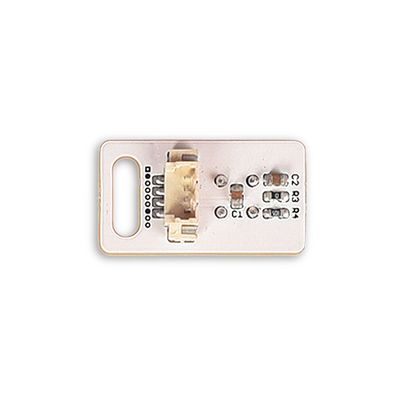
| + | ::<p style="color: #000000;font-size:120%">Sensor-PIR红外热释电运动传感器能检测运动的人或动物身上发出的红外线,输出开关信号,可以应用于各种需要检测运动人体的场合。</p> | ||
| + | |} | ||
| + | <br> | ||
| + | <br> | ||
{| style="width: 800px;" | {| style="width: 800px;" | ||
|- | |- | ||
| | | | ||
| − | + | <p style="color: #333333;font-size:155%">'''技术规格'''</p> | |
| + | {| class="wikitable" | ||
| + | |- | ||
| + | | '''电压'''||3V~5V | ||
| + | |- | ||
| + | | '''生效距离'''||10厘米~3米 | ||
| + | |- | ||
| + | | '''传感器大小'''||23.5mm*13mm | ||
| + | |- | ||
| + | | '''接口'''||1.27mm间距的4Pin座 | ||
| + | |- | ||
| + | | '''工作电流'''||12~15uA | ||
| + | |- | ||
| + | | '''工作温度'''||-20~85℃ | ||
| + | |- | ||
| + | | '''特性描述'''||数字接口返回高或低,有热量运动时为高,没有运动时为低 | ||
| + | |} | ||
| + | <br> | ||
| + | ---- | ||
| − | + | <br> | |
| + | <p style="color: #333333;font-size:155%">'''引脚'''</p> | ||
| + | {| border="0" cellpadding="10" width="90%" | ||
| + | |- | ||
| + | |width="35%" valign="center" align="left"| | ||
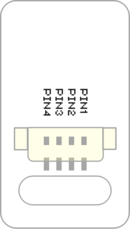
| + | *IN'''<big style="color: #00A0A6">(数字信号)</big>''' | ||
| + | **PIN1:GND | ||
| + | **PIN2:VCC | ||
| + | **PIN3:数字信号输出 | ||
| + | **PIN4:NC(空) | ||
| + | |width="35%" valign="top" align="center"| | ||
| + | [[file: Sensor_backpin.png|130px|center]] | ||
| + | |width="25%" valign="top" align="center"| | ||
| + | |} | ||
| + | <br> | ||
| + | ---- | ||
| + | <br> | ||
| + | <p style="color: #333333;font-size:155%">'''技术参数'''</p> | ||
| + | *静止触发时间:立即 | ||
| + | *触发转静止时间:2.3~3秒左右 | ||
| + | [[File: PIR触发时序.png|300px|center]] | ||
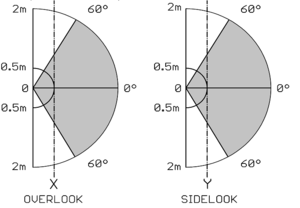
| + | *感应角度:传感器面对方向,左右150°上下150° | ||
| + | *感应距离:3米效果最佳,更远可至5米。 | ||
| + | [[File: PIR生效距离.png|300px|center]] | ||
| + | <br> | ||
| + | ---- | ||
| + | <br> | ||
| + | <p style="color: #333333;font-size:155%">'''编程手册'''</p> | ||
| + | 您可以通过[[AVR核心:Getting_started/zh|Getting Started]]了解使用Arduino IDE编程控制模块。 | ||
| − | + | *本传感器可连接到核心的以下接口:'''D2~D13''' | |
| + | *除核心、电池盒、SensorHub外,还需准备一个PIR传感器和一个LED灯 | ||
| + | *本传感器检测到热量运动时,返回高电平,未检测到时返回低电平 | ||
| + | *使用4pin传感器线连接传感器与SensorHub扩展板的D6/D7接口,并将LED灯连接在D8/D9接口 | ||
| + | *该例程效果为:当PIR检测到热量运动时,LED灯点亮,当一段时间检测不到热量运动时,LED灯熄灭 | ||
| + | <source lang="cpp"> | ||
| + | #define PIR_PIN 6 | ||
| + | #define LED_PIN 8 | ||
| + | void setup() { | ||
| + | // put your setup code here, to run once: | ||
| + | pinMode(PIR_PIN, INPUT); //PIR传感器接口 | ||
| + | pinMode(LED_PIN, OUTPUT); //LED接口 | ||
| + | } | ||
| + | void loop() { | ||
| + | // put your main code here, to run repeatedly: | ||
| + | if (digitalRead(PIR_PIN)) //如果传感器返回高(即有热量运动) | ||
| + | { | ||
| + | digitalWrite(LED_PIN, HIGH); //亮灯 | ||
| + | }else{ | ||
| + | digitalWrite(LED_PIN, LOW); //灭灯 | ||
| + | } | ||
| + | } | ||
| + | </source> | ||
| + | <br> | ||
| + | ---- | ||
| + | <br> | ||
| + | <p style="color: #333333;font-size:155%">'''文档'''</p> | ||
| + | *传感器文档:'''[[File:EF4055-数字智能传感器 AM412.pdf]]''' | ||
| + | *传感器CAD图纸:'''[[File:Sensor_CAD.pdf]]''' | ||
| + | <br> | ||
| + | ---- | ||
| + | <br> | ||
| + | <p style="color: #333333;font-size:155%">'''注意事项'''</p> | ||
| + | *一般生物本身具有热量,会向外辐射红外线,该传感器会检测发热物体的红外线。所以不仅限于人类,多数发热物体的运动都有可能触发传感器。 | ||
| + | *静止的发热物体一般不会触发传感器。 | ||
| + | *该传感器较为敏感,测试时很可能因为5米/传感器面前扇形150°范围内使用者无意的肢体运动而触发。需要特别注意。 | ||
| + | *红外热释传感器均不适宜放在冷热交替较为明显或阳光暴晒的位置,这些位置容易产生热浪或红外波,误触发传感器。 | ||
| + | <br> | ||
| + | ---- | ||
| + | <br> | ||
| + | <p style="color: #333333;font-size:155%">'''示例教程'''</p> | ||
| + | *[[PIR人体红外检测]]<br> | ||
| + | *[[人体红外热释传感器]]<br> | ||
| + | *[[尖叫怪]]<br> | ||
| + | *[[招财猫]]<br> | ||
| + | *[[电子迎宾器]] | ||
| + | <br> | ||
| + | ---- | ||
| + | <br> | ||
| + | <p style="color: #333333;font-size:155%">'''Q&A'''</p> | ||
| + | <br> | ||
| + | ---- | ||
| + | <br> | ||
| + | <p style="color: #333333;font-size:155%">'''历史'''</p> | ||
| − | |||
| − | |||
| − | |||
| − | |||
| − | |||
| − | |||
| − | |||
| − | |||
| − | |||
| − | |||
| − | |||
| − | |||
| − | |||
| − | |||
| − | |||
| − | |||
| − | |||
| − | |||
| − | |||
| − | |||
| − | |||
| − | |||
| − | |||
| − | |||
| − | |||
| − | |||
| − | |||
| − | |||
| − | |||
| − | |||
| − | |||
| − | |||
| − | |||
| − | |||
| − | |||
| − | |||
| − | |||
| − | |||
| − | |||
| − | |||
| − | |||
| − | |||
| − | |||
| − | |||
| − | |||
| − | |||
| − | |||
| − | |||
| − | |||
<br> | <br> | ||
| − | + | ---- | |
| − | <br style=" | + | <br> |
| − | + | <p style="color: #333333;font-size:135%">'''图库'''</p> | |
| − | |||
| − | |||
| − | |||
| − | |||
| − | |||
| − | |||
| − | |||
| − | |||
| − | |||
| − | |||
| − | |||
| − | |||
| − | |||
| − | |||
{| border="0" cellpadding="10" width="100%" | {| border="0" cellpadding="10" width="100%" | ||
|- | |- | ||
| 第86行: | 第131行: | ||
|} | |} | ||
|} | |} | ||
| + | |||
| + | <p style="font-size:150%">[[MCookie 传感器系列|返回Sensor界面]]</p> | ||
| + | <br> | ||
| + | <br> | ||
2018年1月11日 (四) 11:22的最新版本
| |
|
|
技术规格
引脚
技术参数
编程手册 您可以通过Getting Started了解使用Arduino IDE编程控制模块。
#define PIR_PIN 6
#define LED_PIN 8
void setup() {
  // put your setup code here, to run once:
  pinMode(PIR_PIN, INPUT);   //PIR传感器接口
  pinMode(LED_PIN, OUTPUT);   //LED接口
}

void loop() {
  // put your main code here, to run repeatedly:
  if (digitalRead(PIR_PIN))   //如果传感器返回高(即有热量运动)
  {
    digitalWrite(LED_PIN, HIGH);    //亮灯
  }else{
    digitalWrite(LED_PIN, LOW);   //灭灯
  }
}
文档
注意事项
示例教程
Q&A
历史
图库 |
