“感温杯”的版本间的差异
(Created page with "{{Language| 感温杯}} {| style="width: 800px;" |- | ==目的== 放一杯水上去,不同的温度会根据程序设定亮起不同颜色的灯光。 File: Temp_Cap-cool....") |
(→原理) |
||
| (未显示同一用户的4个中间版本) | |||
| 第5行: | 第5行: | ||
==目的== | ==目的== | ||
放一杯水上去,不同的温度会根据程序设定亮起不同颜色的灯光。 | 放一杯水上去,不同的温度会根据程序设定亮起不同颜色的灯光。 | ||
| − | [[File: Temp_Cap-cool.jpg|600px|center | + | [[File: Temp_Cap-cool.jpg|600px|center]] |
==原理== | ==原理== | ||
| − | + | 温湿度传感器检测环境的温湿度,使彩灯在不同的区间亮不同的颜色。 | |
| − | [[File: Temp_Cap- | + | [[File: Temp_Cap-sch.jpg|600px|center]] |
==设备== | ==设备== | ||
| 第77行: | 第77行: | ||
==搭建硬件== | ==搭建硬件== | ||
*Setup 1:将温湿度传感器接到接到hub的IIC引脚上,彩灯接到A0引脚上。 | *Setup 1:将温湿度传感器接到接到hub的IIC引脚上,彩灯接到A0引脚上。 | ||
| − | [[file: ThermoCup _setup_2.jpg | | + | [[file: ThermoCup _setup_2.jpg |600px|center]] |
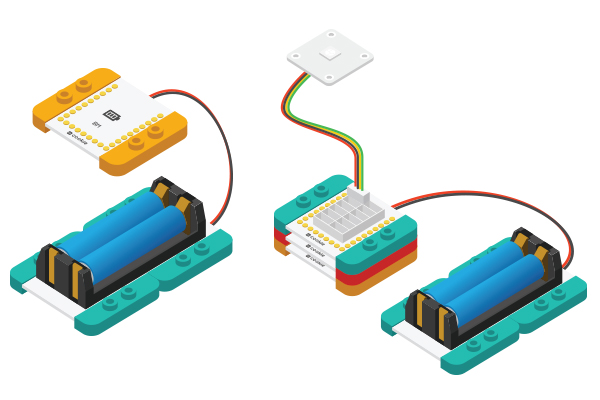
*Setup 2:将激活后的电池盒与BM模块相连. | *Setup 2:将激活后的电池盒与BM模块相连. | ||
| − | [[File: | + | [[File:CoreUSB_Ble_steup2.jpg|600px|center]] |
*Setup 3:将所有模块堆叠在一起,顺序随意,电路部分搭建完成。 | *Setup 3:将所有模块堆叠在一起,顺序随意,电路部分搭建完成。 | ||
[[File: ThermoCup_steup3.jpg|600px|center]] | [[File: ThermoCup_steup3.jpg|600px|center]] | ||
2015年9月19日 (六) 07:07的最新版本
| Language | English |
|---|
目的放一杯水上去,不同的温度会根据程序设定亮起不同颜色的灯光。 原理温湿度传感器检测环境的温湿度,使彩灯在不同的区间亮不同的颜色。 设备
加载代码
调试代码
void readByAM2321()
{
  AM2321 am2321;
  am2321.read();
  sensor_tem = am2321.temperature / 10.0;
  Serial.println(sensor_tem);
  delay(100);
}
#define temp1    28
#define temp2    30
#define temp3    32
  if (sensor_tem <= temp1)
    colorSet(strip.Color(0, 255, 0));

  else if (sensor_tem > temp1 && sensor_tem <= temp2)
    colorSet(strip.Color(0, 0, 255));

  else if (sensor_tem > temp2 && sensor_tem <= temp3)
    colorSet(strip.Color(255, 255, 0));

  else
    colorSet(strip.Color(255, 0, 0));
RGB值是定义光颜色的一种方法,R(Red)G(Green)B(Blue)为光的三原色,数值在0到255之间,代表该颜色的强度。将三种不同强度的光叠加在一起就能形成丰富多彩的颜色了。比如(0,255,0),R和B的值都是0,G的值为255,因此就是绿光。 搭建硬件
结果传感器检测到不同的温度数据灯光。你也可以通过乐高搭建一个漂亮的外观。 视频 |
