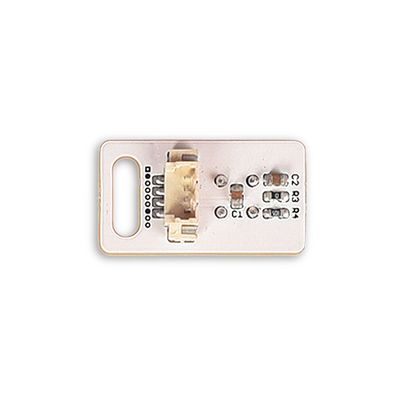
“Sensor-PIR/zh”的版本间的差异
502748957@qq.com(讨论 | 贡献) |
502748957@qq.com(讨论 | 贡献) |
||
| (未显示同一用户的6个中间版本) | |||
| 第23行: | 第23行: | ||
|- | |- | ||
| '''接口'''||1.27mm间距的4Pin座 | | '''接口'''||1.27mm间距的4Pin座 | ||
| + | |- | ||
| + | | '''工作电流'''||12~15uA | ||
| + | |- | ||
| + | | '''工作温度'''||-20~85℃ | ||
|- | |- | ||
| '''特性描述'''||数字接口返回高或低,有热量运动时为高,没有运动时为低 | | '''特性描述'''||数字接口返回高或低,有热量运动时为高,没有运动时为低 | ||
| 第37行: | 第41行: | ||
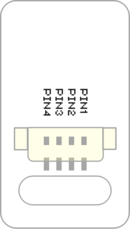
**PIN1:GND | **PIN1:GND | ||
**PIN2:VCC | **PIN2:VCC | ||
| − | ** | + | **PIN3:数字信号输出 |
**PIN4:NC(空) | **PIN4:NC(空) | ||
|width="35%" valign="top" align="center"| | |width="35%" valign="top" align="center"| | ||
| 第43行: | 第47行: | ||
|width="25%" valign="top" align="center"| | |width="25%" valign="top" align="center"| | ||
|} | |} | ||
| − | |||
| − | |||
| − | |||
| − | |||
| − | |||
| − | |||
| − | |||
| − | |||
| − | |||
| − | |||
<br> | <br> | ||
---- | ---- | ||
| 第59行: | 第53行: | ||
*静止触发时间:立即 | *静止触发时间:立即 | ||
*触发转静止时间:2.3~3秒左右 | *触发转静止时间:2.3~3秒左右 | ||
| − | * | + | [[File: PIR触发时序.png|300px|center]] |
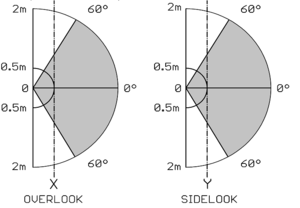
| − | * | + | *感应角度:传感器面对方向,左右150°上下150° |
| + | *感应距离:3米效果最佳,更远可至5米。 | ||
| + | [[File: PIR生效距离.png|300px|center]] | ||
<br> | <br> | ||
---- | ---- | ||
| 第73行: | 第69行: | ||
*该例程效果为:当PIR检测到热量运动时,LED灯点亮,当一段时间检测不到热量运动时,LED灯熄灭 | *该例程效果为:当PIR检测到热量运动时,LED灯点亮,当一段时间检测不到热量运动时,LED灯熄灭 | ||
<source lang="cpp"> | <source lang="cpp"> | ||
| + | #define PIR_PIN 6 | ||
| + | #define LED_PIN 8 | ||
void setup() { | void setup() { | ||
// put your setup code here, to run once: | // put your setup code here, to run once: | ||
| − | pinMode( | + | pinMode(PIR_PIN, INPUT); //PIR传感器接口 |
| − | pinMode( | + | pinMode(LED_PIN, OUTPUT); //LED接口 |
} | } | ||
void loop() { | void loop() { | ||
// put your main code here, to run repeatedly: | // put your main code here, to run repeatedly: | ||
| − | if (digitalRead( | + | if (digitalRead(PIR_PIN)) //如果传感器返回高(即有热量运动) |
{ | { | ||
| − | digitalWrite( | + | digitalWrite(LED_PIN, HIGH); //亮灯 |
}else{ | }else{ | ||
| − | digitalWrite( | + | digitalWrite(LED_PIN, LOW); //灭灯 |
} | } | ||
} | } | ||
| 第93行: | 第91行: | ||
<br> | <br> | ||
<p style="color: #333333;font-size:155%">'''文档'''</p> | <p style="color: #333333;font-size:155%">'''文档'''</p> | ||
| − | '''[[File: | + | *传感器文档:'''[[File:EF4055-数字智能传感器 AM412.pdf]]''' |
| + | *传感器CAD图纸:'''[[File:Sensor_CAD.pdf]]''' | ||
<br> | <br> | ||
---- | ---- | ||
| 第133行: | 第132行: | ||
|} | |} | ||
| − | + | <p style="font-size:150%">[[MCookie 传感器系列|返回Sensor界面]]</p> | |
| − | + | <br> | |
| − | + | <br> | |
| − | |||
| − | [[ | ||
2018年1月11日 (四) 11:22的最新版本
| |
|
|
技术规格
引脚
技术参数
编程手册 您可以通过Getting Started了解使用Arduino IDE编程控制模块。
#define PIR_PIN 6
#define LED_PIN 8
void setup() {
  // put your setup code here, to run once:
  pinMode(PIR_PIN, INPUT);   //PIR传感器接口
  pinMode(LED_PIN, OUTPUT);   //LED接口
}

void loop() {
  // put your main code here, to run repeatedly:
  if (digitalRead(PIR_PIN))   //如果传感器返回高(即有热量运动)
  {
    digitalWrite(LED_PIN, HIGH);    //亮灯
  }else{
    digitalWrite(LED_PIN, LOW);   //灭灯
  }
}
文档
注意事项
示例教程
Q&A
历史
图库 |
