Joystick Control servo rotation

来自Microduino Wikipedia
1304410487@qq.com讨论 | 贡献2015年10月20日 (二) 08:32的版本 (Created page with "{{Language| Joystick Control Servo}} {| style="width: 800px;" |- | ==Objective== Control servo rotation through Joystick and get correspsonding rotation of the arrow icon in S...")
(差异) ←上一版本 | 最后版本 (差异) | 下一版本→ (差异)
跳转至: 导航搜索
Language English

Objective

Control servo rotation through Joystick and get correspsonding rotation of the arrow icon in Scratch.

Principle

Read Joystick X-axis values and get servo rovolve to certain angel according to return values.

Equipment

Hardware Buildup

  • Setup 1:Stack CoreUSB and Sensorhub
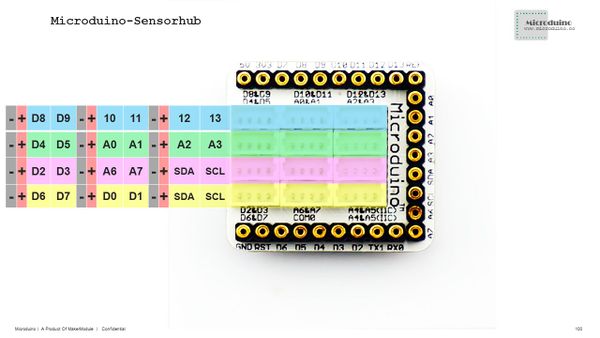
  • Setup 2:Connect Joystick to analog A0 and A1. There is pin description on two sides of Sensorhub,to which you can connect sensors correspondingly.
  • Setup 3:Connect servo to D8.
Microduino-sensorhub rule.JPG

Software Debugging

  • Setup 1:Build Scratch programming environment.
  • Setup 2:Start programming. Example program download: 文件:Joystick Servo.zip
  • Setup 3:Code description—detect Joystick values for one part and the arrow icon will make correpsonding movement according to Joystick.
    • You need to create a variable to save Joystick data.
      • Reflect variable values of 0-1023 to 0-180° and control servo through “Motor” plug-in.
    • Rotate the arrow according to variables. (Users can change the arrow icon according to individual needs. )

Result

By moving Joystick on X-axis, you can control servo rotation angle.

Video